Fixing a running toilet requires five key steps: shutting off the water supply, removing the tank lid, identifying the faulty component, replacing either the flapper or the fill valve, and testing the repair before restoring normal use. In most households, a toilet that runs continuously points to one of two culprits — a warped or deteriorated flapper that no longer seals the flush valve seat, or a malfunctioning fill valve that fails to stop water from entering the tank. Both repairs are straightforward, require no specialized plumbing license, and can be completed in under an hour with basic tools from any hardware store.
Before replacing any part, diagnosing the exact source of the leak is the essential first step. A running toilet can stem from a faulty flapper, a misadjusted float, a worn fill valve, or water spilling over the overflow tube — and each cause demands a different fix. Skipping the diagnostic stage and replacing the wrong component wastes both time and money, so confirming the root cause through a simple dye test or visual water-level check will point you directly to the right repair.
Beyond the immediate repair, understanding what a running toilet costs in wasted water makes the urgency clear. A toilet that runs nonstop can drain between 200 and 1,000 liters of water every single day, translating into a significantly inflated water bill by the end of the month. Addressing the problem promptly — once the correct component is identified — eliminates that ongoing waste and restores the toilet to full efficiency.
What Are the Steps to Fix a Running Toilet?
Fixing a running toilet follows five main steps: turn off the water supply valve, lift the tank lid to inspect internal components, identify whether the flapper or fill valve is at fault, replace the damaged part with a compatible replacement, and verify the repair by running a full flush cycle. This structured sequence ensures that no step is skipped and that the repair holds long-term.
Below is a complete walkthrough of the entire process, along with the tools you will need before starting:
Tools and materials to prepare:
- Adjustable pliers or channel-lock pliers
- Dry towel or sponge (to absorb residual water)
- Replacement flapper (matched to your toilet model)
- Replacement fill valve (universal or brand-specific)
- Food coloring or dye tablet (for leak detection)
- Scissors (to trim flapper chain if needed)
Overview of the five repair steps:
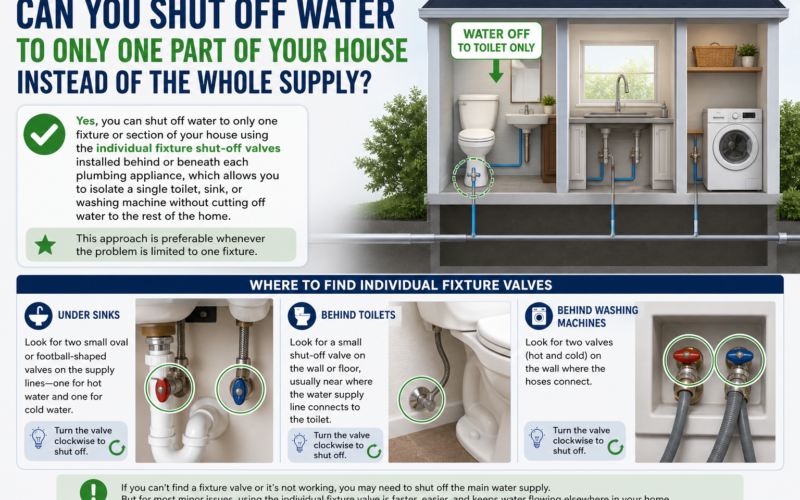
- Turn off the water supply. Locate the shutoff valve behind or beneath the toilet tank. Turn it clockwise until it stops to cut off the water flow completely.
- Remove the tank lid. Lift the porcelain lid carefully and set it on a flat, stable surface. Visually inspect the tank interior for obvious signs of wear, misalignment, or debris around the flapper and fill valve.
- Flush the toilet to drain the tank. Press the flush handle to evacuate as much standing water as possible. Use a towel or sponge to absorb any remaining water at the tank bottom for a dry working environment.
- Replace the faulty component. If the flapper is cracked, warped, or failing to seat correctly, replace it following the steps in the next section. If the fill valve is malfunctioning or the water level is incorrectly set, replace the fill valve and readjust the float.
- Test the repair. Reopen the shutoff valve, allow the tank to refill completely, and flush once. Observe whether the tank refills and shuts off cleanly without water continuing to run into the bowl.
According to the Environmental Protection Agency (EPA), a running toilet is one of the most common sources of indoor water waste in U.S. homes, with a single leaking toilet potentially wasting more than 6,000 gallons of water per month if left unaddressed.
How Do You Replace a Toilet Flapper?
Replacing a toilet flapper involves turning off the water supply, draining the tank, unclipping the old flapper from the overflow tube pegs, attaching a correctly sized replacement, reconnecting the chain to the flush handle arm, and testing the seal with a full flush. The entire process typically takes between 10 and 20 minutes.
To replace the flapper correctly, follow these precise steps:
- Shut off the supply valve by turning it clockwise until fully closed.
- Flush the toilet to drain the tank. Remove any remaining water with a sponge.
- Unhook the flapper chain from the flush handle arm. Note the chain length and the hole it connects to — you will replicate this when installing the new flapper.
- Slide the flapper off the overflow tube pegs. Most standard flappers have two side ears that loop over the pegs on either side of the flush valve seat. Gently pull each ear outward to release them.
- Inspect the flush valve seat. Run your finger around the rubber ring where the flapper rests. If you feel mineral buildup, grit, or roughness, clean the seat gently with a damp cloth before installing the new flapper — a clean seat ensures a tight seal.
- Install the new flapper. Match the flapper size to your toilet model. Standard toilets use a 2-inch flapper; many newer models require a 3-inch flapper. Snap the new flapper’s ears onto the overflow tube pegs firmly.
- Reconnect the chain. Attach the chain to the flush arm with approximately 1.5 cm of slack. Too little slack prevents the flapper from sealing; too much slack causes the chain to get trapped under the flapper.
- Open the supply valve and test. Allow the tank to fill completely. Flush once and observe whether water stops running within 60 seconds of the tank refilling.
Important note on flapper compatibility: If your toilet is a dual-flush model, it uses a specialized cartridge-style flapper rather than the standard rubber disk. Always check the manufacturer’s model number printed inside the tank before purchasing a replacement.
How Do You Replace a Fill Valve?
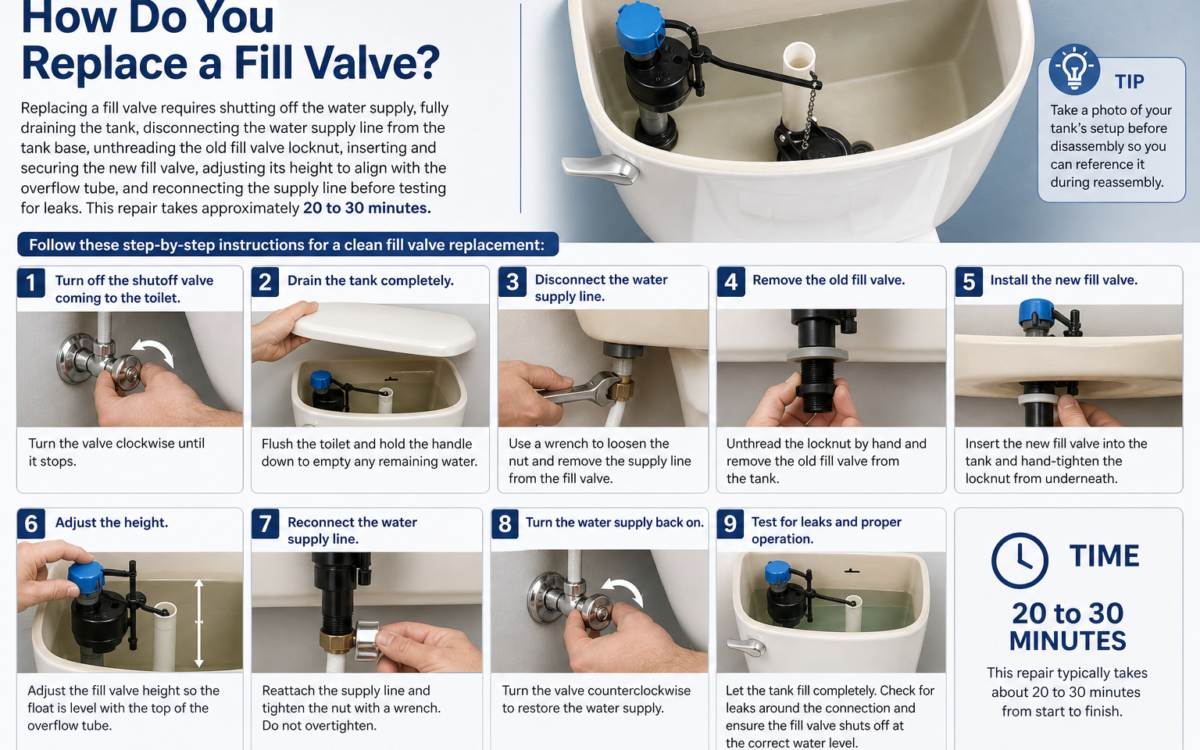
Replacing a fill valve requires shutting off the water supply, fully draining the tank, disconnecting the water supply line from the tank base, unthreading the old fill valve locknut, inserting and securing the new fill valve, adjusting its height to align with the overflow tube, and reconnecting the supply line before testing for leaks. This repair takes approximately 20 to 30 minutes.
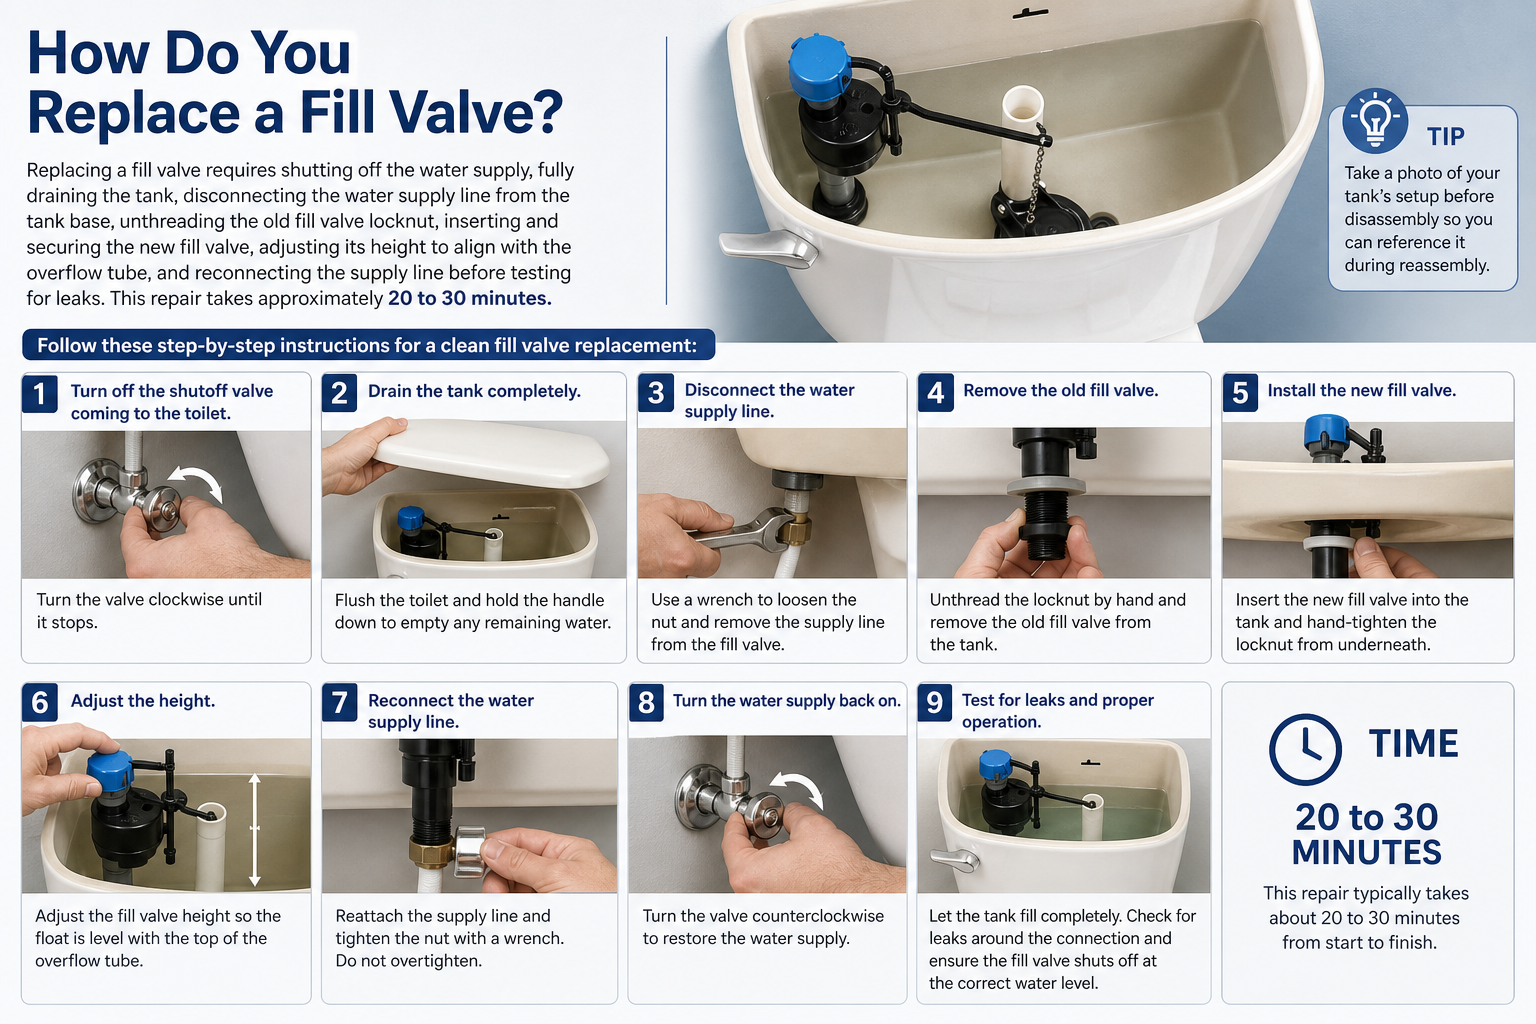
Follow these step-by-step instructions for a clean fill valve replacement:
- Turn off the shutoff valve completely by rotating clockwise.
- Flush the toilet and remove all remaining water from the tank using a sponge.
- Disconnect the water supply line from the bottom of the tank. Have a small bowl or towel ready to catch residual water in the line.
- Unthread the fill valve locknut located on the underside of the tank (beneath the fill valve base). Use adjustable pliers to loosen it counterclockwise. Once loose, lift the old fill valve straight up and out of the tank.
- Insert the new fill valve. Most universal fill valves adjust in height. Before insertion, set the height so the critical level mark (labeled “C.L.” on the valve body) sits at least 2.5 cm above the top of the overflow tube.
- Hand-tighten the locknut from underneath the tank. Avoid overtightening, which can crack the tank base. Snug plus a quarter-turn with pliers is sufficient.
- Attach the refill tube from the top of the new fill valve to the top of the overflow tube. Clip it into place so it does not extend too far into the overflow tube, which would siphon water and cause continuous running.
- Reconnect the supply line to the fill valve shank and hand-tighten.
- Open the shutoff valve slowly and allow the tank to fill. Watch the water level as it rises. The water should stop approximately 2.5 cm below the top rim of the overflow tube.
- Adjust the float if the water level is too high or too low. On ball-float valves, bend the float arm downward to lower the water level. On cup-float valves, pinch the adjustment clip and slide the float cup downward to reduce the fill level.
Correct float calibration is critical. If the water level exceeds the overflow tube height, water will silently trickle into the bowl around the clock, mimicking a flapper leak and causing the fill valve to cycle continuously.
How Do You Diagnose Where a Running Toilet Is Leaking?
Diagnosing a running toilet leak comes down to identifying which of three root causes is responsible: a worn or improperly seated flapper, a faulty or maladjusted fill valve and float assembly, or water overflowing into the overflow tube due to an incorrect water level. Confirming the correct cause before touching any hardware is the most important action you can take to avoid unnecessary part replacements.
To accurately diagnose the source, begin with a visual inspection of the tank interior under normal operating conditions, then apply targeted tests for each component:
Three primary causes of a running toilet:
- Flapper failure: The rubber flapper is no longer seating flush against the valve seat, allowing water to leak from the tank into the bowl continuously.
- Fill valve or float malfunction: The fill valve does not shut off once the tank is full, or the float is set too high, causing constant water inflow.
- Overflow tube spillage: The water level in the tank is set too high, causing water to continuously pour into the overflow tube and down into the bowl.
Understanding these three causes allows you to apply the right diagnostic test for each scenario without guesswork.
Is a Faulty Flapper Causing the Toilet to Run Continuously?
Yes, a faulty flapper is one of the most common causes of a continuously running toilet, and you can confirm it in under five minutes using a simple food coloring test. If the water in the toilet bowl changes color without flushing, the flapper is leaking.
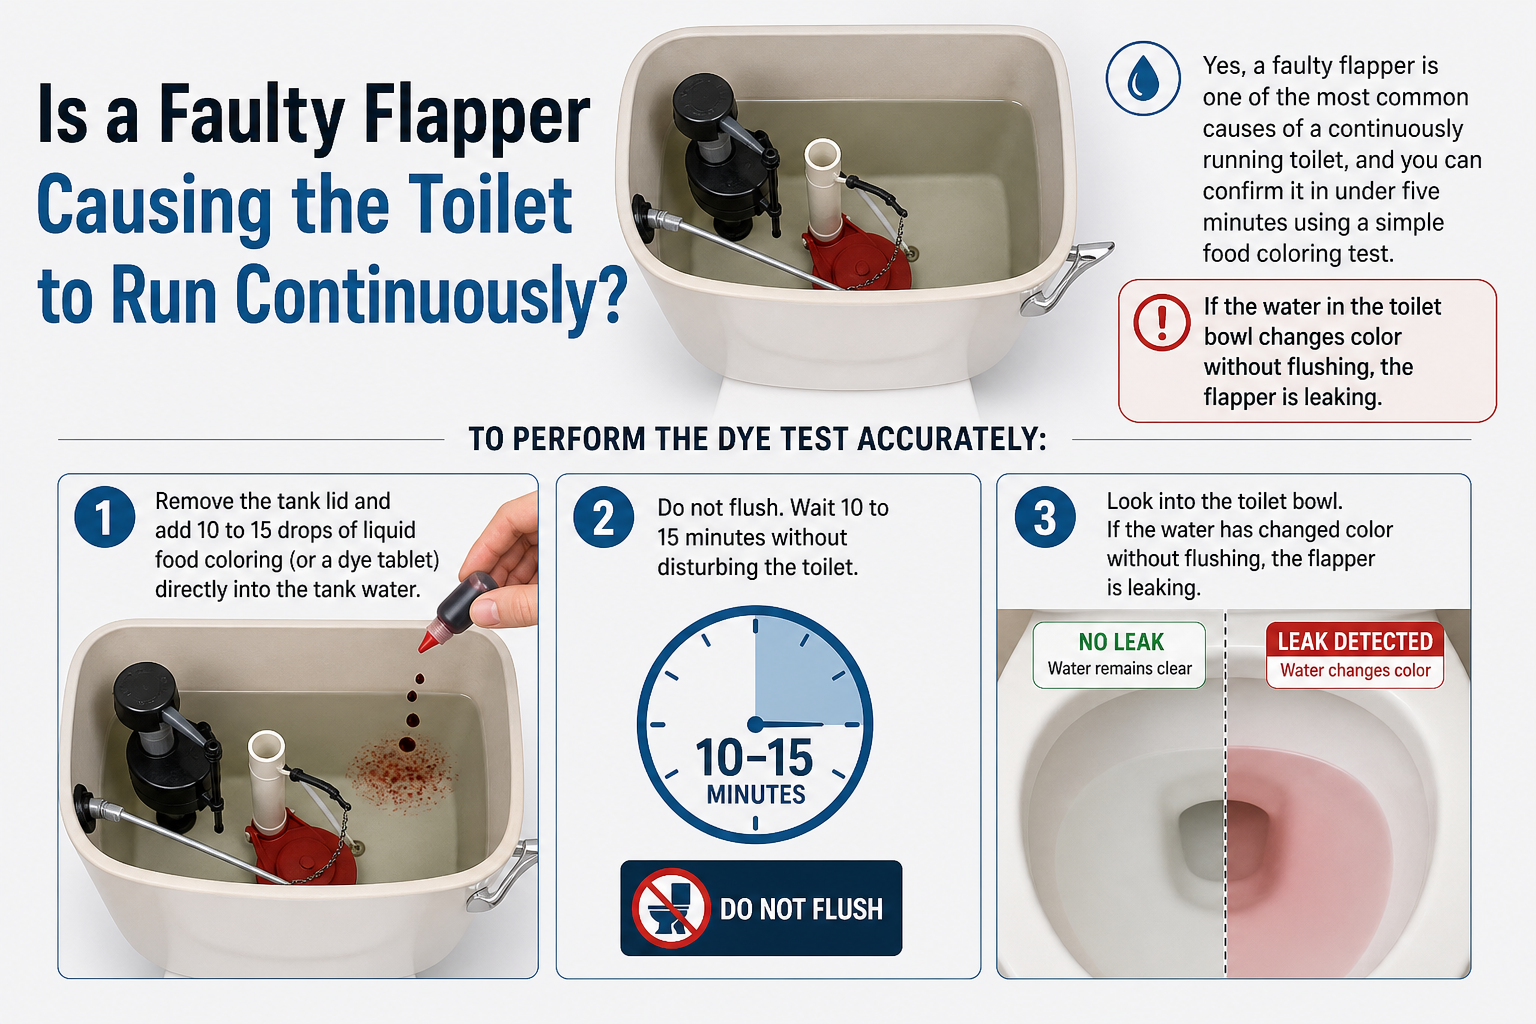
To perform the dye test accurately:
- Remove the tank lid and add 10 to 15 drops of liquid food coloring (or a dye tablet) directly into the tank water.
- Do not flush. Wait 10 to 15 minutes without disturbing the toilet.
- Look into the toilet bowl. If colored water appears in the bowl, the flapper is allowing water to seep through the valve seat into the bowl — confirming a flapper leak.
- If the bowl water remains clear after 15 minutes, the flapper is sealing correctly and the problem lies elsewhere.
Physical signs of a worn flapper to check during inspection:
- The rubber is visibly brittle, cracked, or warped along the seating edge
- The flapper feels stiff and no longer presses flat against the flush valve seat
- Mineral deposits or calcium buildup are coating the seating surface, preventing full contact
- The flapper chain is too short, holding the flapper slightly open even when the flush arm is at rest
Flappers degrade over time due to chlorine in municipal water supplies, heat fluctuations, and simple wear from repeated use. Most rubber flappers have a functional lifespan of 4 to 8 years before requiring replacement.
Is the Fill Valve Causing the Toilet to Keep Running?
Yes, a malfunctioning fill valve or incorrectly positioned float is causing the toilet to keep running when the water level in the tank meets or exceeds the top of the overflow tube, or when the fill valve fails to shut off even after the tank has reached full capacity. You can diagnose this with two quick physical checks.
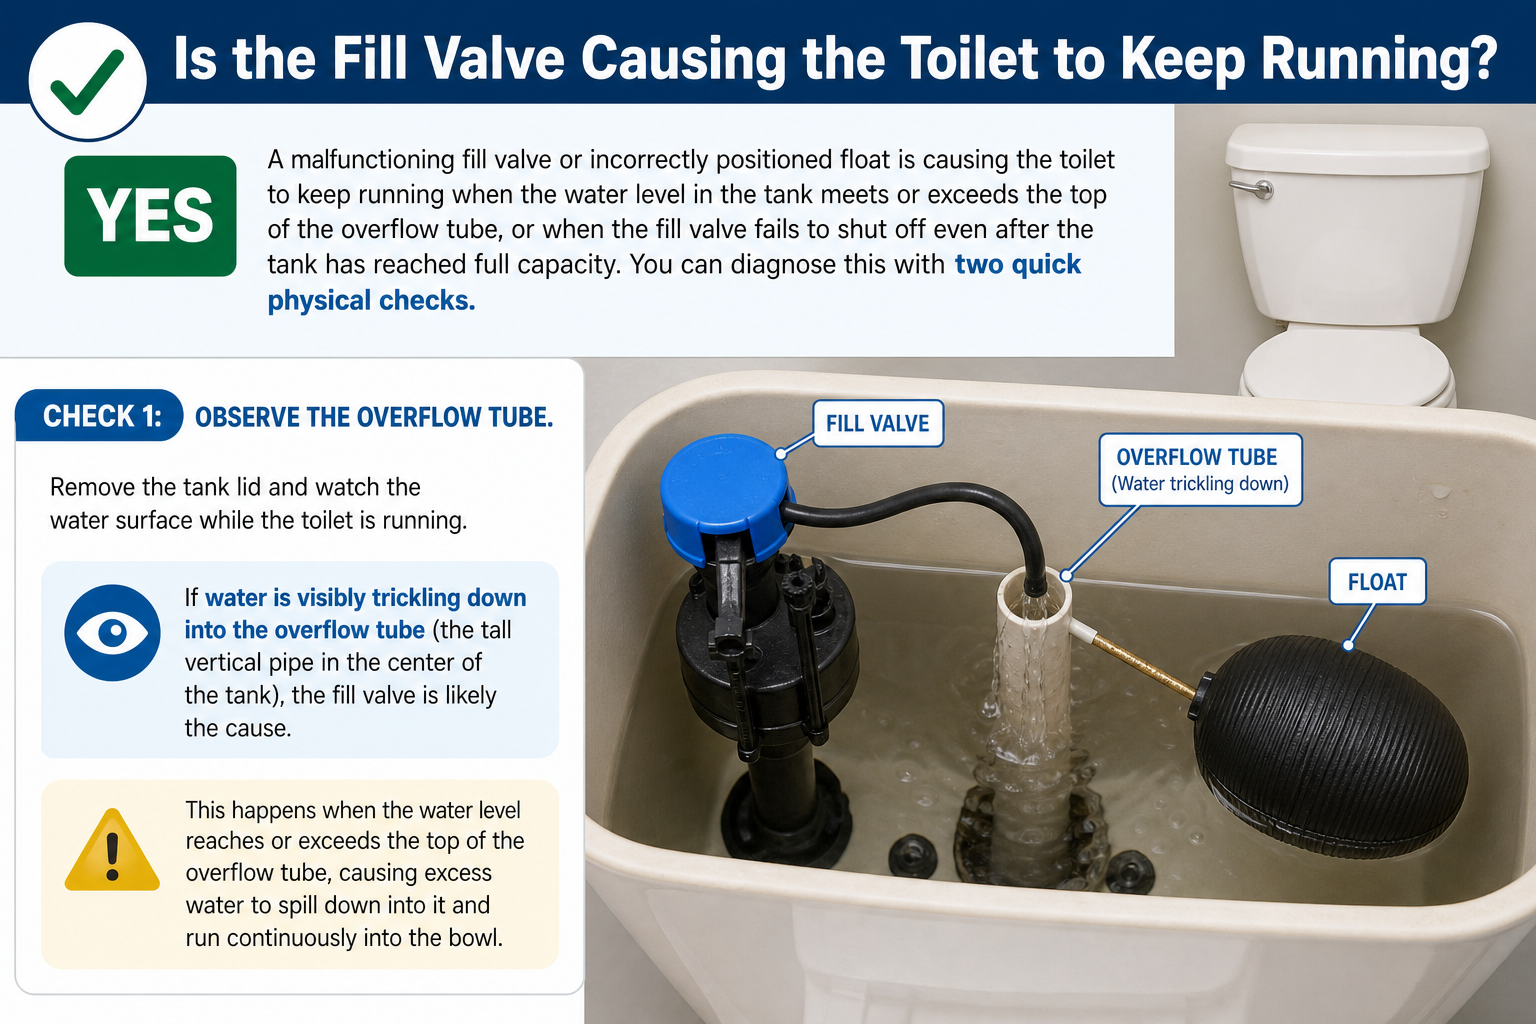
Check 1: Observe the overflow tube.
Remove the tank lid and watch the water surface while the toilet is running. If water is visibly trickling down into the overflow tube (the large open-topped tube in the center of the tank), the water level is set too high. This is a float or fill valve adjustment issue, not a flapper issue.
Check 2: Manually lift the float.
With the tank filled and water still running, reach into the tank and gently lift the float ball or cup upward with your hand.
- If the water stops running immediately when you lift the float: the float is positioned too low or is waterlogged, causing the fill valve to stay open past the correct fill point. Adjusting or replacing the float will resolve the issue.
- If the water continues running even when the float is fully raised by hand: the fill valve itself is mechanically worn and is no longer responding to the float signal. The fill valve requires full replacement.
Additional diagnostic indicator: Listen for a hissing sound from the fill valve area while the toilet is supposedly at rest. A persistent hiss from the tank — distinct from the sound of water moving through the flush valve — typically indicates that the fill valve is not closing fully between uses.
Is It Worth Fixing a Running Toilet Yourself or Should You Call a Plumber?
Self-repair is worth it for the two most common running toilet causes — a worn flapper and a faulty fill valve — because both repairs cost between $5 and $30 in parts, require no special tools or plumbing license, and can be completed by any homeowner within 30 minutes. Calling a licensed plumber becomes necessary only when the leak stems from a cracked tank, a failed wax ring, damaged internal porcelain, or a complex dual-flush cartridge system that requires brand-specific components.
When DIY repair is appropriate:
- The flapper is visibly deteriorated or confirmed leaking via dye test
- The fill valve or float is malfunctioning and causing continuous inflow
- The water level is incorrect and needs adjustment through float repositioning
- The toilet model is a standard single-flush design with widely available replacement parts
When to call a licensed plumber:
- The toilet tank has a visible crack allowing water to leak externally
- Multiple components are failing simultaneously, suggesting systemic internal damage
- The toilet uses a proprietary dual-flush mechanism with no compatible universal replacement parts
- Water is leaking from the base of the toilet onto the floor, indicating a wax ring failure
- DIY replacement of the fill valve has not resolved the issue after two attempts
How Much Water Does a Running Toilet Waste Per Day?
A running toilet wastes between 200 and 1,000 liters of water per day, depending on the severity of the leak. At the high end, this translates to roughly 30,000 liters of wasted water per month from a single toilet.
According to the U.S. Environmental Protection Agency (EPA, 2023), household toilet leaks account for more than 1 trillion gallons of water wasted annually across American homes — with running toilets being the single largest contributor among all fixture types.
Financial and environmental impact breakdown:
| Leak Severity | Estimated Daily Water Loss | Estimated Monthly Cost Increase |
|---|---|---|
| Minor drip (slow flapper leak) | 200 liters/day | $5 to $15 |
| Moderate leak (partial flapper or float issue) | 500 liters/day | $15 to $35 |
| Severe leak (fully open flapper or failed fill valve) | 1,000+ liters/day | $35 to $70+ |
This table compares water waste volume and associated monthly utility cost increases across three severity levels of a running toilet leak, based on average U.S. municipal water pricing.
The cost impact compounds quickly. A moderate toilet leak running undetected for three months can add $50 to $100 to a household’s water bill before the homeowner notices the discrepancy. Beyond cost, the environmental toll of a single leaking toilet over one year is equivalent to the water needed to fill a standard backyard swimming pool more than three times over.
What Is the Difference Between a Toilet Flapper and a Fill Valve?
The flapper controls water flowing out of the tank and into the bowl during a flush, while the fill valve controls water flowing into the tank from the supply line after a flush. These two components perform opposite directional functions within the same tank, and failure of each produces distinctly different symptoms.
Component-level comparison:
| Attribute | Flapper | Fill Valve |
|---|---|---|
| Function | Seals the flush valve seat; releases water downward into bowl when flush handle is pressed | Admits fresh water upward into tank from supply line after each flush |
| Location in tank | Bottom of tank, seated over the flush valve drain hole | Side of tank, connected to the water supply line below |
| Failure symptom | Water continuously trickling into bowl, confirmed by dye test | Water continuously entering tank, hissing sound, overflow into overflow tube |
| Replacement cost | $5 to $15 | $10 to $30 |
| Replacement difficulty | Very easy, no tools required | Moderate, requires disconnecting supply line |
This table compares the flapper and fill valve across five attributes: function, tank location, failure symptom, replacement cost, and repair difficulty.
Identifying which component has failed by symptom:
- If dye added to the tank appears in the bowl without flushing: the flapper is the source of the leak.
- If the tank hisses continuously or the water level is at or above the overflow tube: the fill valve or float is the source of the problem.
- If both symptoms are present simultaneously: inspect both components independently before replacing either, as a damaged fill valve can mask a secondary flapper issue and vice versa.
Understanding this functional distinction prevents the most common DIY mistake: replacing the flapper when the fill valve is actually at fault, or vice versa, and then wondering why the toilet continues to run after the repair.