Operating a circular saw safely requires following a structured step-by-step process that covers proper setup, correct body positioning, blade selection, and kickback prevention. For complete beginners, this guide walks through every critical phase of circular saw operation, from understanding the tool’s components to executing a clean, controlled cut on your first attempt. The good news is that a circular saw is entirely manageable for new users who follow the right procedure from start to finish.
Before making a single cut, you need to equip yourself with the right personal protective equipment, including safety glasses, hearing protection, a dust mask, and steel-toed boots. Every piece of PPE serves a specific protective function, and skipping any one item increases your exposure to real injury risks. Safety is not a checklist you complete once and forget; it is the operating mindset you maintain throughout every session.
Mastering every cut without risk means understanding the difference between a straight rip cut, a crosscut, and more advanced techniques like plunge cuts, and knowing which setup each one demands. This guide also compares the circular saw to other power saws and breaks down blade selection by material, giving you the full picture you need to work confidently and precisely on any project.
What Is a Circular Saw and How Does It Work?
A circular saw is a handheld or stationary power tool that uses a toothed, disc-shaped blade spinning at high RPM to cut through materials such as wood, plywood, metal, and plastic by contact friction. Understanding how it works gives beginners the foundation they need to use it correctly and safely.
Specifically, the blade rotates upward at the front edge of the cut, which means the cutting action occurs on the upstroke. This directional motion is why the good face of your workpiece should face downward when cutting, since the blade exits the top surface and can cause splintering there. To understand the saw fully, you first need to identify its core components.
What Are the Main Parts of a Circular Saw That Beginners Must Know?
Every beginner must recognize seven key parts of a circular saw: the blade, base plate (shoe), blade guard, upper handle, front knob handle, trigger with safety lock, and the depth and bevel adjustment knobs. Each component directly affects both cutting accuracy and personal safety.
Here is what each part does and why it matters:
- Blade: The cutting element. Blade diameter (most commonly 7¼ inch) determines maximum cutting depth. Never use a blade that is chipped, cracked, or warped.
- Base plate (shoe): The flat metal plate that rests on the workpiece surface. It stabilizes the saw and determines cut depth relative to the material. Keeping it flat against the workpiece during the cut is essential.
- Blade guard: A spring-loaded protective cover that retracts automatically as the blade enters the material and snaps back when you exit the cut. Never pin back or disable the guard. A non-functioning guard is a reason to stop work immediately.
- Upper handle and front knob handle: The upper handle houses the trigger; the front knob provides secondary support. Using both hands at all times gives you control and reduces the chance of the saw twisting off the cut line.
- Trigger and safety lock: The safety lock prevents accidental activation. You must press the lock with your thumb before the trigger engages. Always release the trigger before setting the saw down.
- Depth adjustment knob: Located at the rear of the shoe, this loosens so you can raise or lower the blade depth. The correct setting exposes the blade approximately 6 to 10 mm below the material surface.
- Bevel adjustment: Located at the front of the shoe, this allows angled cuts between 0 and 45 or 56 degrees depending on the model.
According to data published by the U.S. Consumer Product Safety Commission, blade guard disengagement or failure is a contributing factor in a significant portion of circular saw injuries recorded annually, reinforcing why understanding and inspecting the guard before every use is non-negotiable.
What Types of Circular Saws Are Best for Beginners?
The best circular saw for beginners is a corded, 7¼-inch model with a lightweight frame, an automatic blade guard, and a built-in laser or notch guide. These features reduce learning friction and improve safety margins for new users.
Here is a breakdown of the two main types and what beginners should look for:
- Corded circular saws deliver consistent power without interruption and are generally less expensive. The tradeoff is limited mobility due to the power cord, which must be managed carefully to keep it clear of the blade path.
- Cordless (battery-powered) circular saws offer greater freedom of movement and are increasingly powerful thanks to brushless motor technology and high-capacity lithium-ion batteries (18V or 20V platforms). They tend to be heavier due to the battery, which can cause fatigue during extended use.
For beginners, key selection criteria include:
- Weight under 10 lbs for manageable control during long cuts.
- 7¼-inch blade size, which handles most residential cutting tasks and is the most widely supported blade format.
- Built-in laser guide or notch sight for accurate line tracking.
- Tool-free blade change system to simplify maintenance.
- Spindle lock button for safe, easy blade replacement.
What Safety Equipment Do You Need Before Operating a Circular Saw?
You need six categories of personal protective equipment (PPE) before operating a circular saw: safety glasses or a face shield, ear protection, a dust mask or respirator, work gloves, steel-toed boots, and close-fitting work clothing. No single item is optional; each one blocks a specific type of harm.
Dưới đây is a complete PPE checklist with the reasoning behind each requirement:
| PPE Item | Hazard It Prevents | Notes for Beginners |
|---|---|---|
| Safety glasses or face shield | Flying wood chips, blade fragments, dust | Choose ANSI Z87.1-rated glasses minimum; a face shield adds full-face coverage |
| Hearing protection (earplugs or earmuffs) | Noise-induced hearing loss from sustained saw noise (90 to 110 dB) | Prolonged exposure without protection causes permanent damage |
| N95 dust mask or respirator | Fine wood dust inhalation, which causes respiratory disease and is classified as a carcinogen for certain hardwoods | Particularly important when cutting MDF, treated lumber, or composite materials |
| Cut-resistant work gloves | Lacerations during material handling and blade changes | Do NOT wear loose gloves during the cut itself; snug-fitting gloves only |
| Steel-toed boots | Dropped saw or material crushing toes | Non-slip soles also prevent slipping on sawdust-covered floors |
| Close-fitting work clothing | Loose fabric being caught by the spinning blade | Remove ties, drawstrings, and jewelry before starting |
The table above lists each PPE category alongside the specific hazard it prevents and a practical note for new users, helping beginners understand the purpose behind each item rather than treating them as arbitrary requirements.
According to the National Institute for Occupational Safety and Health (NIOSH), wood dust from species such as oak, beech, and walnut is classified as a Group 1 carcinogen by the International Agency for Research on Cancer (IARC), making respiratory protection especially important even for occasional DIY users.
Beyond PPE, your workspace preparation is part of your safety setup. Ensure the work area is well-lit, clear of tripping hazards, and free of bystanders, especially children, before you start the saw.
How Do You Set Up a Circular Saw Correctly Before Making the First Cut?
Correct circular saw setup involves four sequential actions: inspecting the tool, selecting and installing the correct blade, adjusting blade depth to the workpiece thickness, and clamping the material securely. Skipping or rushing any of these steps is where many beginners create the conditions for accidents or poor cuts.
Let us work through each phase in order.
Step 1: Pre-use inspection
Before plugging in or inserting the battery, perform a quick visual and physical check:
- Confirm the blade guard moves freely and springs back completely.
- Check the blade for missing teeth, cracks, or warping. A damaged blade should be replaced before any work begins.
- Inspect the power cord for cuts, fraying, or exposed wiring. For cordless models, check the battery contacts and charge level.
- Ensure the shoe plate is flat and the bevel and depth locks tighten securely.
Step 2: Set blade depth
Loosen the depth adjustment knob, place the shoe flat against the edge of your workpiece, and lower the blade until it protrudes approximately 6 to 10 mm below the material. This minimal exposure reduces kickback risk, limits the amount of blade that can contact a hand accidentally, and produces a cleaner cut. Tighten the knob firmly before proceeding.
Step 3: Set bevel angle
For standard 90-degree cuts, confirm the bevel adjustment reads zero and the shoe sits perpendicular to the blade. For angled cuts, use the bevel scale and a protractor or combination square to verify the angle before cutting into your workpiece.
How Do You Choose the Right Circular Saw Blade for Each Material?
Choosing the right circular saw blade depends on tooth count, tooth geometry, and blade material, with low tooth counts (18 to 24 teeth) for fast rip cuts in framing lumber and high tooth counts (60 to 80 teeth) for smooth crosscuts in plywood and finish carpentry. Using the wrong blade produces rough edges, burning, binding, and excessive blade wear.
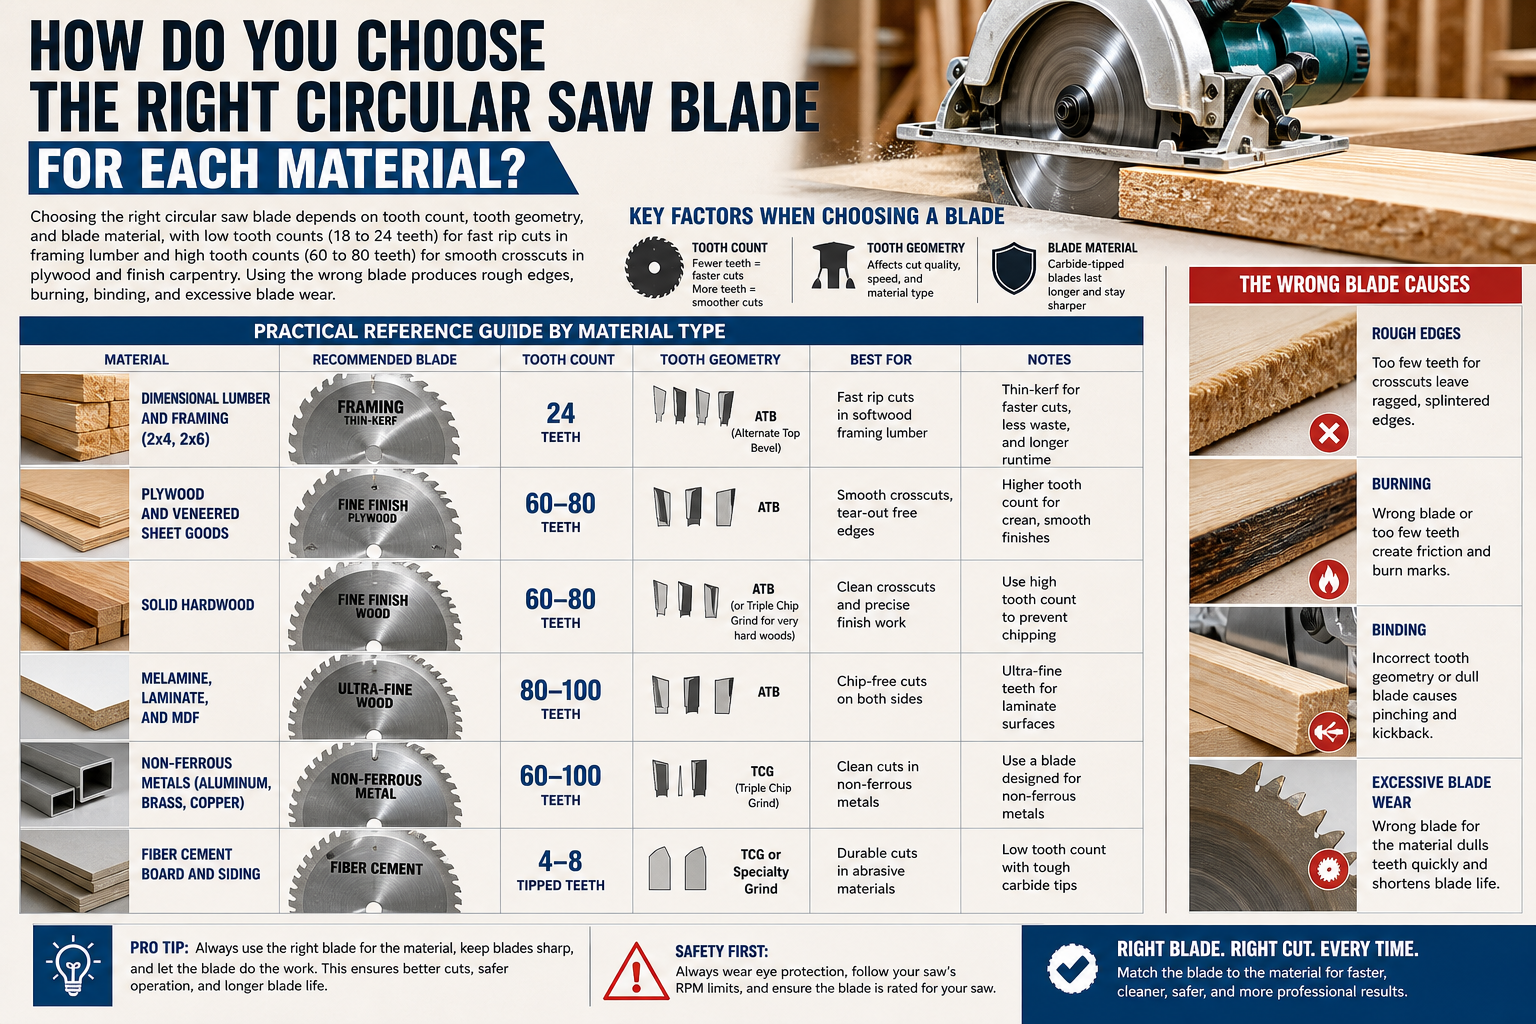
Here is a practical reference guide by material type:
- Dimensional lumber and framing (2×4, 2×6): Use a 24-tooth, thin-kerf framing blade. Speed matters more than finish quality in structural work.
- Plywood and sheet goods: Use a 40 to 60-tooth blade with ATB (Alternate Top Bevel) geometry to minimize tearout on face veneers.
- MDF and particleboard: Use a 60 to 80-tooth blade. MDF is abrasive and dulls blades quickly, so carbide-tipped teeth are essential.
- Hardwood (oak, maple, walnut): Use a 50 to 60-tooth fine-tooth blade for clean edges.
- Fiber cement siding: Use a dedicated polycrystalline diamond (PCD) blade or a fiber cement blade. Standard wood blades fail immediately on this material.
- Plastic sheets: Use a fine-tooth blade (60 to 80 teeth) at slower feed rates to prevent melting and chipping.
Signs that your blade needs replacing include burn marks on cut edges, the saw requiring excessive pushing force, a high-pitched squealing during the cut, and visible rounded or missing teeth on inspection.
How Do You Mark and Secure Your Workpiece Before Cutting?
Mark your cut line using a combination square, a tape measure, and a sharp pencil or marking knife, then clamp the workpiece to a stable sawhorse or workbench so that neither piece can shift or drop freely during the cut. Unsecured material is one of the primary causes of kickback and loss of cut accuracy.
Follow these marking and clamping steps:
- Measure twice, mark once. Use a combination square for perpendicular lines and a sliding bevel gauge for angled cuts. A marking knife produces a finer line than a pencil and gives the blade a physical groove to follow.
- Support both sides of the cut line. When the saw completes the cut, both sections of the workpiece must be supported so neither drops suddenly. A dropping offcut pulls the blade sideways, causing binding and kickback.
- Use at least two clamps. Position clamps so they do not interfere with the saw’s travel path. One clamp is not sufficient for large sheet goods.
- Never hold the workpiece with your free hand. Your non-dominant hand belongs on the front knob of the saw, not on the material.
- Keep the waste side free to fall away. For small offcuts, let them drop freely rather than trying to catch them while the blade is still spinning.
How Do You Operate a Circular Saw Safely Step by Step?
Operating a circular saw safely follows a seven-step sequence: gear up with PPE, set up and clamp the workpiece, align the blade to your cut line, start the motor before contact, push with steady even pressure, keep your free hand away from the cut path, and wait for the blade to stop completely before setting the saw down. This sequence is the core answer to the main intent of this guide, and every step is mandatory.
Below is the full operational procedure in the order it must be performed:
Step 1: Put on all PPE before touching the saw.
Safety glasses, ear protection, dust mask, and proper footwear must be on before you pick up the tool.
Step 2: Inspect, set depth, and clamp your material.
Complete all setup steps described in the previous section. Confirm the workpiece is solid and immovable on your work surface.
Step 3: Align the blade notch with your cut line.
Most circular saws have a notch or kerf indicator on the front of the shoe. Position this notch directly over your pencil line. Look at the notch, not the blade, as you cut.
Step 4: Start the motor before the blade touches the material.
Squeeze the trigger (after disengaging the safety lock) and let the blade reach full speed before bringing the saw forward to the workpiece edge. Pushing a stationary or slow blade into material is a primary kickback cause.
Step 5: Feed the saw with steady, even pressure.
Push forward at a pace the blade can clear comfortably. You will hear and feel the motor slow down if you are pushing too fast. Let the blade do the work; excessive force causes blade binding and kickback.
Step 6: Keep your body positioned to the side, not behind the cut line.
Stand slightly to the side of the saw rather than directly behind it. If kickback occurs, the saw will travel backward along the cut line. Being offset removes you from that trajectory.
Step 7: Complete the cut, release the trigger, and wait.
After the blade exits the material, release the trigger immediately and hold the saw steady until the blade stops completely. Only then set the saw down on its shoe, not on its blade side, on a flat, stable surface.
How Do You Make a Straight Cut with a Circular Saw?
Making a straight cut with a circular saw requires either a rip fence (parallel guide), a straightedge clamped to the workpiece as a guide rail, or a commercial track system, combined with keeping your eyes on the notch sight rather than the blade throughout the cut. Freehand straight cuts are unreliable for most beginners and should be avoided on finish work.
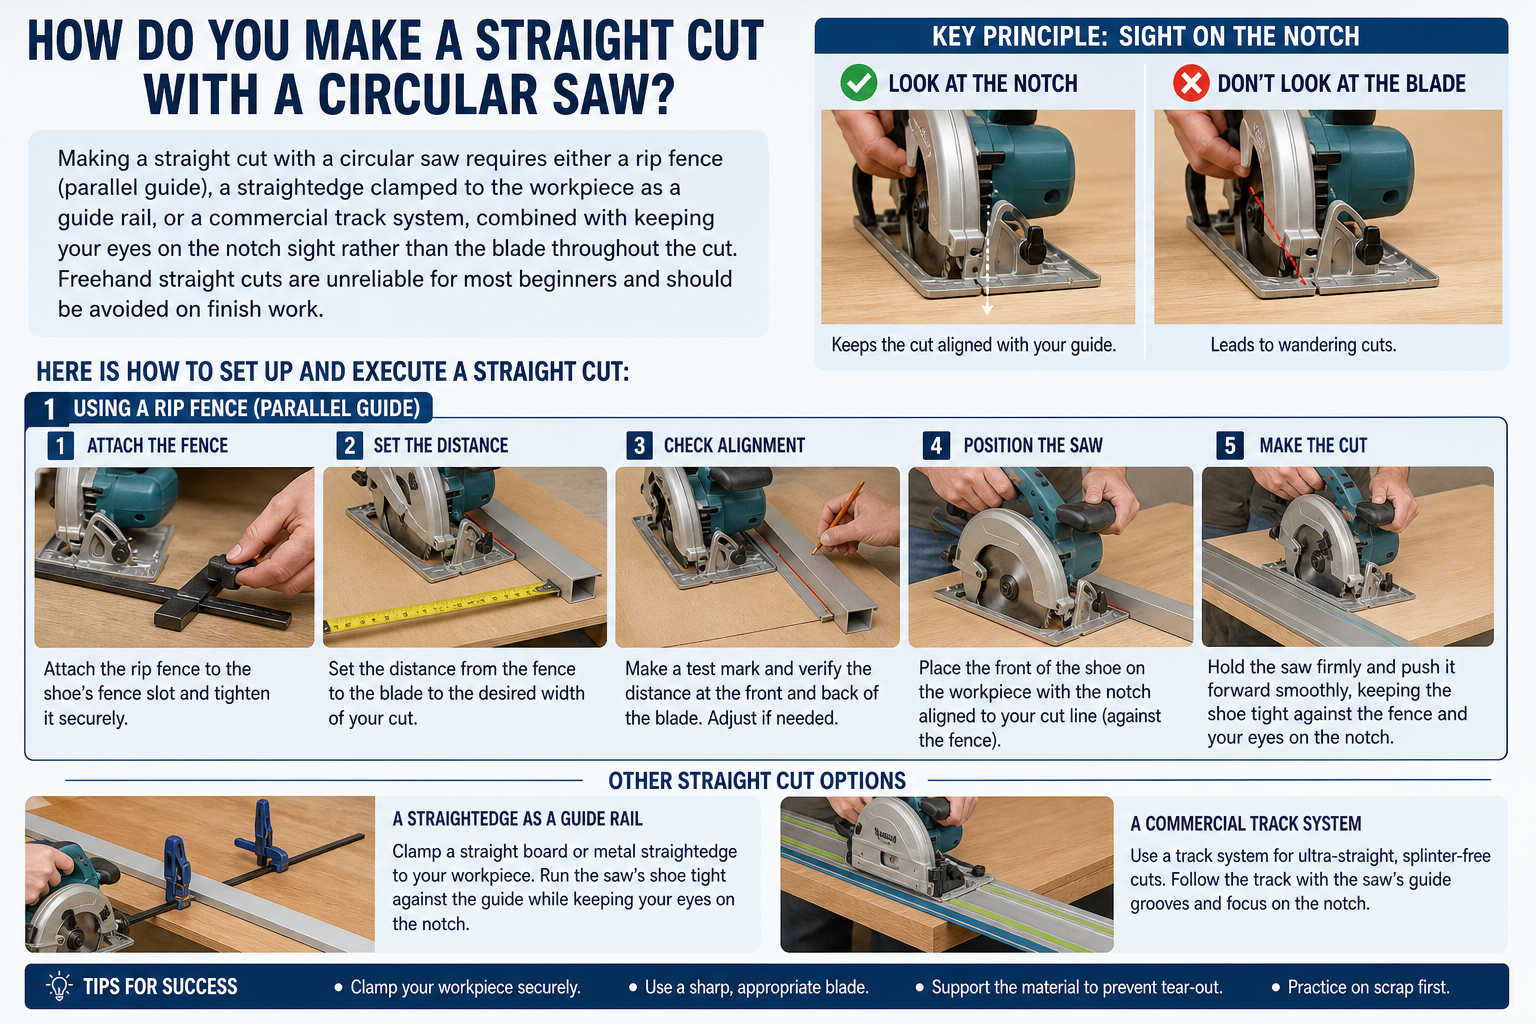
Here is how to set up and execute a straight cut:
- Using a rip fence: Attach the fence to the shoe’s fence slot and set the distance from the fence edge to the blade using a tape measure. Run the fence against the board’s edge as you cut.
- Using a clamped straightedge: Measure the offset distance between the saw’s notch and the blade, then clamp a piece of MDF or aluminum angle that distance away from your cut line. The shoe rides against it throughout the cut.
- Technique during the cut: Keep your eyes on the notch indicator, not on the blade or the pencil line behind the blade. Apply consistent side pressure to keep the shoe in contact with the guide. Do not twist the saw to correct drift; if the saw is pulling off line, stop, back the blade out of the kerf completely, recheck your setup, and start again.
A common beginner error is looking at the blade rather than the guide notch, which causes the eyes to send incorrect steering signals and the cut to arc away from the intended line.
How Do You Prevent Kickback When Using a Circular Saw?
Kickback is the sudden, violent backward and upward throw of the saw that occurs when the spinning blade becomes pinched or snagged in the kerf, and it is the most dangerous event in circular saw operation. Understanding its causes and applying five specific prevention measures makes kickback a manageable and largely avoidable risk.
What causes kickback:
- The workpiece closes on the blade mid-cut because it was not properly supported on both sides.
- The blade is set too deep, exposing more blade to friction than necessary.
- Pushing the saw too fast causes the blade to bind before it can clear the kerf.
- Cutting against the grain in a direction that traps the blade.
- A dull or damaged blade requires more force and is more prone to binding.
Five proven kickback prevention measures:
- Set blade depth correctly. The blade should protrude no more than 6 to 10 mm below the material surface. More exposure means more blade in contact with the kerf walls if binding occurs.
- Support both sides of the cut. Ensure neither section of the workpiece can sag or close on the blade during or after the cut. Use sawhorses positioned on both sides of the cut line.
- Stand offset from the cut path. Position your body to the side rather than directly behind the saw so that a kickback event does not throw the saw into your torso.
- Never stand the blade into a stopped cut. If you pause mid-cut, release the trigger and wait for the blade to stop completely before withdrawing. Restarting a blade inside a kerf causes immediate binding.
- Use an anti-kickback blade. Many modern saw blades feature anti-kickback shoulders between the teeth that limit how deeply the blade can grab if it contacts the kerf wall. For beginners, this blade design adds a valuable mechanical safety margin.
According to a study published by the American Journal of Industrial Medicine, kickback is involved in approximately 33 percent of circular saw-related emergency room visits, making it statistically the most important injury mechanism for new users to understand and prevent.
What Are the Most Common Mistakes Beginners Make When Using a Circular Saw?
The eight most common beginner mistakes with a circular saw are: not inspecting the blade guard, not clamping the workpiece, starting the blade inside the material, using the wrong blade, ignoring cord management, setting incorrect blade depth, not waiting for the blade to stop before setting the saw down, and skipping PPE. Each mistake has a specific, practical correction.
Here is a detailed breakdown:
Mistake 1: Not checking the blade guard
The guard is the last line of defense between the blade and your hand. Beginners often assume it works without testing. Before every session, push the guard up manually and confirm it snaps back fully. If it sticks, do not use the saw until the guard is repaired.
Mistake 2: Not clamping the workpiece
Holding material with your free hand while cutting is never acceptable. The material must be fixed to a stable surface with clamps so both hands stay on the saw.
Mistake 3: Starting the cut with the blade already touching the material
Starting the blade at rest against the material creates immediate binding and kickback risk. Always let the blade reach full speed in open air before introducing it to the workpiece edge.
Mistake 4: Using a dull or incorrect blade
A dull blade requires more pushing force, generates more heat, and is far more likely to bind. A wood blade used on metal or fiber cement will fail catastrophically. Match the blade to the material every time.
Mistake 5: Ignoring cord management (corded saws)
The power cord must be draped over your shoulder or kept behind your body at all times. Running the blade over the cord causes immediate electrical hazard. Before starting, check the cord position and confirm it is clear of the cut path.
Mistake 6: Setting blade depth too deep
Dropping the blade to maximum depth for every cut is a common beginner assumption. Excessive blade depth increases kickback severity, causes more splintering, and creates a larger danger zone if the blade contacts something unexpected. Set the blade to 6 to 10 mm below the material surface only.
Mistake 7: Setting the saw down before the blade stops
After releasing the trigger, the blade continues spinning for several seconds. Setting the saw down with a spinning blade on an unsecured surface can cause the saw to walk, tip, or contact your leg. Hold the saw in the air, blade pointing away from your body, until the blade comes to a complete stop.
Mistake 8: Skipping PPE because the cut looks simple
Injuries do not scale with the difficulty of the task. A single short cut in a familiar material can still send a chip directly into an unprotected eye. PPE is non-negotiable regardless of cut length, material, or experience level.
Is It Safe for a Complete Beginner to Use a Circular Saw?
Yes, it is safe for a complete beginner to use a circular saw, provided they follow the correct setup procedure, wear full PPE, use both hands on the saw at all times, and never bypass any safety feature. The circular saw is not inherently more dangerous than a kitchen knife in the context of proper use; the risk comes entirely from procedural errors, not from the tool itself.
The following five golden rules summarize everything a beginner needs to internalize before picking up a circular saw:
- Always inspect the blade guard before each use. A functioning guard is the most critical mechanical safety feature on the tool.
- Clamp your workpiece without exception. Two clamps, two sawhorses, material fully supported: this configuration eliminates the most common kickback cause.
- Start the blade in free air and let it reach full speed before contact. This single habit prevents the majority of binding events.
- Keep your body offset from the cut path. Side positioning ensures that a kickback event does not result in a direct hit.
- Wait for the blade to stop before setting the saw down or changing your grip. This rule prevents the most common post-cut injuries, which happen during the transition from cutting to tool storage.
Beyond these five rules, beginners benefit enormously from a deliberate first session: choose a low-stakes material such as inexpensive 2×4 framing lumber, practice one straight cut from start to finish before attempting sheet goods or angles, and build familiarity with the tool’s sound, vibration, and feed resistance before increasing complexity.
The danger of a circular saw is real but highly predictable. Every specific failure mode has a specific, learnable prevention. A beginner who has read this guide and practiced its steps is not in the same risk category as someone who picks up the saw without preparation. Confidence built on correct technique is sustainable; confidence built on luck is not.
How Does a Circular Saw Compare to Other Power Saws for Beginners?
A circular saw offers the best balance of versatility and portability for beginners, while a jigsaw is safer for curved cuts, a miter saw is more accurate for repetitive crosscuts, and a table saw delivers the highest precision for rip cuts but carries the greatest safety demands. The table below compares these four tools across criteria most relevant to new users.
The table below describes four common power saws evaluated across flexibility, beginner safety, cut types, and typical cost range:
| Saw Type | Flexibility | Beginner Safety | Best Cut Type | Typical Cost |
|---|---|---|---|---|
| Circular saw | High, portable, cuts sheets and lumber | Moderate, requires full procedure adherence | Straight rip and crosscuts | $50 to $250 |
| Jigsaw | High, handles curves and irregular shapes | High, slower blade and smaller cutting force | Curved, interior, and freeform cuts | $40 to $150 |
| Miter saw | Low, stationary, fixed cut angles | High, blade is guarded until the handle is pressed | Accurate repetitive crosscuts and miters | $150 to $600 |
| Table saw | Low, stationary, requires fixed setup | Low, highest injury severity among common saws | Precision rip cuts and sheet good resizing | $300 to $2,000+ |
For a beginner asking whether to start with a circular saw or a jigsaw: if your projects involve primarily straight cuts in lumber and sheet goods, the circular saw is the more practical investment. If your first project involves curved cuts, decorative shapes, or interior cutouts, start with a jigsaw and add the circular saw later.
What Are the Best Circular Saw Blades for Cutting Different Materials?
The best circular saw blades by material are: 24-tooth carbide-tipped for framing lumber, 60-tooth ATB for plywood, 80-tooth for MDF, PCD blades for fiber cement, and fine-tooth 60-tooth blades for plastics. Top-performing brands include Diablo, Freud, and Irwin. To extend blade life, clean resin buildup monthly with blade cleaner spray, store blades flat or hanging, and never force a blade through material that requires excessive feed pressure.
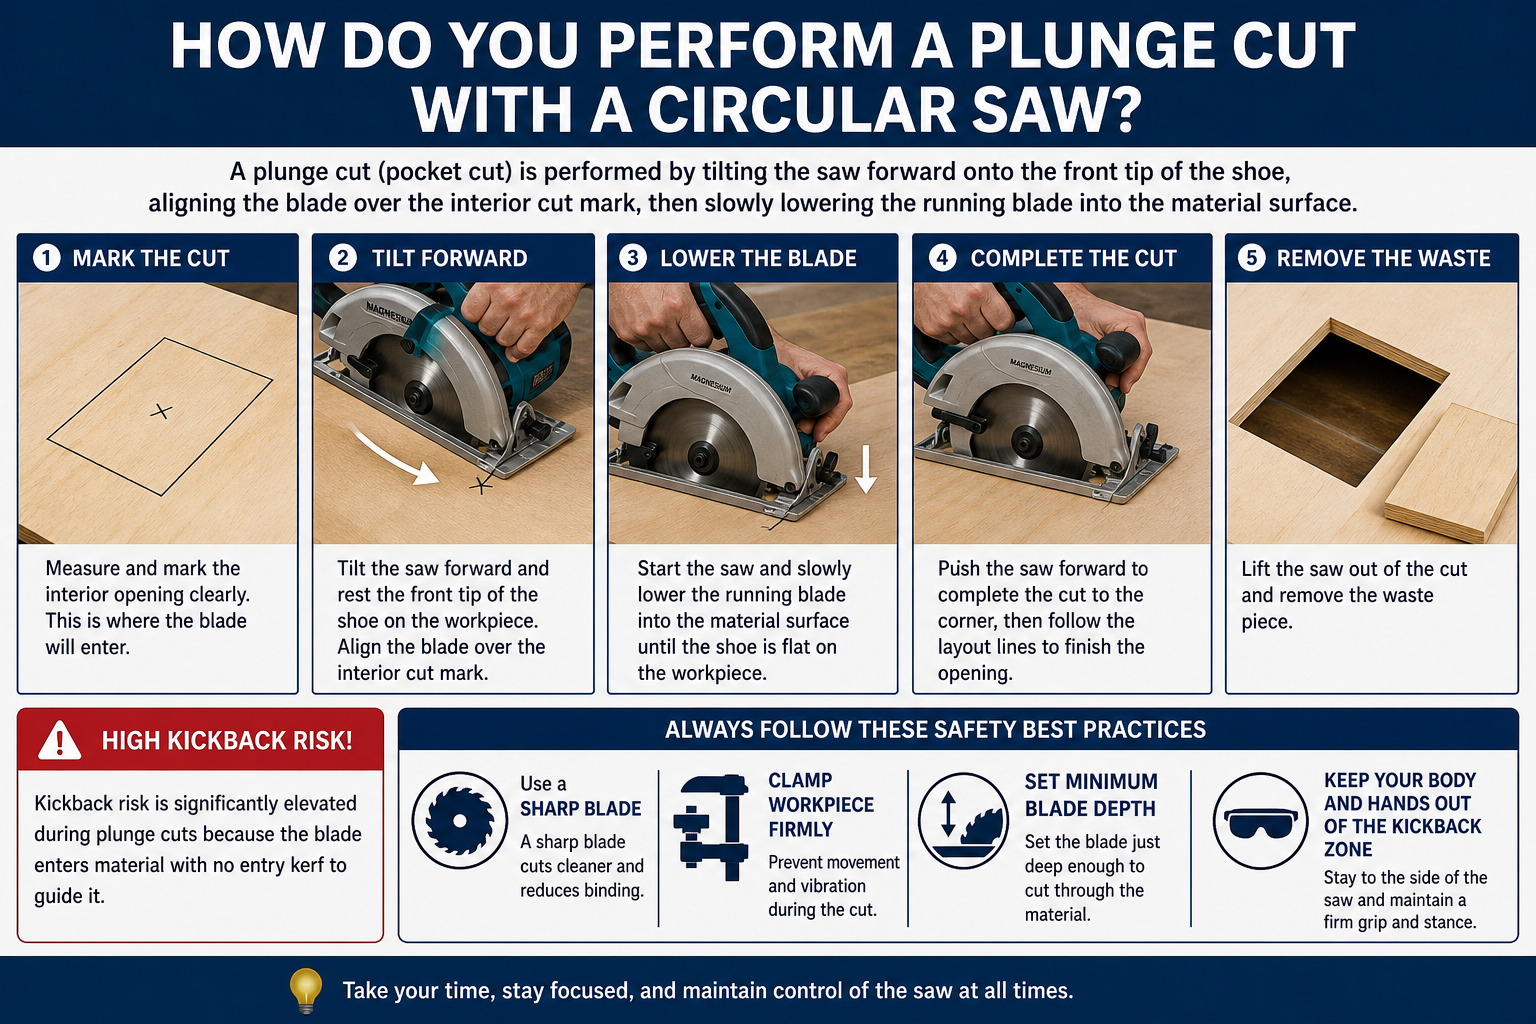
How Do You Perform a Plunge Cut with a Circular Saw?
A plunge cut (pocket cut) is performed by tilting the saw forward onto the front tip of the shoe, aligning the blade over the interior cut mark, then slowly lowering the running blade into the material surface. This technique is used to cut window or door openings in installed panels. Kickback risk is significantly elevated during plunge cuts because the blade enters material with no entry kerf to guide it. Always use a sharp blade, clamp the workpiece firmly, set minimum blade depth, and keep your body fully offset from the cut direction before beginning the plunge.