You can sharpen dull drill bits at home by cleaning the bit, setting the correct point angle (118° or 135°), grinding each cutting lip evenly, cooling the metal between passes, and testing the edge before use. The entire process takes under ten minutes per bit when you follow a structured sequence, and it restores performance that rivals a brand-new twist drill. More importantly, sharpening extends the working life of your bits significantly, saving you money on frequent replacements.
Choosing the right tool for the job matters just as much as technique. A bench grinder delivers speed and flexibility for experienced users, a dedicated drill bit sharpener such as the Drill Doctor handles angle alignment automatically for beginners, and a flat hand file or whetstone works reliably when power tools are unavailable. Each method produces a sharp, functional edge when applied correctly, so your choice depends on what you already own and how comfortable you are with freehand grinding.
Knowing when a bit needs sharpening in the first place saves time and prevents frustration. A dull drill bit produces visible smoke, emits a high-pitched squeal, pushes chips back instead of ejecting them cleanly, and scorches the material surface. Recognizing these signals early means you sharpen before the edge deteriorates past the point of easy recovery, and understanding when to sharpen versus when to replace keeps your toolkit both sharp and cost-efficient.
How Do You Sharpen a Dull Drill Bit Step by Step?
Sharpening a dull drill bit follows a five-phase process: prepare the bit and workspace, inspect the existing edge geometry, grind each cutting lip to the correct point angle, cool the metal between grinding passes, and verify symmetry before use. This sequence applies to standard high-speed steel (HSS) twist bits, which are the most common type found in home workshops and professional toolkits. Following each phase in order prevents the two most common mistakes in drill bit sharpening: overheating the steel and grinding unequal lip lengths that cause the bit to wander off-center.
To understand each phase clearly, the sections below break the full sharpening process into three practical stages, covering preparation, the grinding action itself, and the final quality check.
How Do You Prepare a Drill Bit and Workspace Before Sharpening?
Preparing the drill bit and workspace before sharpening means cleaning the bit of rust and metal debris, identifying the correct target angle for your material type, putting on personal protective equipment, and inspecting the condition of your grinding tool. Skipping this preparation phase leads to uneven grinds and increases the risk of eye injury from flying metal sparks.
Proper preparation sets the foundation for a precise, safe sharpening session. Work through the following steps before touching the bit to any abrasive surface:
- Clean the drill bit thoroughly: Use a wire brush or fine steel wool to remove surface rust, dried cutting fluid, and embedded metal particles from the flutes. Debris on the bit can cause inconsistent contact with the grinding wheel and throw off your angle reading.
- Identify the correct point angle: Standard twist bits designed for wood, aluminum, and mild steel require a 118-degree point angle (59 degrees per side from the centerline). Bits intended for stainless steel, hardened steel, or other tough materials perform better at a 135-degree point angle (67.5 degrees per side), which reduces cutting pressure and heat buildup at the tip.
- Put on personal protective equipment: Wear ANSI-rated safety glasses or a full face shield to protect against metal sparks and grinding wheel fragments. Heat-resistant gloves are recommended when handling the bit during cooling cycles, though you should remove them when feeding the bit against a spinning wheel to maintain tactile control.
- Inspect your grinding tool: Check a bench grinder wheel for cracks, chips, or glazing before powering it on. A glazed wheel (one that looks smooth and shiny rather than coarse) must be dressed with a wheel dresser before use, as it generates excess heat without removing material efficiently. If using a hand file, confirm the file teeth are clean and not loaded with metal filings.
How Do You Grind the Cutting Lip at the Correct Angle Without Overheating the Bit?
Grinding the cutting lip correctly means positioning the bit at the target point angle against the grinding wheel, rotating the bit slightly clockwise as you press the face into the wheel, and lifting off every three to five seconds to cool the steel in water. This technique preserves the temper of the high-speed steel, which loses its hardness permanently if it overheats and turns blue or purple.
With the workspace prepared and the target angle identified, follow this grinding sequence for each cutting lip:
Step 1: Position the bit at the correct angle. Hold the drill bit so the cutting lip (the sharp leading edge on one side of the tip) contacts the face of the grinding wheel at your target angle. For a 118-degree point, your hand angle relative to the horizontal surface of the tool rest sits at approximately 59 degrees. Many bench grinders include a tool rest you can tilt to this angle.
Step 2: Apply light, controlled pressure. Press the cutting lip gently into the rotating wheel. Do not force the bit hard against the wheel; light contact removes metal evenly and reduces heat generation. You should see a small, consistent stream of sparks flowing away from the contact point.
Step 3: Rotate the bit as you grind. While maintaining the angle, rotate the bit slightly in a clockwise direction (as seen from the shank end). This sweeping motion grinds the relief surface behind the cutting edge, creating the secondary clearance angle that allows the lip to bite into material rather than rubbing against it.
Step 4: Cool frequently. Lift the bit away from the wheel every three to five seconds and dip the tip into a container of cold water for two to three seconds. If the tip glows red or orange at any point, you have already overheated the steel. Overheated high-speed steel becomes soft and will dull again within seconds of use.
Step 5: Grind the second lip to match. Rotate the bit 180 degrees and repeat the identical motion on the opposite cutting lip. Both lips must be the same length (measured from the center point to each outer corner) and sit at the same angle. Unequal lip lengths cause the bit to drill oversized holes and produce excessive vibration.
Step 6: Inspect the chisel edge. The short transverse edge connecting the two lips at the very center of the tip is called the chisel edge. After grinding both lips, this edge should appear short and centered. If it looks wide or off-center, you have removed more material from one side than the other and need to re-grind the higher lip.
According to testing data published by the Machinery’s Handbook (29th Edition), a correctly sharpened twist bit with symmetric lips and proper relief angles produces cutting forces up to 40 percent lower than a dull bit operating at the same feed rate, which directly reduces heat at the workpiece and extends tool life between sharpenings.
How Do You Test a Sharpened Drill Bit to Confirm It Is Ready to Use?
A sharpened drill bit is ready to use when both cutting lips appear equal in length under direct light, the tip feels uniformly sharp across both edges, and a test bore into soft wood or thin aluminum starts immediately without wandering or requiring heavy downward pressure. Testing takes less than two minutes and prevents you from discovering a poor grind mid-project when the hole position and material already matter.
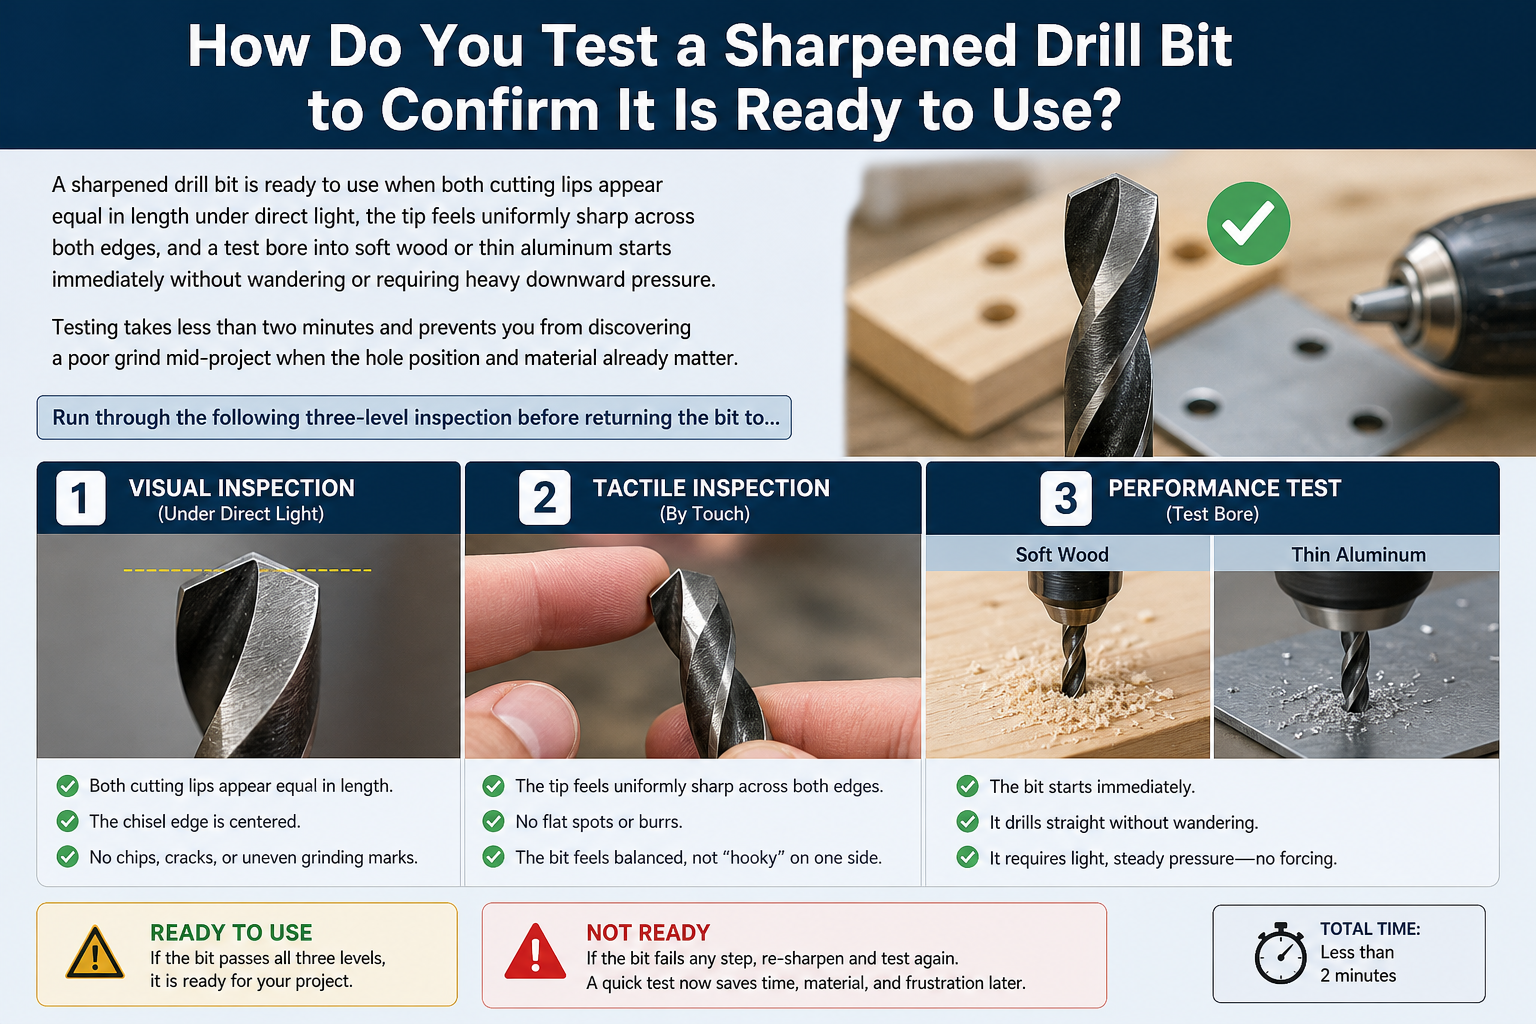
Run through the following three-level inspection before returning the bit to your drill:
Visual inspection: Hold the bit under a desk lamp or work light with the tip pointing toward you. Rotate the bit slowly and observe both cutting lips from directly above the point. The two lips should appear as mirror images, with equal length from the center chisel edge to each outer corner. Any obvious length difference or angle mismatch requires additional grinding on the longer or shallower lip.
Tactile inspection: With the bit pointing away from your body, carefully draw your fingertip or thumbnail across each cutting lip from the flute side toward the edge. A properly sharpened lip catches slightly and feels uniformly sharp along its full length. A dull or rounded edge slides smoothly without catching. Use caution during this step, as a well-sharpened edge can cut skin easily.
Practical test bore: Chuck the bit into your drill, set the drill to a moderate speed, and bore a shallow hole into scrap softwood or a thin piece of aluminum sheet. A sharp bit bites immediately when the point contacts the surface, ejects clean, curling chips through the flutes, and requires only light feed pressure from your hand. Discard the test hole and proceed with your project if the bit passes this check.
Signs that the bit needs additional grinding include: chips that look powdery or granular rather than curled, the bit tip wandering sideways at contact, smoke or burning smell during the test bore, and any requirement to push hard to make the bit advance. If you see any of these, return to the grinding stage and re-examine the lip symmetry and relief angle.
What Tools Can You Use to Sharpen Drill Bits?
There are four main categories of drill bit sharpening tools: bench grinders, dedicated drill bit sharpening machines, hand files, and sharpening stones, each suited to a different combination of skill level, budget, and sharpening volume. Choosing the wrong tool for your experience level is the single most common reason DIYers produce poorly sharpened bits with unequal lips or incorrect angles. Understanding the strengths and limitations of each option allows you to match the tool to your specific situation.
The sections below cover the two most frequently asked questions about sharpening tool selection: whether you can get results without a bench grinder, and how dedicated sharpeners stack up against bench grinders in terms of accuracy and ease.
Can You Sharpen Drill Bits Without a Bench Grinder Using a Hand File or Sharpening Stone?
Yes, you can sharpen drill bits effectively without a bench grinder by using a flat mill file or a fine-grit whetstone, both of which give you slower but more controlled metal removal and suit beginners or anyone who needs to sharpen a single bit without setting up power equipment. The technique differs from wheel grinding in one key way: you move the tool across a stationary bit rather than pressing the bit against a spinning abrasive.
To sharpen with a flat mill file, follow this sequence:
- Secure the drill bit vertically in a bench vise with the tip facing upward and approximately two centimeters of the tip exposed above the vise jaws.
- Position a flat mill file (a bastard-cut or second-cut file works well for HSS bits) against one cutting lip at the target angle of 59 degrees from the centerline for a 118-degree point.
- Push the file across the lip in a single forward stroke, lifting the file on the return. Filing only on the forward stroke prevents the file teeth from loading with metal dust and maintains consistent cutting action.
- Apply equal strokes to both lips, counting strokes per side to maintain symmetry. Three to five strokes per lip per cycle is a good starting rhythm.
A whetstone (also called a sharpening stone or oilstone) works well for bits smaller than 6 mm in diameter, where a file is too coarse to control precisely. Apply a few drops of honing oil or light machine oil to the stone surface before use. Lay the cutting lip flat against the stone at the correct angle and push the bit forward in a consistent arc matching the relief geometry.
Compared to a bench grinder, hand filing is significantly slower (three to five minutes per bit versus under one minute on a wheel), but it produces less heat, reduces the risk of overgrinding, and requires no electricity. It is the most accessible method for emergency field sharpening or occasional use in a home workshop.
How Does a Dedicated Drill Bit Sharpener Compare to a Bench Grinder for Accuracy?
A dedicated drill bit sharpener such as the Drill Doctor 500X or 750X produces more consistent angles than a bench grinder for users without extensive grinding experience, because the machine sets the point angle mechanically and guides the bit through the correct rotation path automatically. A bench grinder outperforms dedicated sharpeners in flexibility and speed for skilled users who can set angles by feel and handle a wide range of bit diameters and types.
The table below summarizes the key performance differences between the two most common sharpening tool categories, helping you identify which option fits your needs:
This table compares dedicated drill bit sharpeners against bench grinders across six practical criteria relevant to home and professional users:
| Criterion | Dedicated Drill Bit Sharpener | Bench Grinder |
|---|---|---|
| Angle accuracy | High (automatic, repeatable) | Moderate to high (manual, skill-dependent) |
| Sharpening speed | 1 to 3 minutes per bit | 30 to 90 seconds per bit |
| Bit size range | Limited (typically 3/32 to 1/2 inch) | Wide (nearly all sizes) |
| Ease of use | Very easy (guided operation) | Moderate to difficult (freehand technique) |
| Tool cost | $50 to $150 USD | $80 to $300 USD |
| Best suited for | Home users, occasional sharpening | Professionals, high-volume sharpening |
Dedicated sharpeners excel at producing repeatable results because the chuck mechanism aligns the bit to the correct point angle before any grinding begins. The user simply inserts the bit, locks the chuck, and rotates the bit through a guided arc against the internal grinding wheel. This eliminates the most difficult skill in freehand grinding: maintaining a consistent angle while simultaneously rotating the bit.
Bench grinders offer greater versatility in exchange for a steeper learning curve. A skilled user can sharpen any bit diameter, adjust the point angle for different materials without a separate chuck, and grind other shop tools (chisels, plane irons, lathe tools) on the same machine. For a professional machinist or serious woodworker who sharpens tools daily, the bench grinder justifies its higher skill requirement through speed and range.
The practical recommendation: If you sharpen drill bits fewer than ten times per month and do not already own a bench grinder, a dedicated sharpener delivers the most consistent results for the investment. If you already own a bench grinder and are willing to practice the freehand technique on scrap bits before working on good ones, the bench grinder handles the full range of sharpening tasks your workshop will ever need.
When Should You Sharpen a Drill Bit Instead of Replacing It?
You should sharpen a drill bit rather than replace it when the bit still has adequate shank length, neither cutting lip is chipped more than one-third of its total length, and the bit body shows no cracks or heat-induced warping. Sharpening a bit that meets these criteria costs nothing beyond a few minutes of your time, while replacing a quality HSS or cobalt bit can cost anywhere from $2 to $25 per piece depending on size and material grade.
The following sections address two specific sharpening scenarios that fall outside the standard twist bit process: carbide-tipped masonry bits and spade bits, both of which require modified techniques.
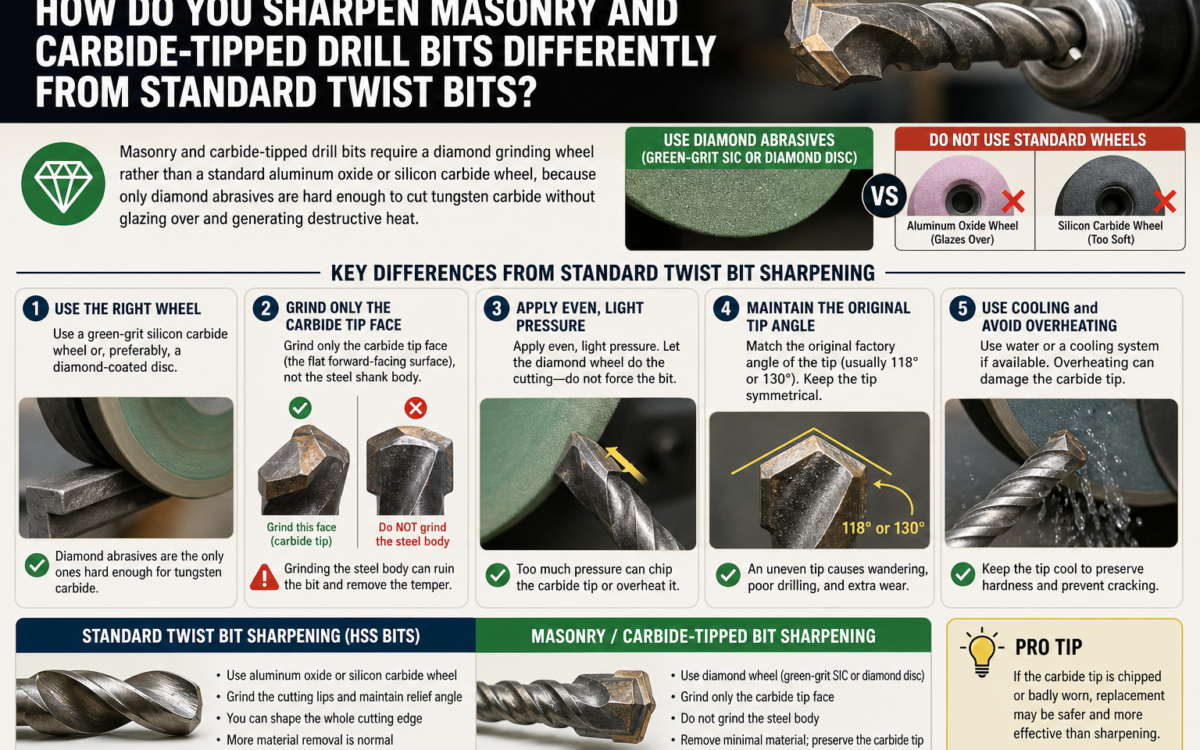
How Do You Sharpen Masonry and Carbide-Tipped Drill Bits Differently from Standard Twist Bits?
Masonry and carbide-tipped drill bits require a diamond grinding wheel rather than a standard aluminum oxide or silicon carbide wheel, because only diamond abrasives are hard enough to cut tungsten carbide without glazing over and generating destructive heat.
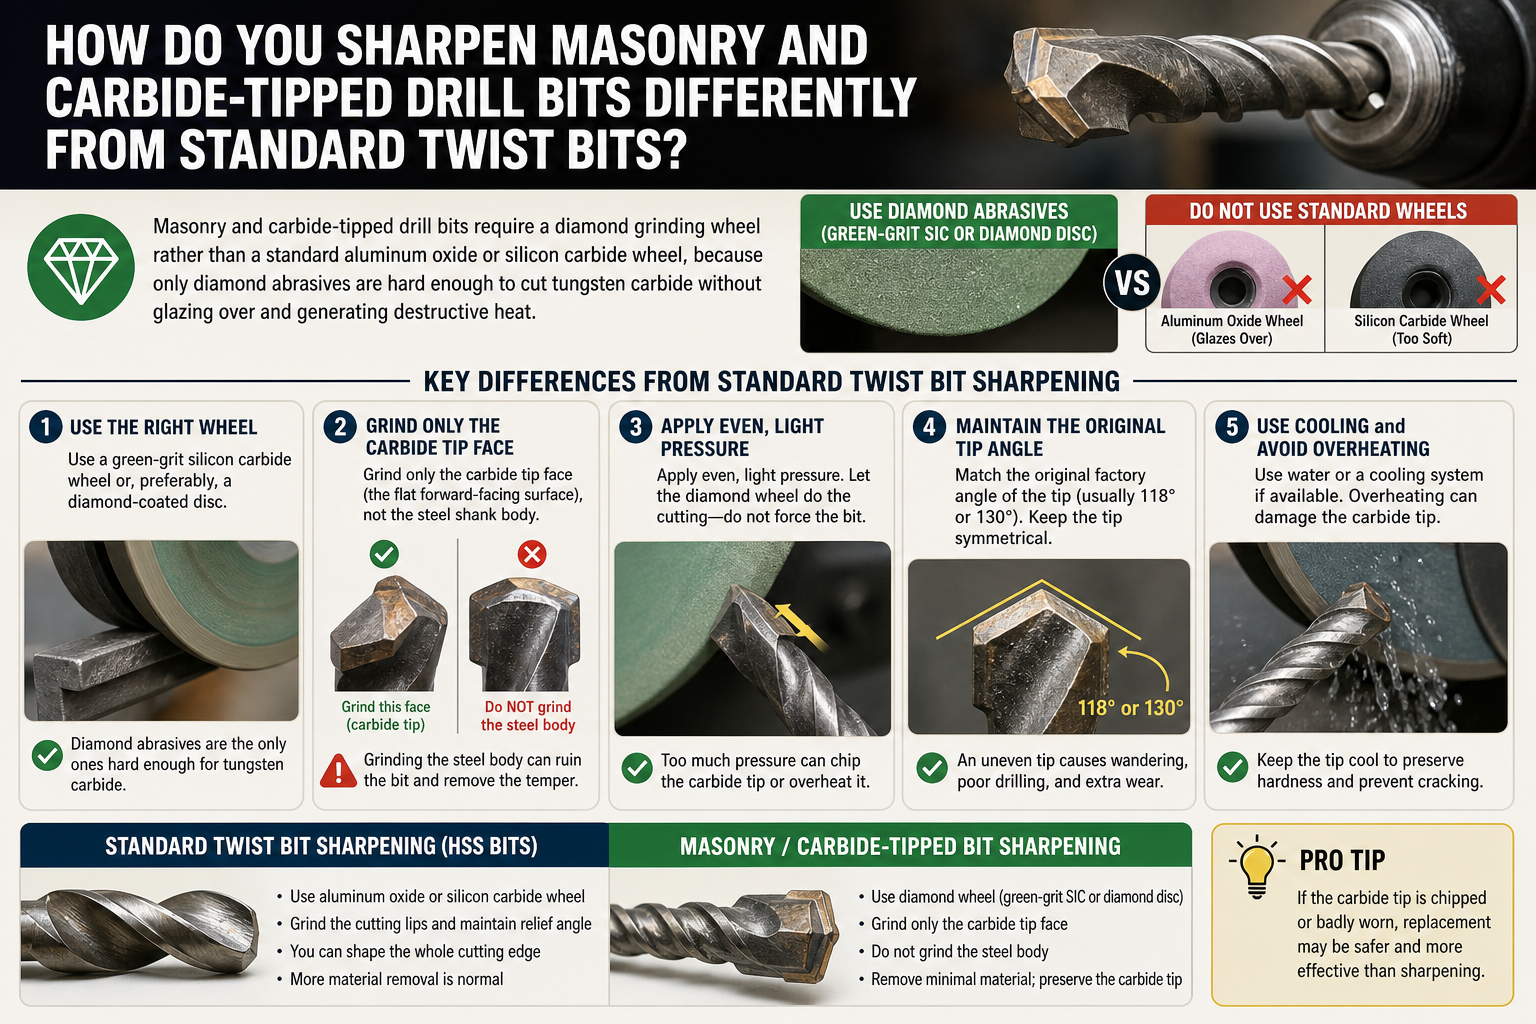
Key differences from standard twist bit sharpening include: use a green-grit silicon carbide wheel or, preferably, a diamond-coated disc; grind only the carbide tip face (the flat forward-facing surface), not the steel shank body; apply even lighter pressure than with HSS bits and cool more frequently, every two to three seconds rather than five; and never use a bench grinder spinning at full speed for carbide work as the heat buildup is faster and more damaging. A slow-speed bench grinder (1,750 RPM rather than 3,450 RPM) or a rotary tool with a diamond burr gives better control for carbide sharpening.
How Is Sharpening a Spade Bit Different from Sharpening a Twist Drill Bit?
Sharpening a spade bit uses a flat hand file or diamond file applied along the beveled cutting edges of each flat paddle wing, rather than the rotational grinding motion used for twist bits, because the spade bit’s flat geometry does not benefit from wheel contact.
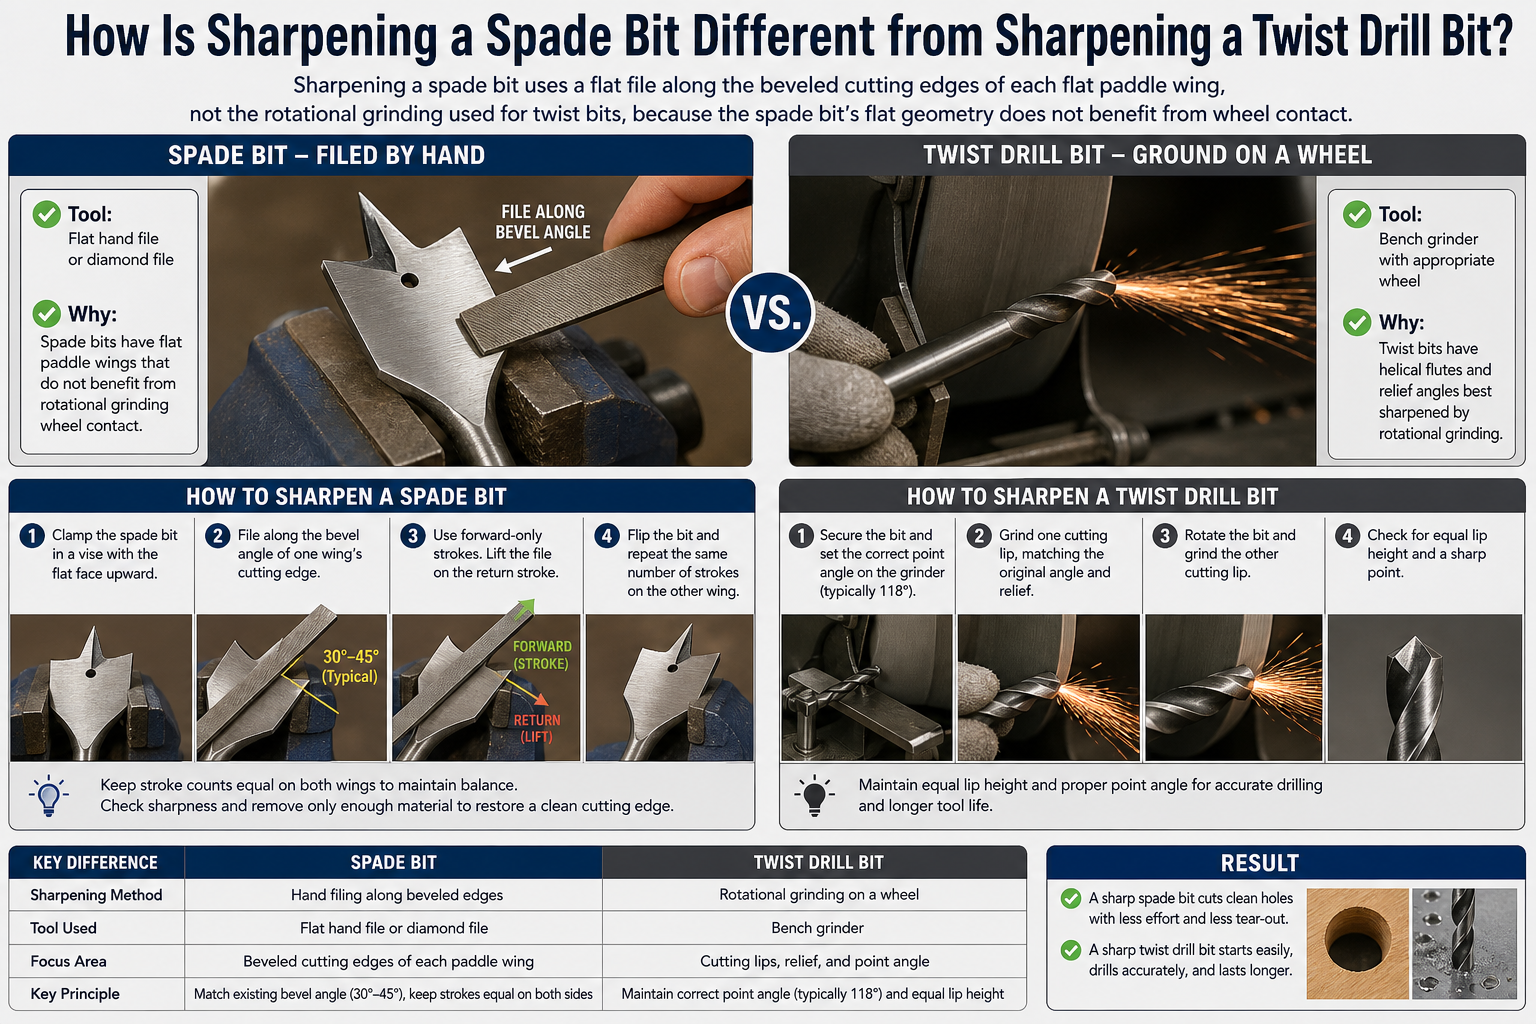
Clamp the spade bit in a vise with the flat face upward. File along the bevel angle of each wing’s cutting edge using forward-only strokes, matching the existing bevel angle (typically 30 to 45 degrees). Keep stroke counts equal on both wings to maintain symmetry. Restore the center point using a needle file or a fine triangular file, sharpening all three faces of the point tip back to a tight apex. Do not file the flat back face of the wings, as removing material there reduces the bit’s cutting clearance and causes binding in the hole.