Adding an electrical outlet to an existing wall is entirely achievable as a DIY project when you follow the correct process: choose the right location, shut off power at the breaker, cut a wall opening, run new wire from a nearby source, connect the wires to the receptacle, and test before finishing. Most homeowners with basic tool experience can complete this project in 2 to 4 hours using an old-work outlet box, the correct gauge electrical wire, and a non-contact voltage tester. The result is a fully functional outlet that meets National Electrical Code (NEC) standards and eliminates the need for dangerous extension cords.
Before picking up a drill, you need to gather the right tools and materials. The core supplies include a cordless drill, drywall saw, fish tape, wire stripper, stud finder, an old-work outlet box, the appropriate gauge electrical wire (14 AWG for a 15-amp circuit or 12 AWG for a 20-amp circuit), a duplex receptacle, wire connectors, and a wall plate cover. Selecting the wrong wire gauge or the wrong type of outlet box is one of the most common mistakes DIYers make, so getting this preparation step right is critical before any cutting begins.
One important question many homeowners ask before starting is whether the project is safe and legal without a licensed electrician. Yes, it is legal and safe in most U.S. jurisdictions, provided you turn off the correct circuit breaker and confirm zero voltage with a non-contact tester before touching any wiring. However, certain older homes with fuse boxes, aluminum wiring, or panels installed before 1970 require a professional assessment before you proceed. Understanding these boundaries protects both you and your home.
What Tools and Materials Do You Need to Add an Electrical Outlet to an Existing Wall?
There are two categories of supplies required for this project: tools for the physical installation work and electrical materials for the wiring itself, and choosing the correct items in each category determines how safely and cleanly the job gets done.
Dưới đây is a complete breakdown of everything you need before you cut the first hole in your wall.
Tools Required for the Installation
A cordless drill, drywall saw, fish tape, non-contact voltage tester, wire stripper, stud finder, flathead screwdriver, Phillips screwdriver, and a pencil or marker are the core tools needed for this project. Each tool plays a specific role in the process, and substituting or skipping any of them increases the risk of a poor result or a safety hazard.
Here is what each tool does:
- Stud finder: Locates wood studs inside the wall so you can position the outlet box in open drywall cavity between two studs, not directly over a stud where the box cannot fit.
- Non-contact voltage tester: Confirms that power is completely off at the work area before you touch any wire. This is the single most important safety tool in the project.
- Fish tape: A long, flexible steel or fiberglass tape used to pull electrical wire through the interior cavity of the wall from one opening to another.
- Drywall saw or oscillating multi-tool: Cuts the rectangular opening in the drywall cleanly and accurately around the outlet box template. An oscillating tool gives more control for beginners.
- Wire stripper: Removes the plastic insulation from the end of each conductor to the correct length (approximately 3/4 inch) without nicking the copper wire underneath.
- Cordless drill: Used to drill entry and exit holes for the fish tape and wire at the top or bottom of the wall cavity.
Electrical Materials Required
The electrical materials needed include an old-work outlet box, a 15-amp or 20-amp duplex receptacle, the correct gauge wire, wire connectors (wire nuts), electrical tape, and a wall plate cover. The choice between 14 AWG and 12 AWG wire depends entirely on the amperage rating of the circuit you are tapping into.
The table below summarizes the correct wire gauge and receptacle pairing by circuit type, so you can confirm the right materials before purchasing:
| Circuit Amperage | Wire Gauge Required | Receptacle Type |
|---|---|---|
| 15-amp circuit | 14 AWG (yellow-sheathed NM-B) | Standard 15-amp duplex |
| 20-amp circuit | 12 AWG (yellow-sheathed NM-B with thicker conductors) | 20-amp duplex (T-slot) |
This table shows the mandatory pairing between circuit breaker rating, wire gauge, and receptacle type. Never install 14 AWG wire on a 20-amp circuit, as undersized wire can overheat under load and become a fire hazard.
One critical distinction to understand is the difference between an old-work box and a new-work box. A new-work box is designed to be nailed directly to a stud before drywall is installed. An old-work box (also called a remodel box) has folding plastic wings or metal ears that clamp against the back of existing drywall from the inside, holding the box firmly in place without requiring stud access. For any project involving an existing finished wall, an old-work box is the only practical choice.
Is It Safe and Legal for a Homeowner to Add an Electrical Outlet Without Hiring an Electrician?
Yes, adding an electrical outlet is safe and legal for a homeowner to do without a licensed electrician, provided you shut off the correct circuit breaker, verify zero voltage at the work area using a non-contact tester, and follow the wiring rules outlined in the National Electrical Code (NEC). However, this answer applies specifically to standard drywall walls in homes built after 1970 with a modern circuit breaker panel and copper wiring.
Cụ thể, there are important legal, safety, and situational factors you must evaluate before you start cutting.
Do You Need a Permit to Add an Electrical Outlet?
In many U.S. jurisdictions, adding a new outlet to an existing wall requires an electrical permit even when the work is done by the homeowner. Permit requirements exist to ensure the work is inspected by a licensed electrical inspector, protecting both you and future buyers of the home.
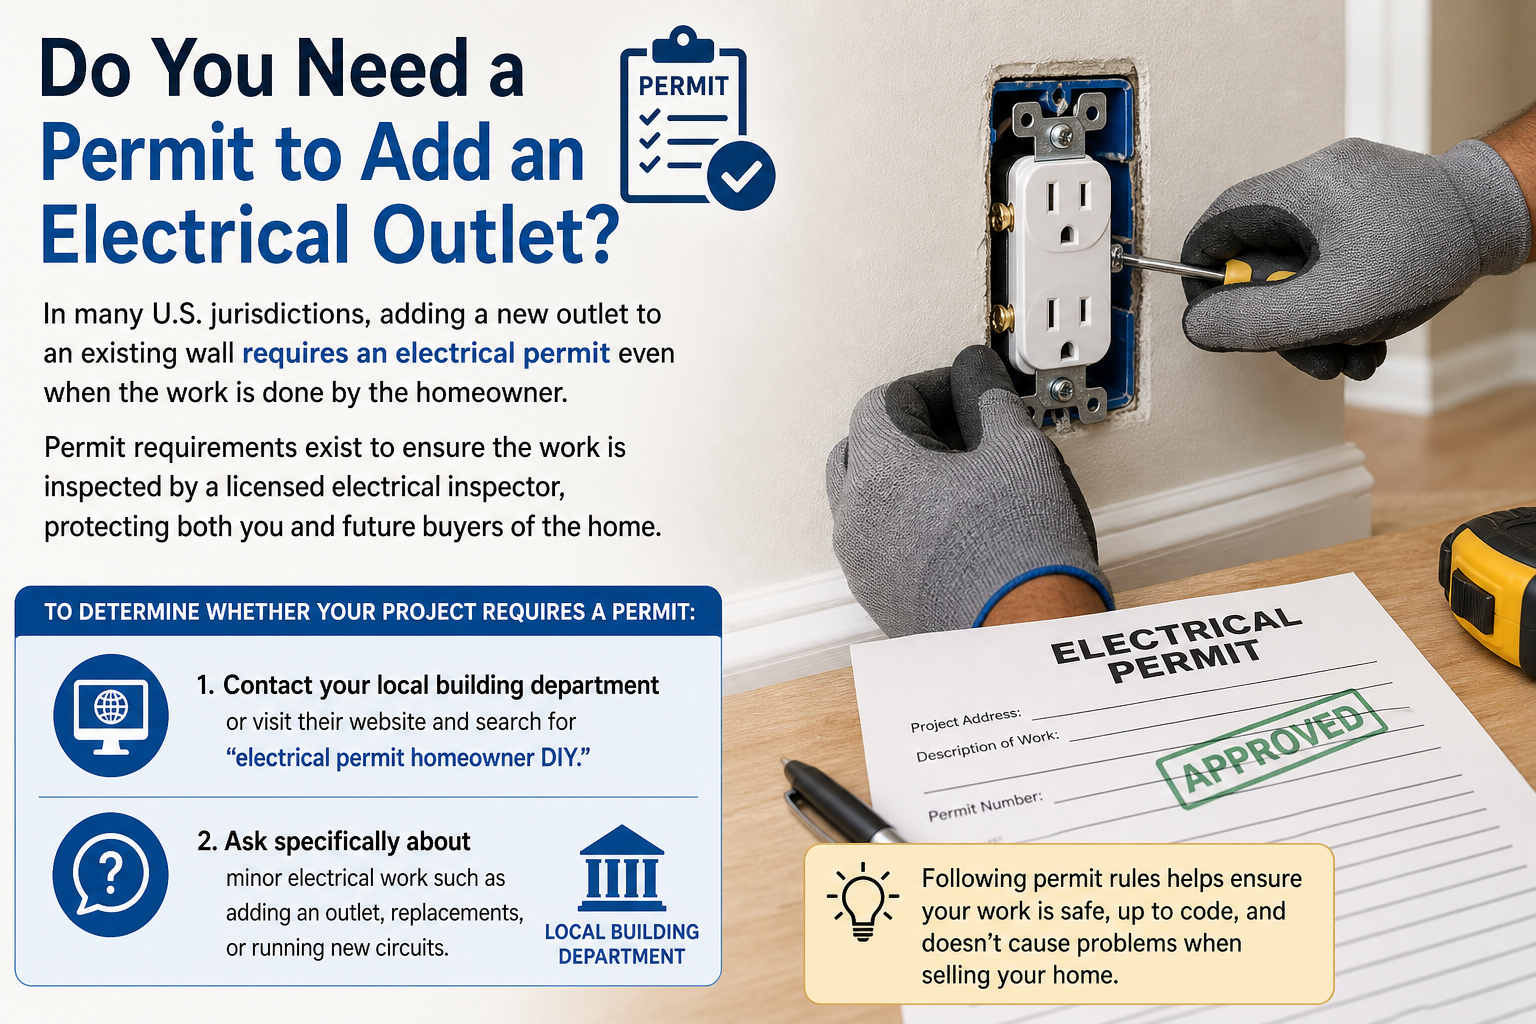
To determine whether your project requires a permit:
- Contact your local building department or visit their website and search for “electrical permit homeowner DIY.”
- Ask specifically about minor electrical work: some jurisdictions issue simplified homeowner permits for small jobs like adding a single outlet.
- Never skip the permit process in jurisdictions that require it. Unpermitted electrical work can void your homeowner’s insurance, create issues during a home sale, and expose you to liability if a fire occurs.
According to the International Association of Certified Home Inspectors (InterNACHI), unpermitted electrical work is one of the most commonly flagged defects during real estate transactions, often requiring expensive remediation before a sale can close.
When Should You Call a Licensed Electrician Instead of DIYing?
There are specific situations where attempting this project yourself introduces risks that outweigh the cost savings of DIY. You should hire a licensed electrician if any of the following conditions apply:
- Your home has a fuse box instead of a circuit breaker panel. Fuse boxes are found in homes built before the 1960s and indicate outdated wiring that may not support additional load safely.
- Your home has aluminum wiring. Homes built between approximately 1965 and 1973 may have aluminum conductors instead of copper. Aluminum wiring requires special receptacles, connectors, and anti-oxidant compound. Improperly extending an aluminum-wired circuit is a documented fire risk.
- You cannot identify which circuit breaker controls the outlet you plan to tap. Working without confirmed circuit identification means there is a possibility of touching a live wire.
- Your breaker panel is already full with no open slots. Adding a new branch circuit requires a new breaker slot or a sub-panel, which is a job for a licensed electrician.
- The home was built before 1970. Older wiring insulation can be brittle, and the wiring system may not be grounded, both of which require professional evaluation.
The Non-Negotiable Safety Step: Confirming the Power Is Off
Turning off the circuit breaker is necessary, but it is not sufficient on its own. The mandatory safety protocol requires that after switching off the breaker, you hold a non-contact voltage tester near every wire at the work area and confirm zero voltage before touching anything. This step catches situations where a wire in the wall is controlled by a different circuit than you expected, or where two circuits share a wall cavity. Skipping this step is the leading cause of electrical shock injuries in DIY electrical work.
How Do You Add an Electrical Outlet to an Existing Wall Step by Step?
Adding an electrical outlet to an existing wall follows 5 sequential steps: select the location and identify a power source, cut the wall opening and install the outlet box, run wire through the wall, connect the wires to the receptacle, and test and finish the installation. The entire process typically takes 2 to 4 hours for a first-time DIYer working on a standard drywall interior wall.
Dưới đây is each step explained in the order you must perform them.
How Do You Choose the Right Location and Identify a Power Source?
The best location for a new outlet is on an interior wall within 6 to 12 feet of an existing outlet, between two wall studs, and away from any plumbing or gas lines. The existing outlet nearest to your chosen spot will serve as the power source for the new one, so the two locations need to be reasonably close to keep the wire run manageable.
To choose your location and identify the source outlet, follow these steps:
Step 1: Use a stud finder to map the stud positions. Mark the center of each stud along the wall with a pencil. Your outlet must sit in the open cavity between two studs, never directly over a stud. Standard stud spacing is 16 inches on center, giving you approximately 14.5 inches of open cavity to work with.
Step 2: Identify the source circuit. Open the electrical panel and note which breaker controls the nearest existing outlet. Use a plug-in circuit tester or lamp in the existing outlet to confirm which breaker controls it. Check the panel’s circuit directory or test systematically by switching breakers off one at a time.
Step 3: Calculate the existing circuit load. Add up the wattage of all devices currently plugged into that circuit. A 15-amp circuit at 120 volts can safely carry 1,440 watts (80% of the 1,800-watt theoretical maximum per NEC guidelines). If the circuit is already near capacity, choose a different source outlet on a less-loaded circuit.
Step 4: Apply the NEC 6-foot / 12-foot rule. According to the NEC, no point along a wall should be more than 6 feet from an outlet, measured horizontally. This means new outlets are typically spaced no more than 12 feet apart. Verify that your planned location satisfies this requirement.
Step 5: Check for hidden obstacles. Before cutting, use a stud finder set to deep-scan mode, or use a wire detector, to look for pipes or existing wires in the cavity. If your wall is an exterior wall, be aware that insulation will make wire fishing significantly more difficult.
How Do You Cut the Wall Opening and Install the Outlet Box?
To cut the wall opening, trace the old-work outlet box directly onto the drywall as a template, then cut along the lines with a drywall saw, staying just inside the marked boundary for a snug fit. The outlet box must sit flush inside the wall without wobbling before you proceed to wire fishing.
Here is the precise cutting and box installation procedure:
Step 1: Position the outlet box template. Hold the old-work box flat against the wall at your chosen height (standard outlet height is 12 to 18 inches above finished floor level). Trace the perimeter of the box opening onto the drywall with a pencil. Double-check that no stud is running directly behind the marked area using the stud finder.
Step 2: Start the drywall cut. Use a drywall saw or an oscillating multi-tool. Before cutting, press gently on the wall surface and listen or feel for any resistance that might indicate a wire or pipe directly behind the drywall. Insert the saw blade slowly at a corner of the marked outline and cut along each edge. Cut slowly and shallowly on the first pass, going only through the drywall layer, not deeper.
Step 3: Remove the drywall cutout. Pull the cut piece free. Shine a flashlight into the cavity and visually inspect for any wires, pipes, or insulation before proceeding.
Step 4: Insert and secure the old-work box. Thread the wires you will later pull into the box through the appropriate knockout opening on the back or side of the box. Push the box into the opening until its outer flange sits flush against the drywall surface. Tighten the mounting screws on the front of the box. As you tighten, the plastic wings or metal ears on the back of the box rotate outward and clamp firmly against the inside surface of the drywall, locking the box in place without any stud required.
How Do You Run Electrical Wire Through an Existing Wall?
Running electrical wire through an existing wall uses one of two methods: fishing wire vertically down from a source outlet directly above the new location, or fishing wire horizontally through the wall cavity using fish tape. The vertical method is simpler and is the preferred approach whenever the source outlet is on the same wall and directly above or below the new outlet position.
Cụ thể, here is how to complete the wire fishing process:
Step 1: Drill access holes at the top and bottom of the wall cavity. At the source outlet location, remove the existing outlet from its box without disconnecting any wires yet. Use a long drill bit (at least 12 inches, 5/8 inch diameter) to drill down through the top plate (the horizontal framing member at the top of the wall) into the wall cavity. Drill a corresponding entry hole at the new outlet box opening if needed.
Step 2: Insert the fish tape. Feed the tip of the fish tape into the drilled hole at the top of the wall. Guide it down through the wall cavity toward the new outlet opening. Have a helper use a wire hook or bent coat hanger through the new outlet opening to catch the fish tape tip and pull it through.
Step 3: Attach and pull the wire. Cut your NM-B cable to the length needed plus an extra 12 to 18 inches at each end. Bend the wire conductors over the fish tape hook and wrap the connection tightly with electrical tape to create a smooth, snag-free nose. Pull the fish tape back up through the wall, drawing the cable along with it. Leave at least 6 to 8 inches of wire extending from each opening.
Step 4: Deal with fire blocking if present. Some walls built after the 1990s contain a horizontal fire block, a piece of framing lumber running between studs at mid-wall height. If your fish tape stops unexpectedly in the middle of the wall, this is likely the cause. You will need to drill through the fire block using a long flexible drill bit, or cut a small access hole in the drywall at the fire block location, drill through it, and then patch the drywall afterward.
Step 5: Protect the wire at each end. At the source outlet, staple the cable to the framing within 12 inches of the outlet box and every 4.5 feet along any exposed run per NEC requirements. At the new outlet box, ensure at least 6 inches of wire extends into the box interior.
How Do You Connect the Wires to the New Electrical Outlet?
Connecting the wires to the new receptacle requires matching each conductor to its correct terminal: black (hot) wire to the brass-colored screw, white (neutral) wire to the silver-colored screw, and bare or green ground wire to the green screw. This color-coded system is universal for standard 120-volt wiring in North America, and reversing any connection creates a shock hazard or wiring polarity fault.
Here is the complete wiring procedure for both the new outlet and the source outlet connection:
Step 1: Shut off the circuit breaker and verify zero voltage. At the source outlet, hold the non-contact voltage tester near all existing wires and confirm no reading before proceeding.
Step 2: Strip the new cable at both ends. Use the wire stripper to remove 6 to 8 inches of the outer plastic sheathing from each end of the cable. Then strip approximately 3/4 inch of insulation from the tip of each individual conductor (black, white, and bare/green).
Step 3: Connect at the new outlet box. Wrap the black wire clockwise around the brass screw on the new receptacle and tighten firmly. Wrap the white wire around the silver screw and tighten. Wrap the bare ground wire around the green screw and tighten. Give each connection a firm tug to confirm it will not pull loose.
Step 4: Make the pigtail connection at the source outlet. If the source outlet sits in the middle of the circuit (mid-circuit), meaning wires enter and exit the existing outlet box, you must use a pigtail connection rather than connecting directly to the existing outlet’s screws. To create a pigtail, cut three short lengths of wire (one black, one white, one ground). Use wire connectors (wire nuts) to join: the existing black wire plus the new black wire plus the black pigtail; the existing white wire plus the new white wire plus the white pigtail; all ground wires together with the ground pigtail. Then connect each pigtail to the corresponding screw on the existing receptacle. This method ensures a clean, secure connection that distributes current evenly.
Step 5: Fold and seat the wires. Before pushing the receptacle into the outlet box, fold each wire in a Z-shape to compress them neatly into the box. Do not force wires into tight bends, as this can crack the insulation over time.
How Do You Test the New Outlet and Complete the Installation?
To test the new outlet, restore power at the circuit breaker and insert a plug-in outlet tester into the receptacle, which will display indicator lights showing whether the hot, neutral, and ground connections are correctly wired. A correct wiring result shows two amber lights and one green light on a standard outlet tester, indicating the outlet is properly wired and safe for use.

Here is the complete testing and finishing sequence:
Step 1: Restore power and perform the initial test. With all wire connections made and the receptacle seated loosely in the box, restore power at the breaker. Insert the outlet tester into the new receptacle. Read the indicator pattern on the tester against the legend printed on the tester body. A “correct” reading means all three wires are connected to their proper terminals.
Step 2: Check for these error readings that require immediate attention:
- Open ground: The ground wire is not connected or the ground screw connection is loose.
- Open neutral: The white wire is not connected or there is a broken connection in the neutral pigtail.
- Open hot: The black wire is not connected or the breaker has not fully reset.
- Hot/neutral reversed: The black and white wires are connected to the wrong screws, a condition that is electrically dangerous even if the outlet appears to work.
Step 3: Test GFCI trip function if applicable. If you installed a GFCI receptacle (required for kitchens, bathrooms, garages, and outdoor locations), press the TEST button on the face of the outlet. A properly wired GFCI will cut power to the outlet immediately when you press TEST. Press RESET to restore power and confirm the GFCI resets correctly.
Step 4: Secure the receptacle and attach the wall plate. Shut off the circuit breaker again before performing this step. Push the folded wires fully into the outlet box. Drive the two mounting screws through the receptacle’s top and bottom ears into the threaded holes in the outlet box. Confirm the receptacle sits straight and flush. Attach the wall plate cover using the single center screw provided. Restore power.
Step 5: Perform a functional load test. Plug a lamp or phone charger into the new outlet and confirm it operates normally. If the breaker trips during this test, turn the breaker off, reopen the outlet, and recheck all wire connections for any stray copper strands that may be causing a short circuit.
According to a study published by the Electrical Safety Foundation International (ESFI) in 2022, approximately 51,000 home electrical fires occur in the United States annually, and a significant percentage are attributed to improper DIY wiring, underscoring why methodical testing before final installation is non-negotiable.
What Type of Electrical Outlet Should You Install When Adding to an Existing Wall?
There are four main types of outlets to consider when adding to an existing wall: a standard 15-amp duplex outlet, a GFCI outlet, a USB combination outlet, and a 20-amp outlet, and the correct choice depends on the room, the circuit capacity, and the specific devices you plan to power.
Hãy cùng khám phá the characteristics and appropriate applications for each type before you make your purchase.
Can You Install a Smart Outlet When Adding a New Outlet to Your Wall?
Yes, you can install a smart Wi-Fi outlet when adding a new outlet to your wall, provided your existing wiring includes a ground wire and your circuit has a neutral wire, both of which are required for smart outlet operation. Standard smart outlets (such as those from Kasa, Leviton, or Lutron) require a neutral (white) wire, a hot (black) wire, and a ground. Most home wiring installed after 1965 includes all three, but homes with two-wire ungrounded systems (no ground wire) are not compatible with standard smart outlets without additional upgrades.
Key considerations for smart outlet installation:
- Wi-Fi compatibility: Most smart outlets operate on 2.4 GHz Wi-Fi networks only. If your home router broadcasts only on 5 GHz, the outlet will not connect.
- Smart home ecosystem: Verify that the brand you choose supports your existing ecosystem. Kasa integrates with Google Home and Amazon Alexa. Eve and iDevices work with Apple HomeKit. Some brands are platform-agnostic and support multiple ecosystems simultaneously.
- Smart outlets do not replace GFCI protection. In NEC-required GFCI locations (bathrooms, kitchens, garages, outdoors), you must install a GFCI outlet or protect the circuit with a GFCI breaker regardless of whether you are also using a smart outlet. A smart outlet and a GFCI outlet can be combined using a smart GFCI outlet, such as those offered by Leviton, which provides both functions in one device.
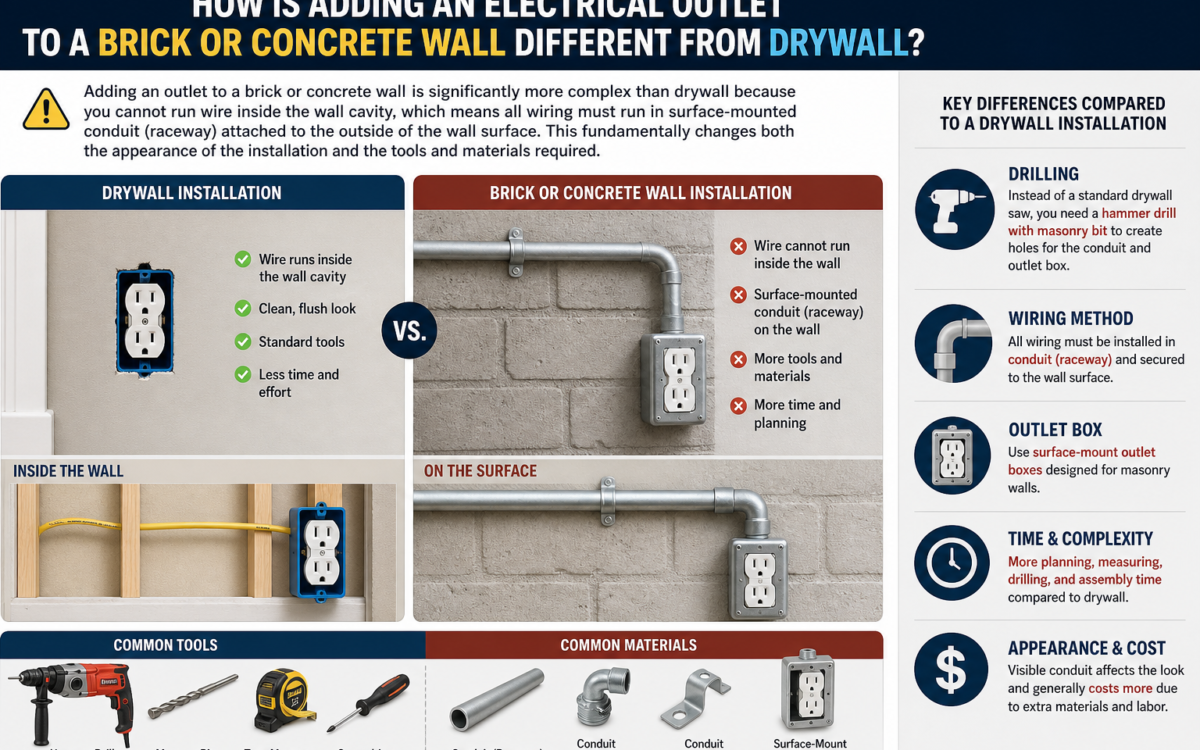
How Is Adding an Electrical Outlet to a Brick or Concrete Wall Different from Drywall?
Adding an outlet to a brick or concrete wall is significantly more complex than drywall because you cannot run wire inside the wall cavity, which means all wiring must run in surface-mounted conduit (raceway) attached to the outside of the wall surface. This fundamentally changes both the appearance of the installation and the tools and materials required.
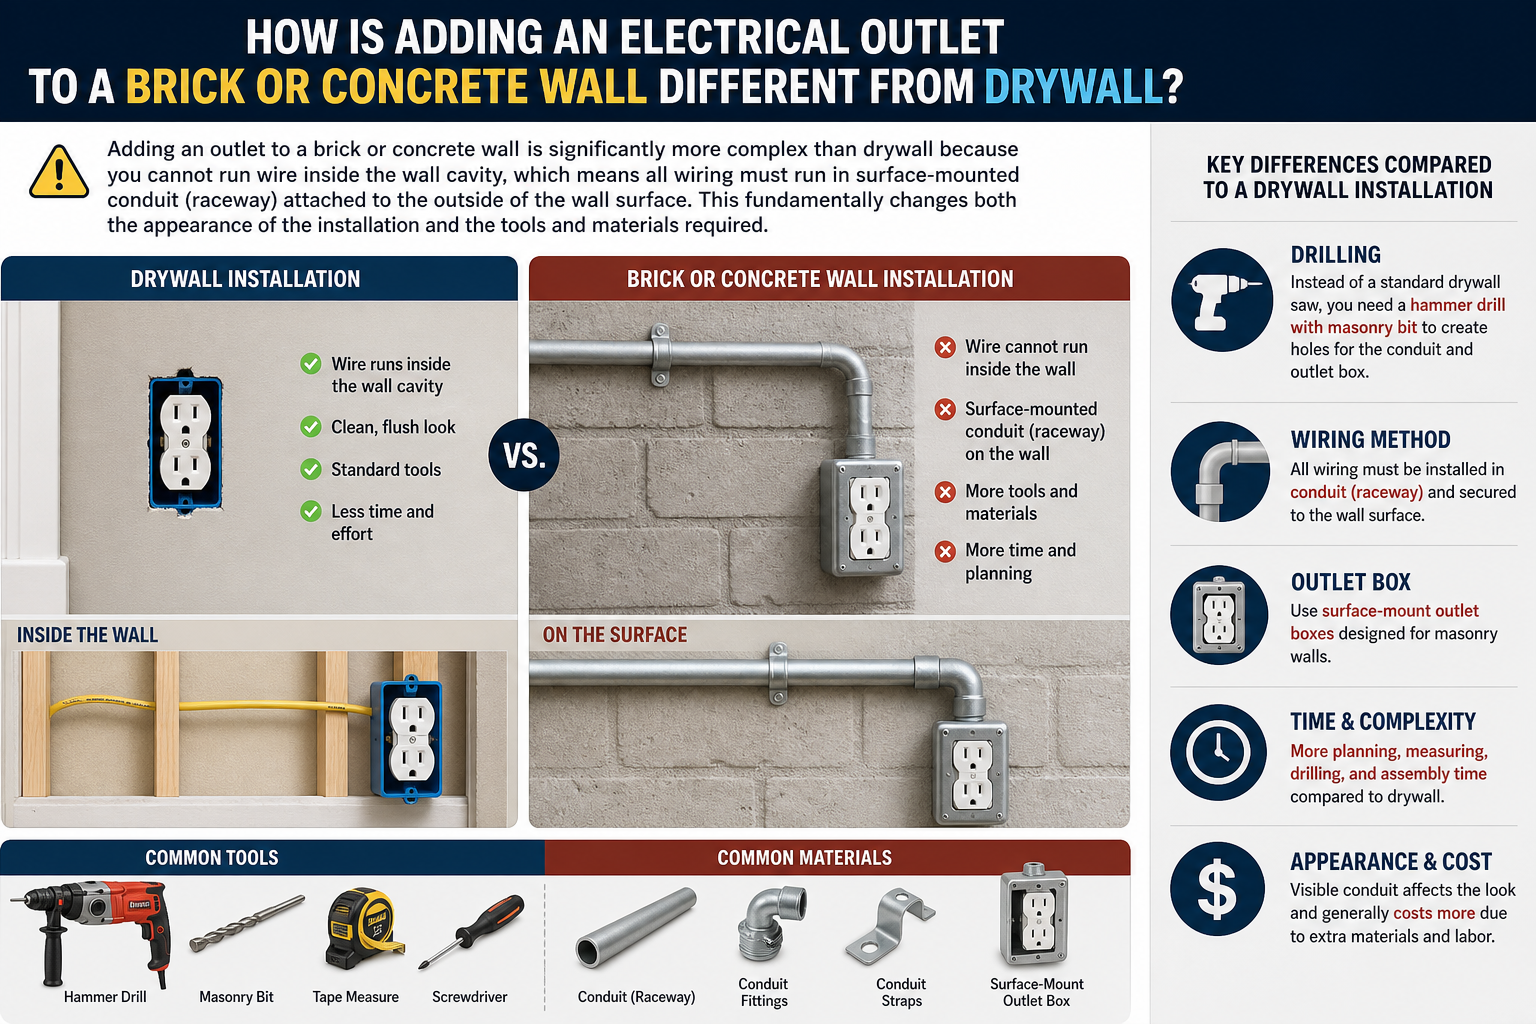
Key differences compared to a drywall installation:
- Drilling: Instead of a standard drywall saw, you need a hammer drill with masonry bits to bore through brick or concrete. A standard cordless drill will not penetrate masonry effectively.
- Outlet box type: You must use a surface-mounted conduit box (also called a surface conduit box or handy box) that attaches directly to the wall face, or a concrete box embedded into a chased-out groove in the masonry. For most DIY applications, a surface raceway system (such as Wiremold brand) is the most practical and code-compliant approach.
- Wire routing: Wiring runs inside plastic or metal surface raceways (rectangular channels) that snap or screw onto the wall surface and cover the wire. This eliminates the need to fish wire through inaccessible cavities.
- Fasteners: Use concrete anchors or masonry screws (such as Tapcon brand) to secure the conduit and outlet box to the wall. Standard drywall screws will not hold in masonry.
- Aesthetic result: Surface raceway systems are functional but visible. In finished living spaces, many homeowners prefer to hire a professional who can chase a groove into the masonry and plaster over it for a concealed installation.