Installing a dimmer switch is a straightforward DIY task that most homeowners can complete in under an hour, provided they follow the correct steps, use the right tools, and observe basic electrical safety precautions. A dimmer switch allows you to adjust the brightness of your lights from full intensity down to a soft glow, giving you both comfort and energy savings. When done correctly, the entire installation process involves five core phases: turning off power, removing the old switch, identifying and connecting the wires, securing the new dimmer, and testing the result.
Before you begin, you will need a small set of tools and materials, including a flathead screwdriver, a Phillips screwdriver, a non-contact voltage tester, needle-nose pliers, wire strippers, wire nuts, and electrical tape. These items ensure you can safely disconnect the old switch and properly terminate the new wiring connections. Having everything ready before you open the electrical box will save time and reduce the risk of interruptions mid-installation.
One of the most important questions homeowners ask before purchasing a dimmer switch is whether it will work with their existing light bulbs. The short answer is: not always. Dimmer switches are not universally compatible, and using the wrong bulb type can cause flickering, buzzing, or even damage to the dimmer itself. Understanding bulb compatibility early helps you avoid costly mistakes and choose the right dimmer from the start.
Beyond the standard single-pole setup, some homes have more complex wiring configurations, including 3-way circuits, smart home systems, or low-voltage lighting rigs. These scenarios each require a slightly different approach, and knowing where your installation falls on that spectrum will help you plan more accurately.
What Is a Dimmer Switch?
A dimmer switch is an electrical control device that regulates the amount of power delivered to a light fixture, allowing you to adjust brightness from fully off to fully on and anywhere in between. Unlike a standard on/off switch, a dimmer uses a component called a TRIAC (Triode for Alternating Current) to rapidly cycle power on and off many times per second, effectively reducing the average voltage reaching the bulb and lowering its output accordingly.
To understand why this matters for your installation, it helps to know how a dimmer differs from a conventional toggle switch. A regular switch simply completes or breaks a circuit. A dimmer, by contrast, modifies the waveform of the alternating current so that the bulb receives less energy per cycle. This mechanism is why dimmer switches have a slightly different wiring configuration and why they generate a small amount of heat during normal operation. Specifically, dimmer switches contain electronic components that a standard switch does not, which means the installation process involves a few additional considerations around wire identification and load compatibility.
The most common residential dimmer switches operate on standard 120V AC circuits (or 240V in some countries) and are designed primarily for lighting loads, not motors or fans. Recognizing this distinction upfront will help you confirm that you are buying the correct type of device for your specific use case before you ever pick up a screwdriver.
What Tools and Materials Do You Need to Install a Dimmer Switch?
Installing a dimmer switch requires seven essential tools and materials: a flathead screwdriver, a Phillips screwdriver, a non-contact voltage tester, needle-nose pliers, wire strippers, wire nuts, and the new dimmer switch itself, along with electrical tape and the mounting screws typically included with the device.
Here is a complete breakdown of what you need and why each item matters:
Tools:
- Flathead screwdriver: Used to remove the cover plate screws and, in some cases, to release terminal screws on the old switch.
- Phillips screwdriver: The most commonly needed screwdriver for mounting screws that hold the switch body inside the electrical box.
- Non-contact voltage tester (NCV tester): This is the single most important safety tool on the list. It detects the presence of live voltage without requiring physical contact with a wire, confirming whether the circuit is truly de-energized before you touch anything.
- Needle-nose pliers: Useful for bending wire ends into hooks for screw terminals or for pulling wires out of a tight electrical box.
- Wire strippers: Needed if any wire ends are too short or if insulation needs to be removed to expose fresh copper for a secure connection.
Materials:
- New dimmer switch: Choose a model rated for your bulb type (LED, incandescent) and your circuit configuration (single-pole or 3-way). Check the wattage rating on the packaging.
- Wire nuts: Used to twist-connect multiple wires together, especially the ground wires. Most dimmer switch packages include at least one or two.
- Electrical tape: Applied over wire nut connections for added insulation, particularly useful in crowded electrical boxes.
- Cover plate (wall plate): Usually included with the dimmer switch. Confirm it is compatible with your wall opening before starting.
According to the Electrical Safety Foundation International (ESFI), more than 51,000 home electrical fires occur each year in the United States, many caused by improper wiring or skipped safety steps. Using a non-contact voltage tester before touching any wire is not optional; it is the minimum standard of practice for any DIY electrical work.
How Do You Install a Dimmer Switch Step by Step?
Installing a dimmer switch follows a three-phase process: safety preparation (turning off power and confirming the circuit is dead), physical installation (removing the old switch and connecting the new one), and final verification (testing the dimmer and completing the assembly). Each phase contains specific steps that must be completed in order to ensure a safe and functional result.
The following three sections walk through each phase in detail, so you can follow along confidently even if this is your first time working inside an electrical box.
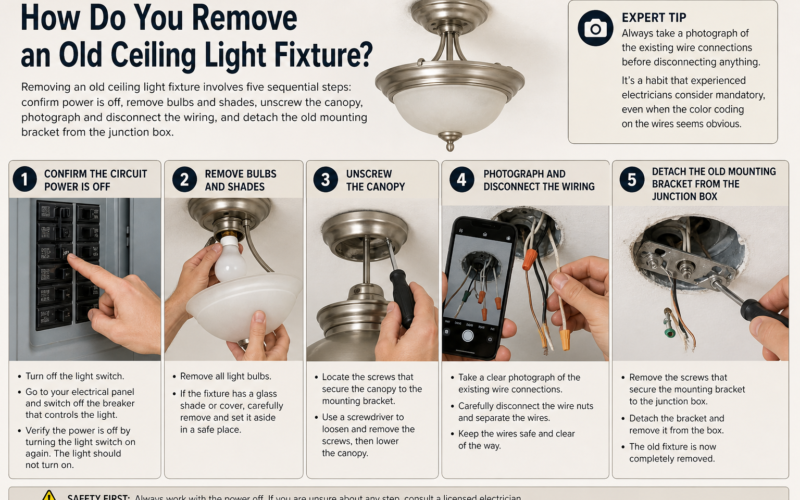
How Do You Turn Off Power and Remove the Old Switch Safely?
Yes, you must turn off power at the circuit breaker before touching any wiring, and you must verify the circuit is dead with a voltage tester before removing the old switch. Skipping either step puts you at serious risk of electrical shock, even if the breaker appears to be labeled correctly.
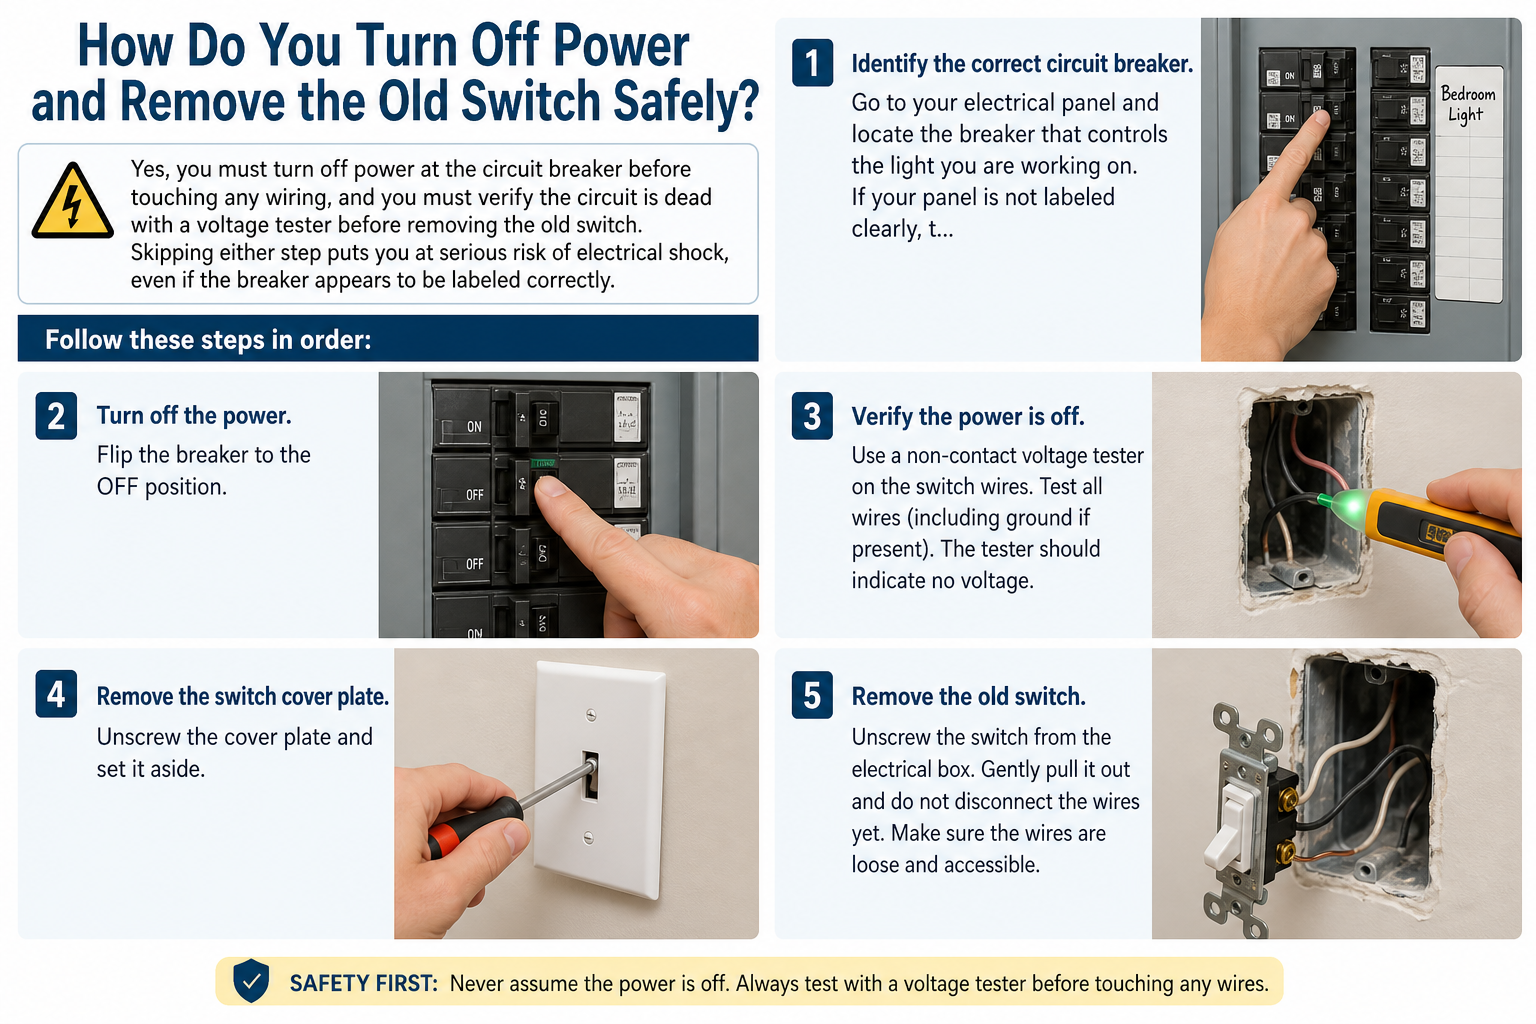
Follow these steps in order:
- Identify the correct circuit breaker. Go to your electrical panel and locate the breaker that controls the light you are working on. If your panel is not labeled clearly, turn on the light, then flip breakers one at a time until the light goes off.
- Turn off the breaker and tape it. Flip the breaker to the OFF position. Place a piece of tape over it with a note that reads “DO NOT SWITCH ON” to prevent anyone in the household from accidentally restoring power while you are working.
- Test with a non-contact voltage tester. Return to the switch, remove the cover plate, and hold the tip of your voltage tester near the switch body and each visible wire. If the tester beeps or lights up, power is still present and you must identify the correct breaker before proceeding.
- Photograph the existing wiring. Before disconnecting anything, take a clear photo of the current switch and all wire connections from multiple angles. This reference image will be invaluable when connecting the new dimmer, especially if wires are labeled inconsistently.
- Remove the old switch. Unscrew the two mounting screws holding the switch body in the electrical box and gently pull the switch forward. Loosen the terminal screws or press the release tabs (depending on switch type) to free each wire. Set the old switch aside.
How Do You Connect the Wires to the New Dimmer Switch?
The wires connecting to a dimmer switch are typically a black hot wire, a black or red load wire, a bare copper or green ground wire, and sometimes a white neutral wire. Correctly identifying each wire before making any connection is the foundation of a safe and functional installation.
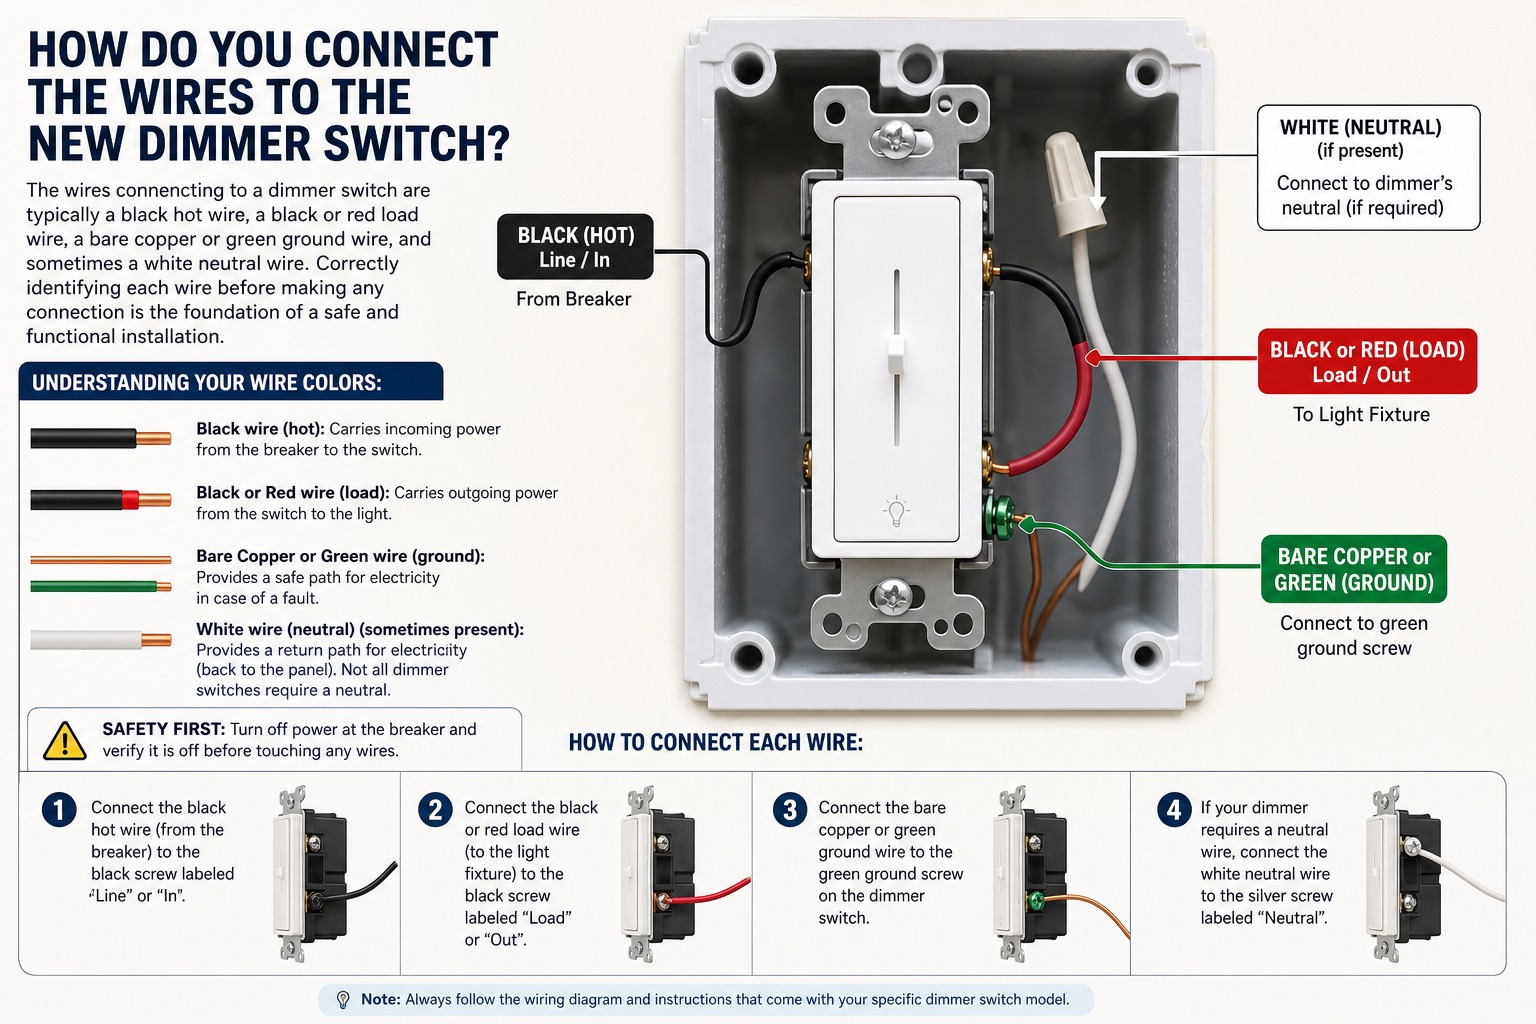
Here is how to connect each wire:
Understanding your wire colors:
- Black wire (hot): Carries incoming power from the breaker to the switch.
- Black wire from dimmer (load): Carries outgoing power from the switch to the light fixture. Some dimmers have two black wires coming out of the device body and label one “HOT” and one “LOAD” on the instruction sheet.
- White wire (neutral): Present in some wiring configurations. Wrap a small piece of black tape around it to indicate it is being used as a hot/load conductor if the dimmer instructions call for it.
- Bare copper or green wire (ground): Connects to the green ground screw or green ground wire on the dimmer.
Step-by-step wiring process:
- Read the dimmer’s included wiring diagram. Every dimmer switch ships with an instruction sheet that includes a diagram specific to that model. Match the diagram to your existing wires before connecting anything.
- Connect the ground wire first. Attach the bare copper or green ground wire from your wall to the green terminal screw or green pigtail wire on the dimmer. Use a wire nut if joining two wires together, and tighten securely.
- Connect the hot wire. Attach the black wire from the wall (incoming power) to the designated HOT terminal or wire on the dimmer. Follow the instructions for your specific model.
- Connect the load wire. Attach the wire going to your light fixture to the LOAD terminal or wire on the dimmer. If your dimmer has two identical black wires, the instruction sheet will specify which is which.
- Secure all connections. Twist wire nuts clockwise until firm, then tug gently on each wire to confirm it will not pull free. Wrap electrical tape around each wire nut for added security.
- Fold wires into the box. Gently fold the wires in an accordion pattern and push them into the electrical box, being careful not to pinch any wire. Set the dimmer body against the box and drive the two mounting screws snugly into the mounting ears.
How Do You Test the Dimmer Switch After Installation?
Testing a newly installed dimmer switch requires restoring power at the breaker, turning the switch on, and adjusting the dimmer control to confirm smooth, flicker-free brightness adjustment from minimum to maximum. If the light responds correctly at every level, the installation is complete and the cover plate can be attached.
Follow this testing sequence:
- Restore power at the breaker. Return to the electrical panel and flip the circuit breaker back to ON.
- Turn on the dimmer switch. At the switch location, press or toggle the power button to turn the light on.
- Slide or rotate the dimmer control through its full range. Move the slider or rotate the knob slowly from the lowest setting to the highest. The light should dim smoothly and brighten gradually without flickering, buzzing, or jumping.
- Check for common issues:
– Flickering or buzzing: Usually caused by an incompatible bulb. Confirm the bulb packaging says “dimmable.”
– Dimmer gets warm: Mild warmth is normal. Excessive heat indicates the load may exceed the dimmer’s wattage rating.
– Light does not turn off completely at minimum: Adjust the low-end trim screw (usually a small slot on the side of the dimmer body) until the light fully extinguishes.
- Attach the cover plate. Once everything is working correctly, snap or screw the cover plate into place to complete the installation.
Is a Dimmer Switch Compatible with All Light Bulbs?
No, a dimmer switch is not compatible with all light bulbs. Compatibility depends on the bulb technology, whether the bulb is rated as dimmable, and whether the combined wattage of all bulbs on the circuit falls within the dimmer’s rated load capacity.
Here is how the three main bulb types compare in terms of dimmer compatibility:
| Bulb Type | Dimmer Compatibility | Notes |
|---|---|---|
| Incandescent | Excellent | Works with virtually all dimmers; the original standard for dimmable lighting |
| Halogen | Excellent | Similar technology to incandescent; compatible with most standard dimmers |
| Dimmable LED | Good | Must be labeled “dimmable”; performance varies by brand and dimmer model |
| Non-dimmable LED | None | Will flicker, buzz, or fail prematurely when used with a dimmer |
| CFL (Compact Fluorescent) | Poor | A small subset of CFLs are labeled dimmable, but range is often narrow |
The table above shows the compatibility spectrum across five common bulb types, ranging from incandescent (fully compatible) to non-dimmable LED (completely incompatible). Incandescent and halogen bulbs have always worked well with dimmers because their resistance naturally decreases as power is reduced. LED bulbs require a driver circuit to manage this process electronically, which is why only specially designed dimmable LED drivers produce a smooth response.
How to check if your LED bulb is dimmable:
Look at the product label, the bottom of the bulb, or the manufacturer’s packaging for the word “DIMMABLE” or a dimming symbol (a small sun icon with an arrow). If the label does not explicitly state that the bulb is dimmable, assume it is not.
Understanding wattage load capacity:
Every dimmer switch is rated for a maximum wattage load, typically between 150W and 600W for residential models. To calculate your load, add the wattage of all bulbs controlled by the single dimmer. For example, if you have four LED bulbs rated at 10W each, your total load is 40W, well within most dimmers’ capacity. Exceeding the rated wattage causes the dimmer to overheat, shorten its lifespan, and in some cases create a fire hazard.
According to the U.S. Department of Energy (DOE), dimmable LED bulbs paired with compatible dimmer switches can reduce lighting energy consumption by 20 to 90 percent compared to running those same bulbs at full power, making compatibility verification well worth the effort before purchase.
How Is Wiring a 3-Way Dimmer Switch Different from a Single-Pole Dimmer Switch?
A 3-way dimmer switch requires an additional wire called the traveler wire, and at least one of the two switch locations must be replaced with a compatible 3-way dimmer while the other typically uses a matching 3-way accessory switch. A single-pole dimmer controls one light from one location, while a 3-way circuit allows two separate switch locations to control the same light fixture.
The key difference lies in the wiring. A single-pole dimmer connects to one hot wire, one load wire, and one ground. A 3-way circuit adds two traveler wires that run between the two switch boxes, creating a communication path so that either switch location can change the state of the light. When installing a 3-way dimmer, you must identify the common terminal (the dark-colored screw) on the old switch and connect the corresponding wire to the common terminal of the new dimmer. The two traveler wires connect to the remaining terminals without regard to polarity. Check the specific diagram included with your 3-way dimmer, as wiring configurations vary by brand and model.
How Do You Install a Smart Dimmer Switch If There Is No Neutral Wire?
Smart dimmer switches such as the Lutron Caseta and Leviton Decora Smart typically require a neutral wire to power their onboard Wi-Fi radio and electronics when the switch is in the off position. If your electrical box does not contain a neutral wire (common in older homes wired before the 1980s), you have two options.
First, check whether the white wire in your box is being used as a neutral by touching it with your voltage tester while the circuit is live. If it reads no voltage, it is likely a true neutral. Second, if no neutral is present, look for “no-neutral” or “no-neutral required” smart dimmers such as the Lutron Caseta PD-6ANS or Leviton DSL06. These models draw a small amount of power through the load wire to stay operational, but they require dimmable LED or incandescent bulbs to function correctly. Non-dimmable or very low-wattage LED loads may not provide enough minimum current for a no-neutral dimmer to operate reliably.
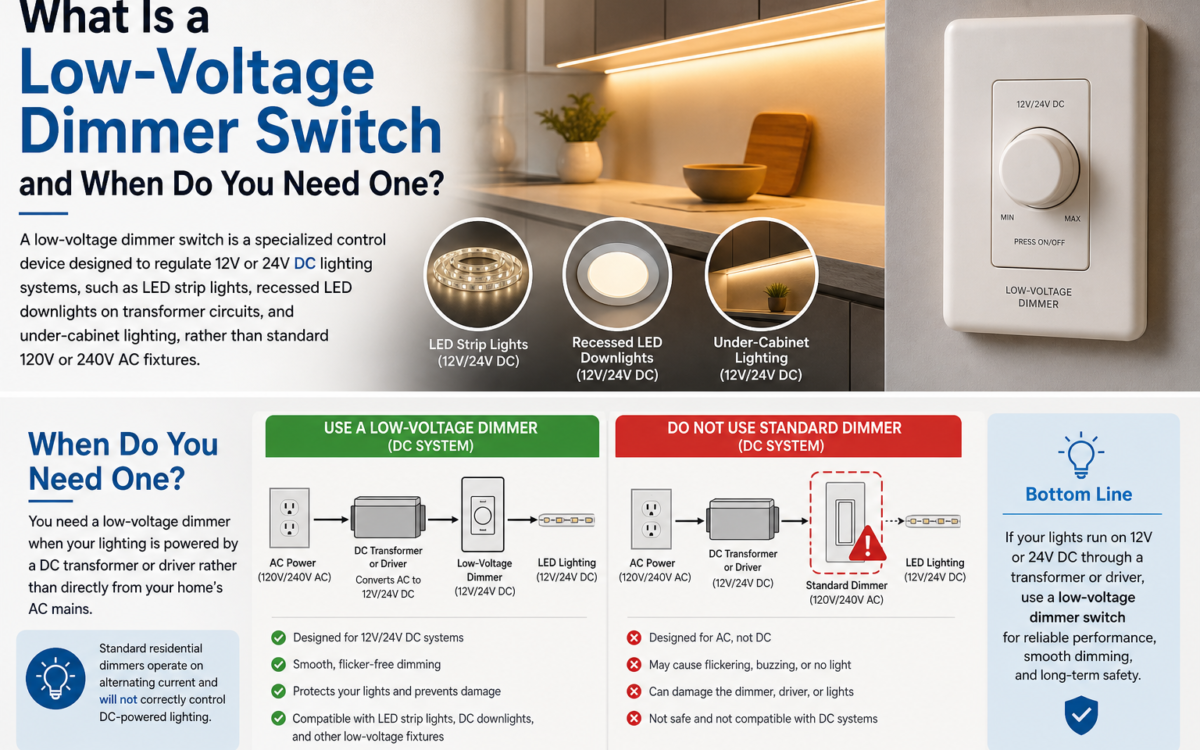
What Is a Low-Voltage Dimmer Switch and When Do You Need One?
A low-voltage dimmer switch is a specialized control device designed to regulate 12V or 24V DC lighting systems, such as LED strip lights, recessed LED downlights on transformer circuits, and under-cabinet lighting, rather than standard 120V or 240V AC fixtures.
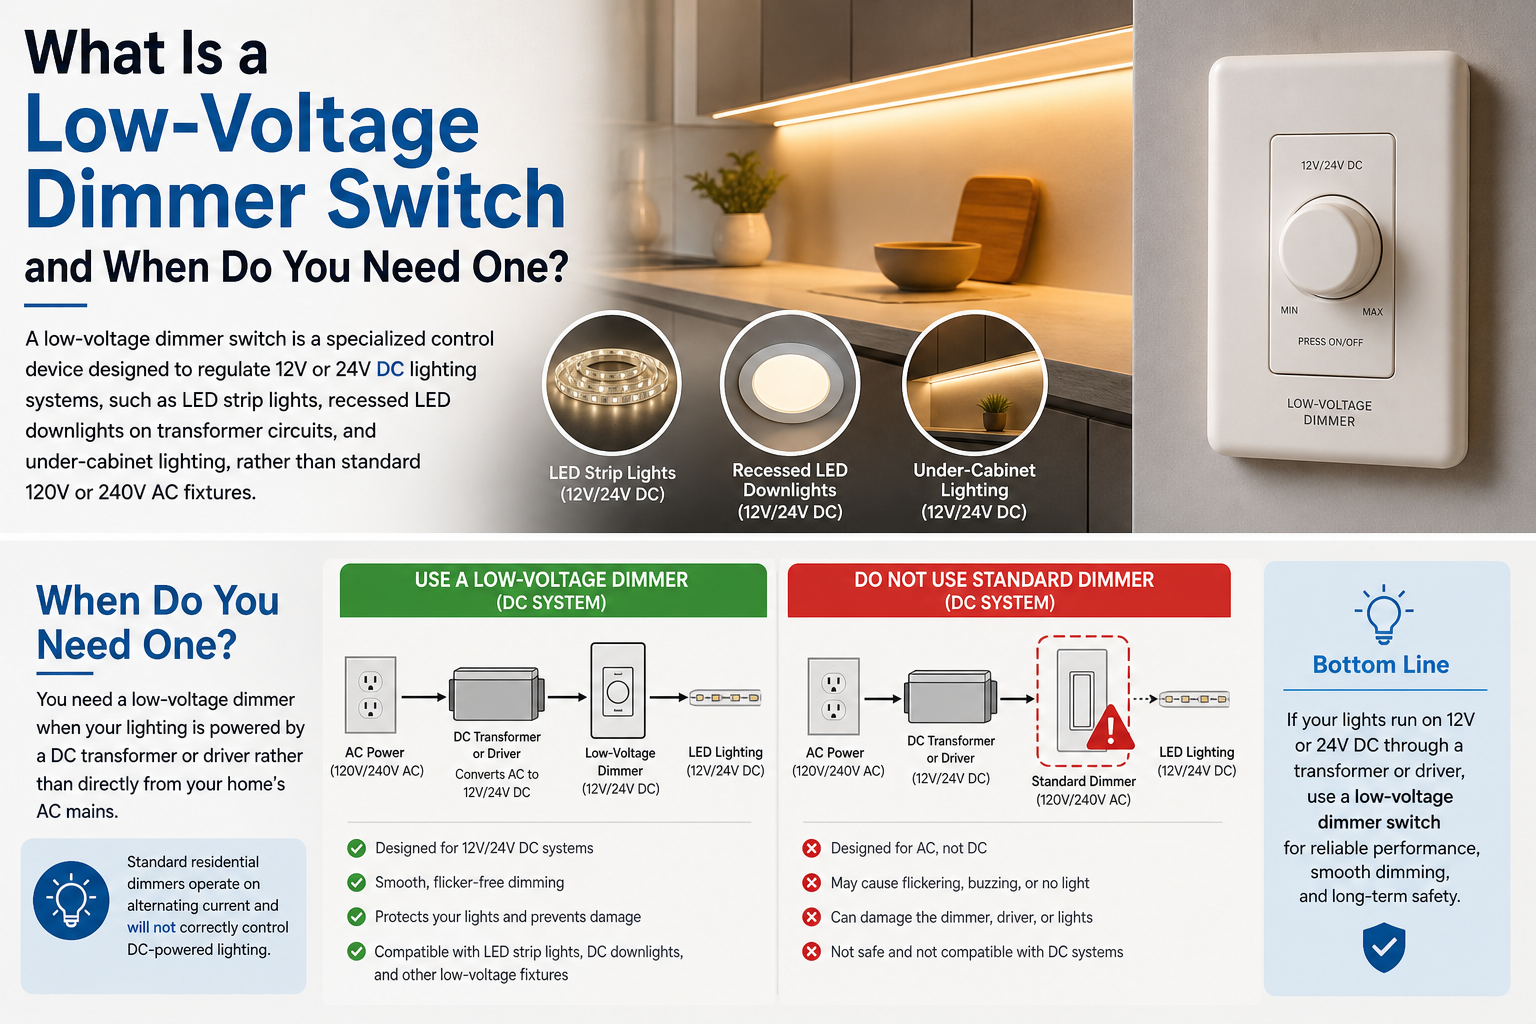
You need a low-voltage dimmer when your lighting is powered by a DC transformer or driver rather than directly from your home’s AC mains. Standard residential dimmers operate on alternating current and will not correctly control DC-powered fixtures; using the wrong type can damage both the dimmer and the LED driver. Low-voltage dimmers are commonly found in kitchen cabinet lighting, outdoor landscape lighting systems, and retail display environments. They typically connect either inline (between the transformer output and the LED strip) or via PWM (pulse-width modulation) output, depending on the driver type. Always match the dimmer’s voltage rating and maximum amperage to your specific transformer and lighting load before installation.