Replacing a ceiling light fixture is a straightforward DIY task that most homeowners can complete safely in under two hours, provided you follow the correct sequence of steps from start to finish. The process covers five core stages: shutting off power at the circuit breaker, removing the old fixture, connecting the wiring on the new unit, mounting the new fixture securely, and testing the installation before calling the job done. Whether you are upgrading a dated flush mount for a modern pendant or simply swapping a burnt-out fixture for a fresh one, the underlying procedure remains consistent across most standard ceiling light types.
Before you begin, gathering the right tools and materials is the single most important preparation step you can take. You will need a flathead and Phillips-head screwdriver, needle-nose pliers, wire strippers, a non-contact voltage tester, a sturdy ladder, wire nuts, and electrical tape. The new fixture itself should come packaged with a mounting bracket, a canopy, and hardware screws. Confirming your kit is complete before climbing the ladder saves considerable time and prevents the frustration of discovering a missing component mid-installation.
Safety is the non-negotiable foundation of every electrical DIY project. Beyond turning off the wall switch, you must cut power at the circuit breaker panel and physically verify with a voltage tester that no live current remains in the ceiling wires before touching them. Understanding these precautions in detail, recognizing the most common mistakes homeowners make during the process, and knowing when to call a licensed electrician instead are the additional layers of knowledge that separate a safe, successful installation from a dangerous one.
What Tools and Materials Do You Need to Replace a Ceiling Light Fixture?
To replace a ceiling light fixture successfully, you need two flathead screwdrivers (one standard, one Phillips-head), needle-nose pliers, wire strippers, a non-contact voltage tester, a stable ladder, wire nuts, electrical tape, and the complete new fixture kit including its mounting bracket and canopy.
Having every item on hand before you start the job is not a matter of convenience. It is a matter of safety. Climbing down a ladder mid-task to retrieve a forgotten tool while live wires are exposed above is one of the most common and preventable causes of electrical accidents in the home. Below is a complete breakdown of every tool, safety device, and material you need to gather before touching your ceiling.
Can You Replace a Ceiling Light Fixture Without an Electrician?
Yes, most homeowners can replace a ceiling light fixture without an electrician, as long as they know how to locate and operate their circuit breaker panel and understand the basic function of the three wire types: the hot wire (black), the neutral wire (white), and the ground wire (green or bare copper).
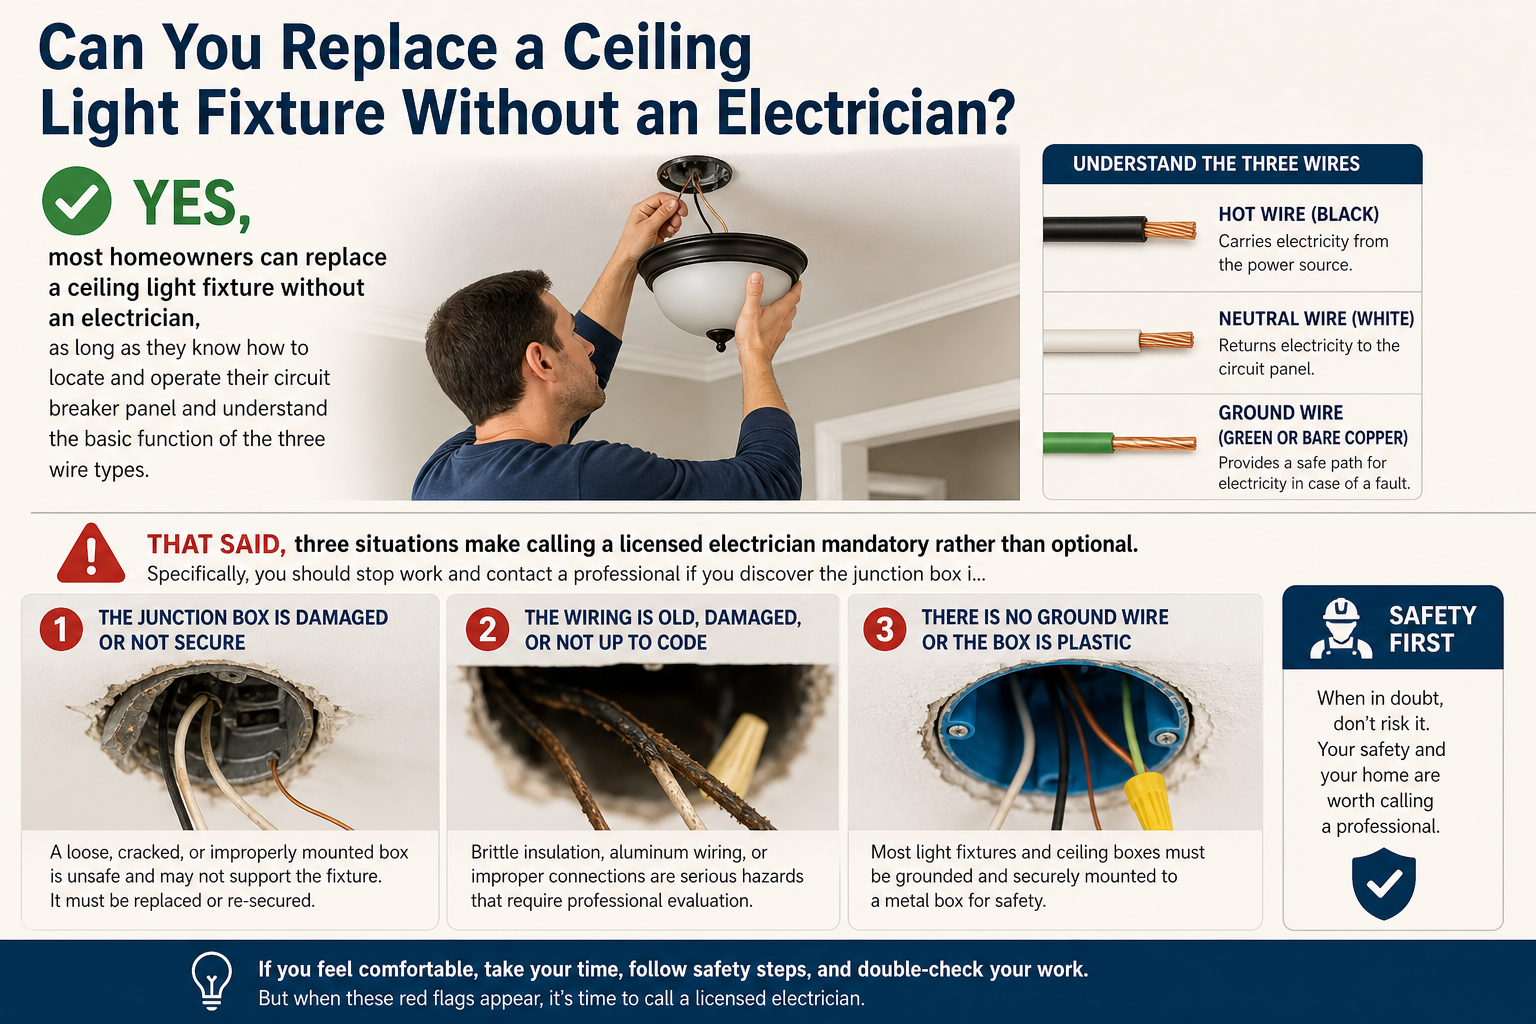
That said, three situations make calling a licensed electrician mandatory rather than optional. Specifically, you should stop work and contact a professional if you discover the junction box is cracked, corroded, or physically unstable; if there is no ground wire present in the ceiling box; or if the existing wiring looks unusual, with silver-colored aluminum conductors or old cloth-wrapped insulation. Beyond safety, some municipalities and counties require a permit for any electrical work, even a simple fixture swap. Before beginning, spend five minutes searching your local building department’s website or calling their office to confirm whether a permit is required in your jurisdiction.
Here is a complete checklist of the tools and materials you need:
Required Tools:
- Flathead screwdriver (standard and small)
- Phillips-head screwdriver
- Needle-nose pliers
- Wire strippers
- Wire cutters
- Sturdy step ladder (rated for your weight plus the weight of the fixture)
- Electrical tape
Required Safety Equipment:
- Non-contact voltage tester (essential, not optional)
- Insulated rubber gloves
- Safety glasses
Required Materials:
- New ceiling light fixture kit (confirm it includes a mounting bracket, canopy, mounting screws, and a ground screw)
- Wire nuts in appropriate sizes (usually included with the fixture; verify before starting)
- A drop cloth or folded blanket placed on the floor directly below the work area to catch falling hardware and protect the old fixture from shattering on impact
Before opening your new fixture box, read the included instruction sheet completely. Manufacturers occasionally ship fixtures with proprietary mounting brackets that differ from the standard crossbar design. Knowing this in advance prevents confusion when you are standing on a ladder with both hands overhead.
What Are the Safety Precautions Before Replacing a Ceiling Light Fixture?
The three non-negotiable safety precautions before replacing a ceiling light fixture are: cutting power at the circuit breaker (not just the wall switch), verifying the power is off using a non-contact voltage tester, and securing your work area to prevent falls and dropped tools.
Turning off the wall switch alone is insufficient. The wall switch only interrupts the hot wire, meaning neutral and sometimes hot wires in the ceiling box can still carry live current depending on how the circuit is wired. The only way to guarantee zero voltage at the fixture is to open your electrical panel, identify the correct breaker for the room, flip it to the OFF position, and then place a strip of tape over it with a handwritten note reading “DO NOT TURN ON — WORK IN PROGRESS.” This prevents another household member from inadvertently restoring power while you have your hands inside the ceiling box.
Follow this safety sequence in strict order before beginning any disassembly:
- Go to the electrical panel and switch off the circuit breaker that controls the room where you are working. If breakers are unlabeled, use a lamp or phone charger plugged into a nearby outlet and flip breakers one by one until the device loses power.
- Return to the room and flip the wall switch to the ON position. This ensures that if any current remains, it will be apparent when you test.
- Position your ladder directly below the fixture. Use a non-contact voltage tester by holding it near the fixture canopy before you unscrew anything. A beep or flashing light means power is still live. Go back to the breaker panel and find the correct circuit.
- Once the tester confirms no voltage, place your drop cloth on the floor beneath the ladder.
- Put on your insulated gloves and safety glasses before touching any part of the fixture.
According to the U.S. Consumer Product Safety Commission, electrical failures and malfunctions are responsible for an estimated 51,000 home fires each year, resulting in nearly 500 deaths and 1,400 injuries annually. The majority of these incidents involve improper wiring or work performed on energized circuits. Verifying power shutoff with a tester takes less than thirty seconds and eliminates that risk entirely.
How Do You Replace a Ceiling Light Fixture Step by Step?
Replacing a ceiling light fixture follows a clear 10-step process: cut power at the breaker, remove the old bulbs and canopy, disconnect the old wiring, unmount the old bracket, install the new bracket, connect the new wires, tuck the connections into the junction box, attach the new canopy, install bulbs, and restore power to test.
This section covers the complete hands-on procedure. Each step builds directly on the one before it, so skipping or reordering steps introduces both functional and safety risks. Follow the sequence below exactly as written.
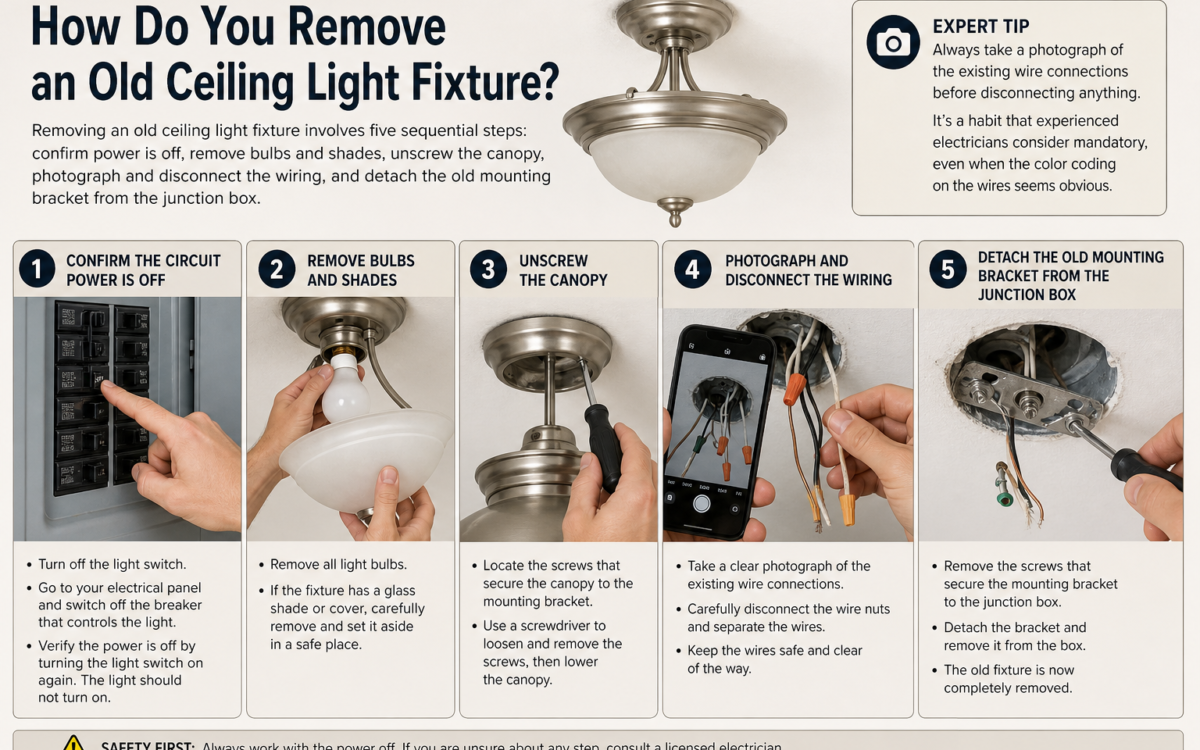
How Do You Remove an Old Ceiling Light Fixture?
Removing an old ceiling light fixture involves five sequential steps: confirm power is off, remove bulbs and shades, unscrew the canopy, photograph and disconnect the wiring, and detach the old mounting bracket from the junction box.

Taking a photograph of the existing wire connections before disconnecting anything is a habit that experienced electricians consider mandatory, even when the color coding on the wires seems obvious. Here is the complete removal sequence:
Step 1: Confirm the circuit breaker is OFF and test with your voltage tester. Do not skip this even if you completed the test five minutes ago. Confirm again at the canopy before touching it.
Step 2: Remove the light bulbs one by one. Set them aside carefully. If the fixture has a glass shade or diffuser panel held by retaining screws or a finial nut at the center, support the shade with one hand and unscrew the fastener with the other. Glass shades are heavier than they look. Never let go of a glass component until it is resting on a stable surface.
Step 3: Remove the canopy. The canopy is the decorative cover that sits flush against the ceiling and hides the junction box. Most canopies are held in place by a central collar nut, which you turn counterclockwise to loosen, or by two to three small screws around its perimeter. Support the canopy from below as the last fastener releases. The canopy may swing down on a hinge or fall free entirely depending on the design.
Step 4: Photograph the wire connections. With the junction box now exposed, use your phone to photograph every wire connection clearly before touching any of them. This image becomes your reference guide during reinstallation.
Step 5: Disconnect the wiring. Using your needle-nose pliers, grip and unscrew the wire nuts (also called wire connectors) by turning them counterclockwise. Once each nut is removed, gently pull the twisted wire pairs apart. Lay each wire down carefully so it does not retract up into the ceiling box.
Step 6: Inspect the junction box. Before proceeding, spend sixty seconds examining the inside of the box. Look for: scorch marks or heat discoloration on the interior walls (a sign of previous arcing or overheating), cracks in the box body, wires with cracked or crumbling insulation, and any signs of moisture or corrosion. If you find any of these conditions, stop the project and call a licensed electrician. Continuing without addressing these issues creates a fire hazard that no amount of correct wiring technique can mitigate.
Step 7: Remove the old mounting bracket. The bracket is a metal crossbar screwed directly into the junction box using two machine screws. Unscrew both fasteners and pull the bracket free. Set it aside separately from the new hardware to avoid confusing the two.
How Do You Wire and Install a New Ceiling Light Fixture?
Installing a new ceiling light fixture involves mounting the new bracket to the junction box, connecting black to black, white to white, and ground to ground, folding the wires neatly into the box, attaching the canopy, installing the correct bulbs, and restoring power to verify function.
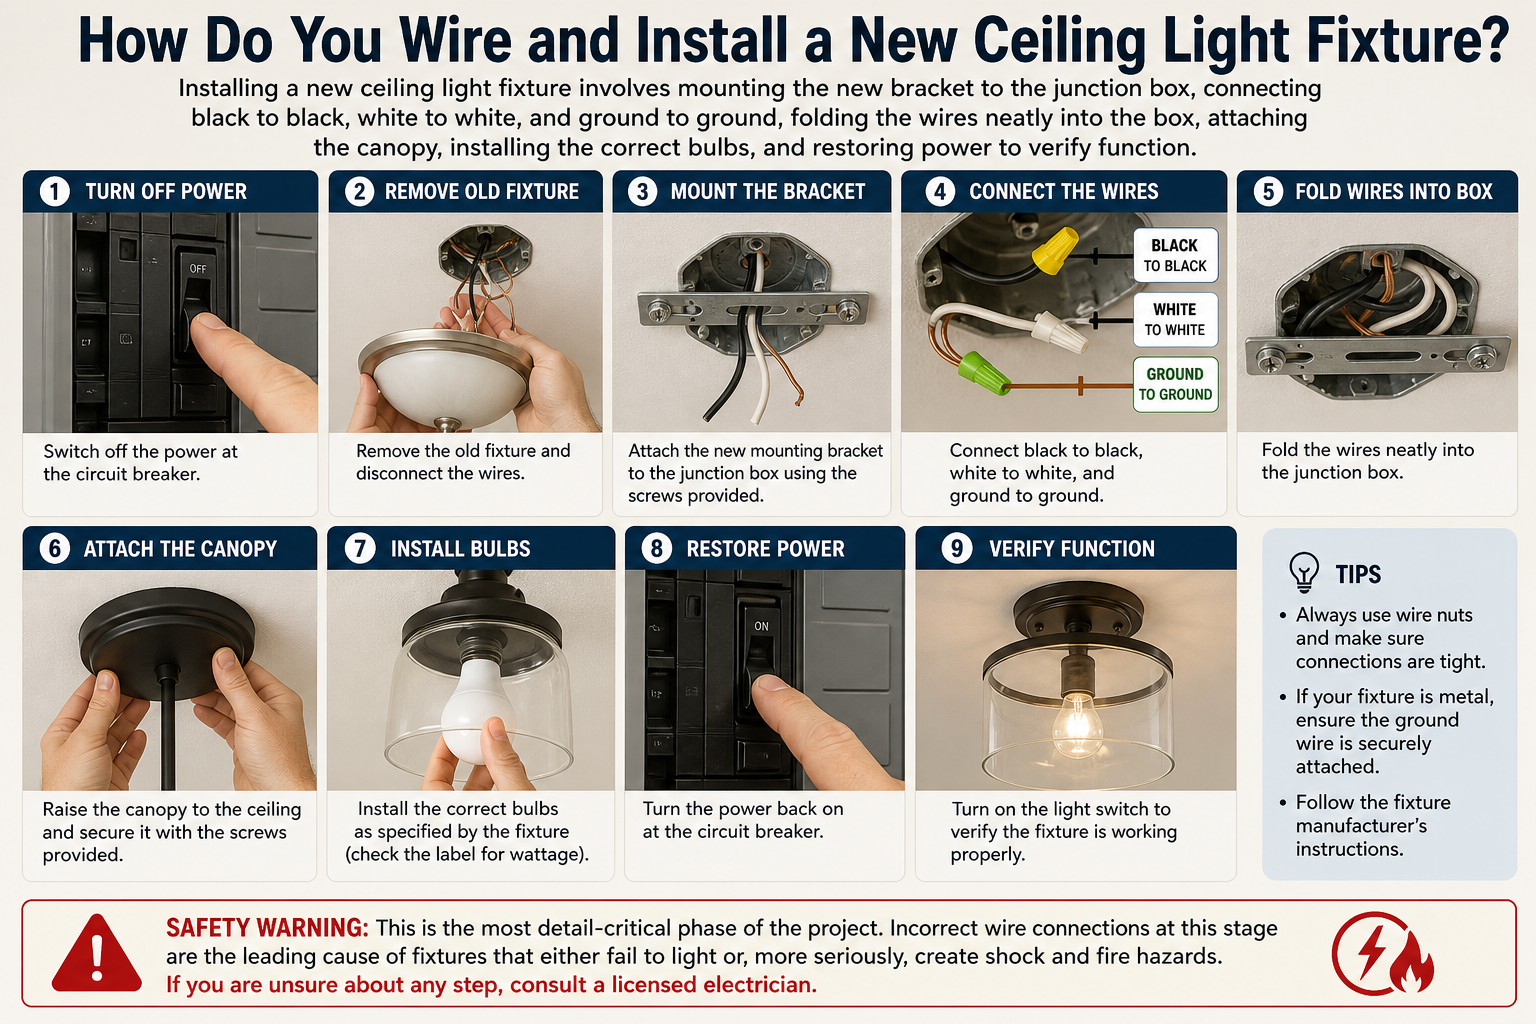
This is the most detail-critical phase of the project. Incorrect wire connections at this stage are the leading cause of fixtures that either fail to light or, more seriously, create shock and fire hazards. Follow each step with deliberate care.
Step 8: Install the new mounting bracket. Open the new fixture’s instruction sheet and identify the mounting bracket. Most standard fixtures use a crossbar-style bracket that threads into the junction box’s existing mounting studs. Align the bracket’s center hole with the center of the junction box and tighten both mounting screws firmly. Grip the bracket and tug it with moderate force: it should not shift, rotate, or flex. A loose bracket is the number-one cause of ceiling fixtures that sag or pull away from the ceiling over time.
Step 9: Connect the wiring. This is the most critical step in the entire installation. Follow this wiring sequence exactly:
- Black wire to black wire (hot connection): Hold the stripped ends of the two black wires side by side. Twist them clockwise together with pliers until the copper strands are tightly unified. Thread a wire nut clockwise over the twisted ends until it is snug and will not spin freely when tugged.
- White wire to white wire (neutral connection): Repeat the exact same process with the two white wires.
- Ground wire connection: The ground wire from the ceiling (green insulation or bare copper) connects to the ground wire from the fixture AND to the green ground screw on the new mounting bracket. Wrap the bare copper or green wire from the ceiling around the green screw on the bracket clockwise and tighten the screw firmly. Then twist the fixture’s ground wire together with the ceiling ground wire and cap with a wire nut.
After completing all three connections, perform a tug test: grip each wire nut firmly and pull downward with moderate force. If a wire slides out of the nut, strip an additional quarter inch of insulation, re-twist the conductors, and apply a new wire nut.
Step 10: Fold the wiring into the junction box. This step is where many first-time installers create problems by rushing. Push the wire nuts upward into the box gently, folding the excess wire length in a loose accordion pattern rather than jamming it in with force. Pinched or sharply bent wires develop insulation cracks over time. The goal is to have all connections sitting comfortably inside the box with no wire jacket pinched between the canopy edge and the ceiling surface.
Step 11: Attach the canopy. Lift the canopy flush against the ceiling and align it with the mounting bracket’s threaded stud or screw locations. Tighten the collar nut or mounting screws until the canopy sits flat and stable against the ceiling surface with no visible gap.
Step 12: Install the bulbs and test. Install bulbs that match the fixture’s maximum wattage rating, which is printed on a label inside the canopy or socket housing. Installing a 100-watt bulb in a fixture rated for 60 watts generates heat that can melt the socket’s wiring insulation over days or weeks. Once bulbs are in place, return to the electrical panel and switch the circuit breaker back ON. Return to the room and flip the wall switch. The fixture should illuminate immediately.
If the fixture does not light: First, check that the circuit breaker is fully in the ON position (not tripped to the middle). Next, climb the ladder, switch the breaker OFF again, and open the canopy to re-examine the wire nut connections. A loose neutral or hot connection is the most common cause of a fixture that fails to light after installation. Re-test all connections and repeat the test sequence.
What Are the Most Common Mistakes When Replacing a Ceiling Light Fixture?
Homeowners replacing a ceiling light fixture most commonly make six mistakes: relying on the wall switch instead of the circuit breaker to cut power, making incorrect or loose wire connections, ignoring the ground wire, overloading the junction box, installing over-wattage bulbs, and failing to photograph the original wiring before disassembly.
Understanding these errors in advance means you can build deliberate checkpoints into your workflow rather than discovering the problem after the fixture is already mounted and the canopy is screwed shut. Here is a detailed breakdown of each mistake and how to avoid it.
Mistake 1: Cutting only the wall switch instead of the circuit breaker.
Flipping the wall switch to OFF interrupts the hot wire at the switch leg, but the wiring configuration inside your ceiling box may still have a live neutral or even a live hot depending on whether the switch is wired at the source or at the end of the run. The only reliable method is to cut the breaker and verify with a non-contact voltage tester. There is no substitute for this step.
Mistake 2: Connecting wires incorrectly or leaving wire nuts loose.
Black to white and white to black is a wiring error that creates a reverse-polarity circuit. While the light may still turn on, the fixture’s shell and socket become energized with hot voltage rather than neutral voltage, creating a shock hazard every time someone changes a bulb. Always match colors precisely: black to black, white to white. After twisting wire nuts on, apply a short wrap of electrical tape around the base of each nut as secondary insurance against loosening.
Mistake 3: Omitting the ground wire connection.
Some homeowners skip the ground wire connection because the light appears to work without it. The ground wire is a fault-protection path. If a wiring fault causes the fixture’s metal parts to become energized, the ground wire carries that fault current safely to the panel and trips the breaker before it reaches a person. Skipping it does not affect day-to-day operation until the moment a fault occurs, at which point the consequence is electrocution rather than a tripped breaker.
Mistake 4: Exceeding the junction box’s weight capacity.
Standard plastic electrical boxes are rated for fixtures weighing 35 pounds or less. A heavy chandelier or large semi-flush fixture can weigh significantly more. When the fixture’s weight exceeds the box’s rating, the mounting hardware pulls progressively loose over months until the fixture drops from the ceiling. Always check the weight rating stamped on the inside of the junction box and compare it against the fixture’s listed weight before purchasing.
Mistake 5: Installing bulbs that exceed the fixture’s maximum wattage.
Every fixture has a maximum wattage label inside the canopy or socket. Exceeding this rating causes the socket’s internal wiring and heat-resistant materials to overheat. Over time, the insulation around the wires inside the fixture degrades and cracks, creating a fire ignition point. If you want brighter light, switch to LED bulbs rather than higher-wattage incandescents. A 10-watt LED produces approximately the same lumen output as a 60-watt incandescent while generating far less heat.
Mistake 6: Skipping the photograph of the existing wire connections.
Color coding on older wiring sometimes fades, or a previous installer may have connected wires in a non-standard configuration. A two-second phone photo before disconnecting anything gives you an exact reference if confusion arises during reconnection. This single habit eliminates one of the most common causes of post-installation troubleshooting.
Are There Special Considerations When Replacing Certain Types of Ceiling Light Fixtures?
Yes, while the core procedure for replacing a ceiling light fixture remains consistent, specific fixture types and older home wiring conditions introduce requirements that fall outside the standard installation process.
A flush mount fixture in a modern home represents the simplest scenario. As soon as you introduce a heavier chandelier, a pendant with a suspended cord, a fixture destined for an older home with pre-1970s wiring, or a smart ceiling light requiring a neutral wire, additional steps and verifications enter the process. The two H3 sections below address the most significant of these special scenarios.
How Is Replacing a Pendant Light or Chandelier Different from a Standard Flush Mount Fixture?
Chandeliers and pendant lights require a junction box rated for their specific weight, typically 35 to 50 pounds minimum, and pendant installations additionally require adjusting the cord or chain length to achieve the correct hanging height for the room.
Standard plastic junction boxes are not rated for chandelier weight. Before purchasing a chandelier or large pendant, locate the weight specification in the product listing and compare it against the load rating stamped inside your existing junction box. If the box is not rated for the fixture’s weight, you must replace it with a fan-rated or chandelier-rated metal junction box before proceeding with installation. These rated boxes anchor directly to a ceiling joist or to a rated expanding brace bar that spans between two joists, giving the fixture a structurally sound attachment point.
For pendant lights, the cord or chain length determines the fixture’s hanging height. A general rule is to hang pendants so the bottom of the shade sits 30 to 36 inches above a countertop or table surface, or 7 feet above a floor in an open room. Most pendants ship with excess cord or chain that you trim or gather at the canopy.
Regarding dimmer switch compatibility: not every LED bulb is dimmable, and not every dimmable LED is compatible with every dimmer switch model. If your room uses a dimmer switch and your new fixture requires LED bulbs, check the bulb manufacturer’s compatibility list before purchasing. Installing an incompatible bulb on a dimmer causes flickering, humming, and premature bulb failure. If needed, replace the dimmer switch itself with a model specified as LED-compatible.
What Should You Know Before Replacing a Ceiling Light Fixture in an Older Home?
In homes built before the 1970s, you may encounter aluminum wiring or knob-and-tube systems that require specialized connectors and, in many cases, a professional electrician’s assessment before any DIY fixture replacement proceeds.
Aluminum wiring, identifiable by its silver color rather than the orange-copper tone of standard copper wire, was used extensively in residential construction from the mid-1960s through the mid-1970s. Aluminum oxidizes more aggressively than copper, causing connections to loosen over time and generating heat at junction points. Standard wire nuts are not rated for aluminum-to-copper connections. If you find aluminum wiring in your ceiling box, you must use connectors specifically rated CO/ALR (which stands for copper-aluminum, revised) and apply an anti-oxidant compound at each connection. Given the increased complexity and the fire risk associated with improperly handled aluminum wiring, consulting a licensed electrician before proceeding is strongly recommended.
Knob-and-tube wiring, found in homes built before approximately 1940, presents a more significant challenge. This system has no ground wire at all, meaning standard three-wire modern fixtures cannot be grounded. Additionally, the cloth insulation surrounding knob-and-tube conductors becomes brittle and cracks with age. Any homeowner discovering knob-and-tube wiring during a fixture replacement should treat it as a signal that a whole-house electrical inspection is warranted before any further DIY work.
For smart ceiling lights, two wiring requirements apply that differ from standard fixtures. First, smart fixtures almost universally require a ground wire for safe operation. Second, many smart light controllers require a neutral wire (white) in addition to the hot and ground, because the smart module needs a continuous, low-current power supply to maintain its Wi-Fi, Zigbee, or Z-Wave radio connection even when the light is switched off. Before purchasing a smart ceiling fixture, confirm that your ceiling junction box contains a neutral wire. If the neutral is absent, which occurs in some switch-loop wiring configurations, you will need either a smart fixture that explicitly states “neutral not required” or a licensed electrician to re-route wiring to provide one. After completing the hardware installation, follow the manufacturer’s app-based setup process to connect the fixture to your home network and configure any scheduling, dimming, or automation routines you want.