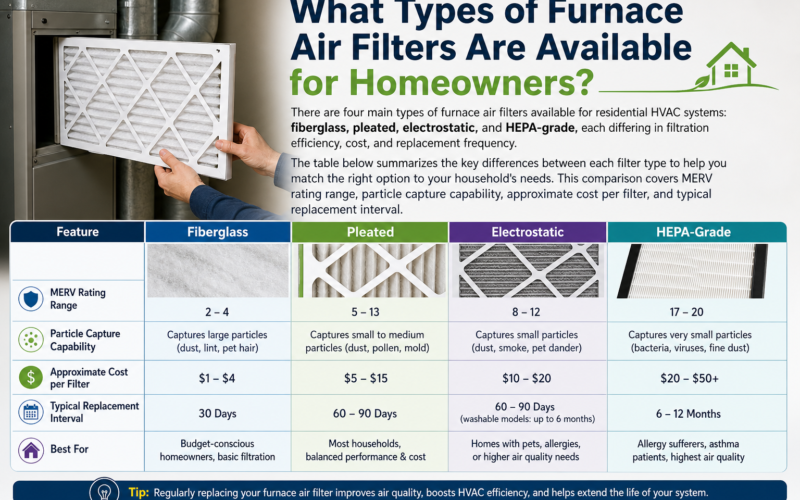
Fixing a drafty window is entirely possible as a DIY project, and in most cases, you can seal air leaks effectively using caulk, weather stripping, window sealant foam, draft snakes, insulation film kits, rope caulk, or an exterior foam backer rod layer. These seven methods address the most common causes of window air leaks, from cracked caulk and degraded rubber gaskets to misaligned sashes and single-pane glass. When applied correctly, they create a tight seal that blocks cold air infiltration and reduces unwanted heat exchange between your interior and the outdoors.
Drafty windows are one of the leading causes of residential energy loss, and understanding how to detect and seal them can make a measurable difference in your utility bills. According to the U.S. Department of Energy, air leaks through windows, doors, and other openings account for 25 to 30 percent of residential heating and cooling energy use. Each of the seven DIY methods covered in this guide targets a specific type of air gap, ranging from hairline cracks in the caulk line to larger structural gaps around the window frame perimeter.
Beyond comfort and cost savings, sealing a drafty window also protects your home from moisture infiltration, which can lead to mold growth, wood rot, and long-term structural damage. This guide walks you through every step, from identifying the problem to choosing the right sealing method for your specific window type, so you can take confident action this weekend without waiting for a contractor.
What Is a Drafty Window and What Causes Air Leaks Around Window Frames?
A drafty window is any window that allows uncontrolled air movement between the interior of a home and the outside environment, primarily through gaps, cracks, or failed sealing materials around the frame, sash, or glazing. These air leaks occur at points where different building materials meet, and they worsen progressively as windows age and materials degrade.
To fully understand the problem, it helps to look at the specific mechanisms that create air gaps and the physics of how heat escapes through them.
What happens to window frames over time that creates air leaks?
Window frames develop air leaks through a combination of material aging, seasonal movement, and mechanical wear. Wood frames expand when wet and contract when dry, which gradually opens gaps at joints and corners. Over years of seasonal cycling, these micro-movements accumulate into visible cracks. Aluminum frames conduct cold aggressively and can warp slightly under temperature extremes, breaking the seal between the frame and the surrounding wall. Vinyl frames are more stable but become brittle over time, and their gaskets compress and lose elasticity after a decade or more of use.
The most common causes of air leaks around window frames include:
- Cracked or missing caulk: The caulk bead along the interior or exterior junction between the window frame and the wall casing shrinks, cracks, and separates over time, leaving open channels for air.
- Degraded weatherstripping: Foam tape, felt strips, and rubber gaskets compress permanently with repeated use and no longer fill the gap between the sash and the frame.
- Warped or settled sashes: The movable part of the window can shift out of alignment, leaving uneven gaps along one or more edges.
- Single-pane glass: Single-pane windows lack the insulating dead air space of double-pane units, making the glass itself a conductor of cold and heat.
- Failed glazing putty: The putty holding glass panes in older wood frames dries out and falls away, exposing gaps between the glass and the frame.
How does heat escape through window air gaps?
Heat escapes through drafty windows through three simultaneous physical processes, each contributing to energy loss in a different way. First, conduction moves heat directly through solid materials, meaning cold glass and metal frames draw warmth out of the room by contact. Second, convection allows warm indoor air to rise toward the top of the window, cool against the cold glass, descend along the frame, and exit through any available gap, creating a continuous loop that pulls heat out of the room. Third, air infiltration physically carries heated or conditioned air out of the home while pulling unconditioned outdoor air in through cracks and gaps around the frame perimeter.
According to Lawrence Berkeley National Laboratory’s research on residential building envelopes, air infiltration alone accounts for up to 40 percent of a home’s heating and cooling load in older housing stock. When all three mechanisms act simultaneously through a single drafty window, the cumulative energy loss from even a modest gap of one-eighth of an inch can be equivalent to leaving a small hole in the wall open year-round.
How Do You Know If Your Window Is Drafty? Signs and Detection Methods
You can detect a drafty window through several reliable methods, including physical sensation near the glass, visual inspection of caulk and weatherstripping, candle or incense smoke testing, the paper-slip test, and a systematic perimeter check of the entire window frame. Each method reveals different types and locations of air leaks, and using more than one approach gives you a complete picture before you start any repair.
Here is how to use each detection method effectively.
What are the physical signs that indicate a window is drafty?
The most obvious signs of a drafty window can be noticed without any tools. A persistent cool sensation when you stand or sit near a window, even when it is fully closed and locked, indicates air infiltration. Curtains or blinds that move slightly when no one is walking past signal a consistent airflow entering from around the frame. A faint whistling or hissing sound during windy conditions points to a gap where air is being forced through a narrow opening at relatively high velocity. Condensation forming on the interior side of the glass in winter, particularly along the lower edge, suggests cold air pooling at the window sill, which is a sign that cold air is entering and cooling the surface below its dew point.
Inside the frame itself, you can see visual warning signs:
- Caulk lines that are cracked, peeling, or have visible gaps between the frame and the wall.
- Weatherstripping that is flat, torn, or missing along the sash perimeter.
- Daylight visible along the window edges when viewed from inside a darkened room.
- Paint bubbling or peeling near the window interior, which can indicate moisture carried in by air infiltration.
How do you test a window for air leaks using a candle or incense?
The candle or incense smoke test is one of the most effective manual methods for pinpointing the exact location of air leaks. To perform this test, close all exterior doors and windows in the home, then turn on all exhaust fans (kitchen hood, bathroom fans) to depressurize the house slightly. This creates a condition where outdoor air is more likely to push through any available gaps.

Light a stick of incense or hold a lit candle near the perimeter of the window you want to test. Move it slowly along the edges of the frame, the corners, the junction between the sash and the frame, and the sill. Watch the smoke or flame carefully:
- Steady horizontal smoke indicates still air, meaning no significant leak at that point.
- Smoke that bends toward the wall or wavers indicates air being drawn inward or moving across the surface, revealing a leak.
- A flame that flickers or leans toward the window confirms air movement from outside.
Mark each location where you detect movement with a piece of painter’s tape so you can address all leak points systematically.
How does the paper slip test reveal gaps in a window seal?
The paper slip test is particularly useful for checking the seal around operable windows such as single-hung, double-hung, and casement types. Place a standard sheet of printer paper or a dollar bill between the sash and the frame, then close and lock the window as you normally would. Try to pull the paper out with steady, moderate force.
If the paper slides out easily or falls out on its own, the sash is not pressing firmly against the weatherstripping, meaning there is a gap that allows air passage. If you feel resistance and the paper tears before releasing, the seal is adequate at that point. Perform this test at multiple locations around the window, including the top rail, bottom rail, and both side jambs, since the gap is often uneven due to sash warping or frame settling.
Can You Fix a Drafty Window Yourself Without Hiring a Contractor?
Yes, you can fix a drafty window yourself without hiring a contractor in the vast majority of cases, particularly when the problem involves failed caulk, worn weatherstripping, deteriorated glazing putty, or gaps that have not caused structural damage to the frame or surrounding wall. DIY window sealing is a well-established home maintenance task that requires only basic tools, modest materials costs, and a few hours of work per window.
Knowing the boundary between a manageable DIY repair and a situation requiring professional intervention will save you time and help you avoid making a structural problem worse.
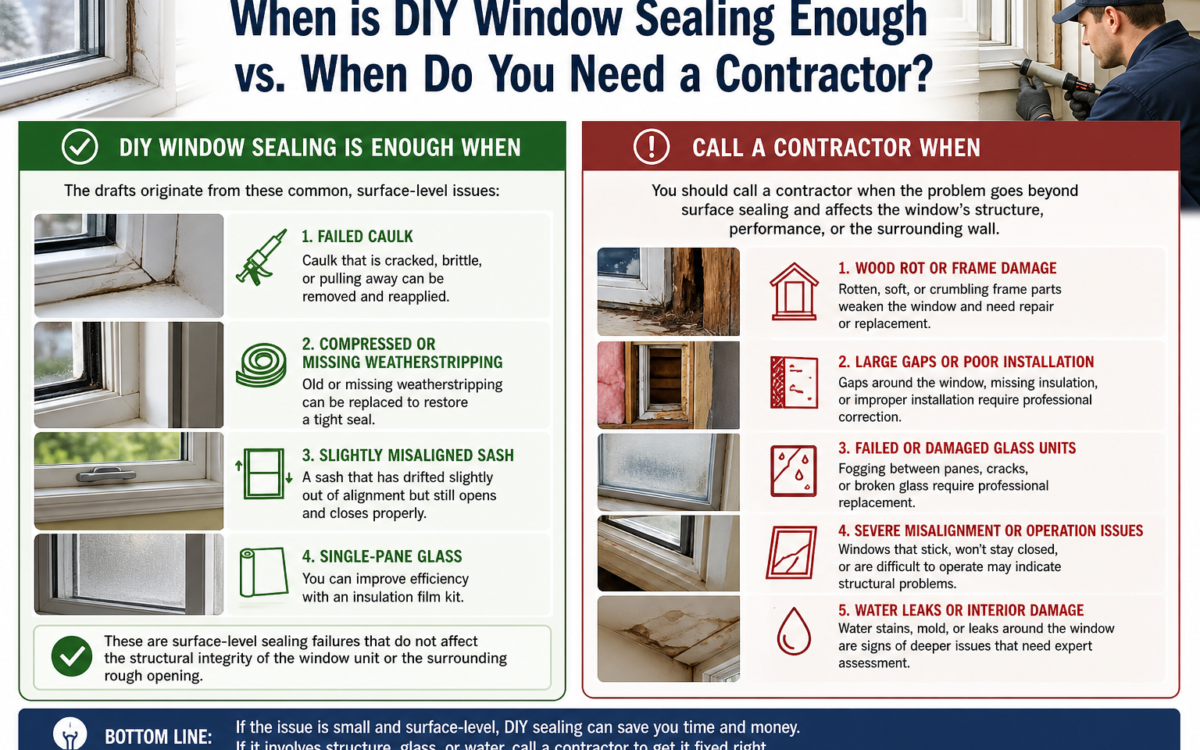
When is DIY window sealing enough versus when do you need a contractor?
DIY sealing is sufficient when the drafts originate from: failed caulk that can be removed and reapplied; compressed or missing weatherstripping that can be replaced; a sash that has drifted slightly out of alignment but still opens and closes properly; or single-pane glass that can be upgraded with an insulation film kit. These are all surface-level sealing failures that do not affect the structural integrity of the window unit or the surrounding rough opening.
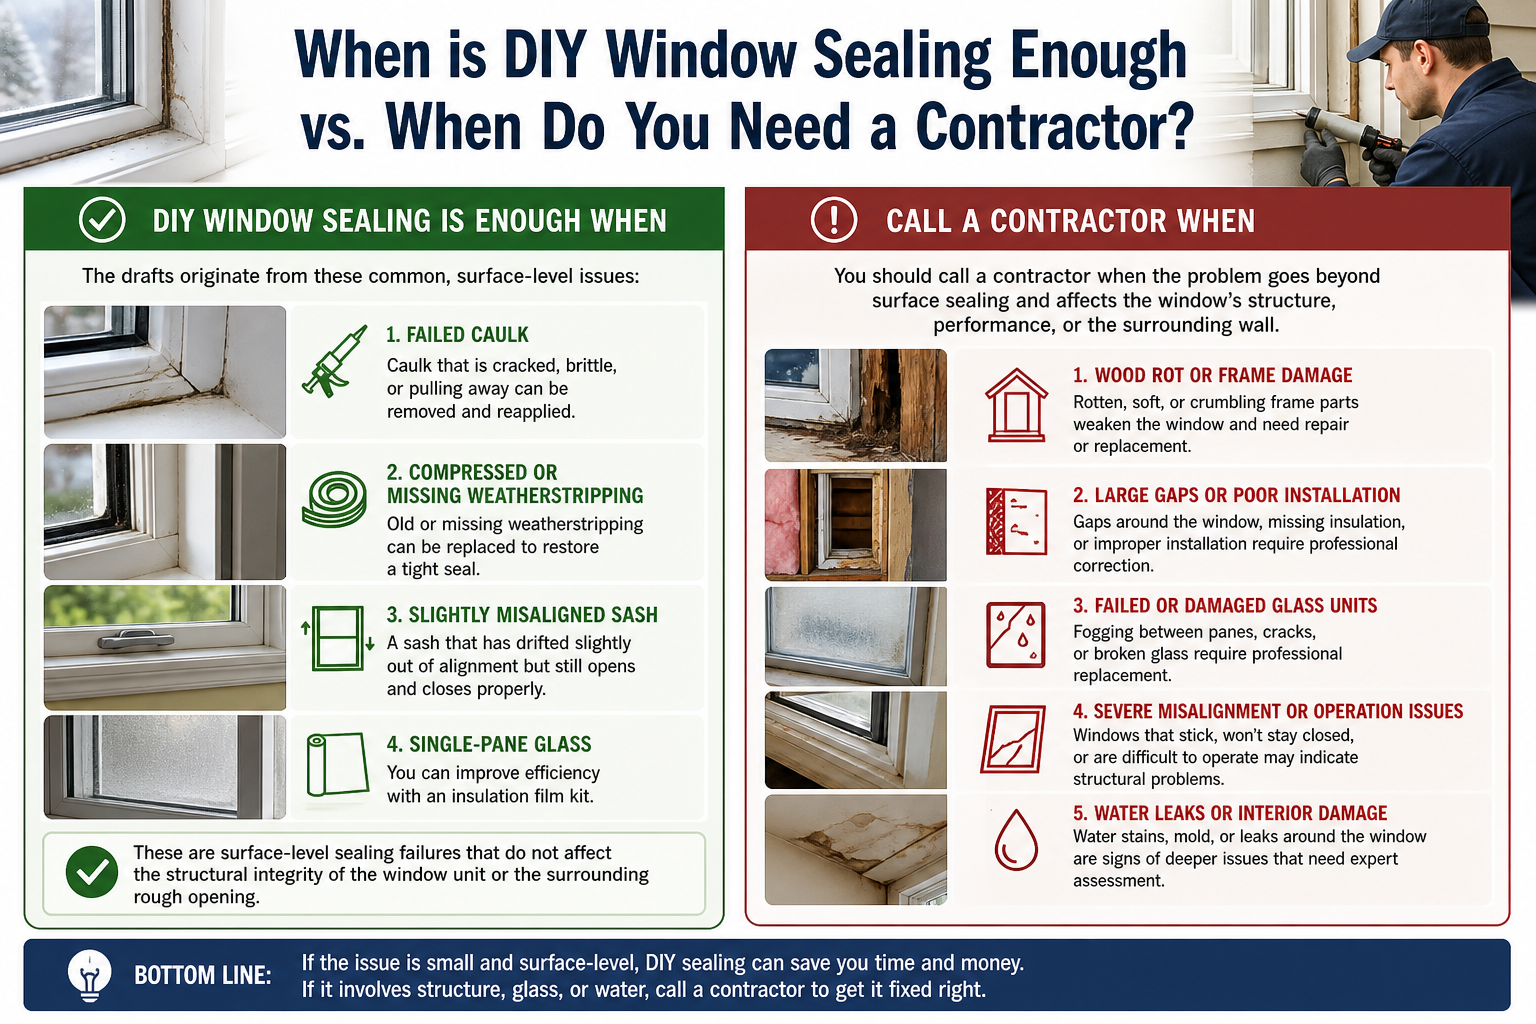
You should call a contractor when you observe: wood framing that is soft, discolored, or crumbling from rot caused by long-term moisture infiltration; condensation forming between the panes of a double-pane insulated glass unit (indicating the gas fill has leaked out and the seal has failed); cracks in the brick or stucco around the window exterior that suggest foundation movement or water damage; or a window sash that no longer closes fully and cannot be realigned without removing the frame.
What tools and materials do you need before starting a DIY window draft repair?
Gathering all materials before you begin prevents interruptions and ensures you can complete the job in a single session. The basic toolkit for most window draft repairs includes:
- Utility knife or box cutter: For removing old caulk beads and cutting weatherstripping to length.
- Caulk removal tool or putty knife: To scrape away deteriorated caulk without gouging the frame.
- Caulk gun: Standard manual or ratcheting caulk gun for applying caulk smoothly.
- Silicone or latex acrylic caulk: Interior-grade for interior gaps, exterior-grade silicone for outdoor applications.
- Foam weatherstripping tape: Self-adhesive closed-cell foam for sealing sash-to-frame contact points.
- Scissors and measuring tape: For cutting weatherstripping to precise lengths.
- Rubbing alcohol and clean rags: To degrease surfaces before applying adhesive-backed materials.
- Window insulation film kit (optional): For complete interior coverage of single-pane or poorly insulated windows in winter.
- Minimal-expanding spray foam (optional): For gaps larger than one-quarter inch that caulk cannot bridge effectively.
The combined cost of these materials for a single window typically ranges from $15 to $60, compared to a professional window service call that begins at $150 to $300 per window depending on your region.
What Are the 7 DIY Ways to Fix a Drafty Window and Seal Air Leaks?
The 7 DIY methods for fixing a drafty window are: applying caulk around the frame perimeter, installing weatherstripping on the sash, using minimal-expanding foam sealant for large gaps, placing draft snakes along the window sill, installing an interior window insulation film kit, pressing rope caulk into seasonal gaps, and applying foam backer rod to exterior gaps. These methods range from a five-minute no-tool fix to a two-hour installation project, allowing you to match the solution to the severity of the leak and your available time.
The key to choosing the right method lies in where the leak is located and how large the gap is. Narrow cracks along caulk lines respond best to caulk. Gaps at the sash-to-frame interface require weatherstripping. Larger structural voids call for foam. Temporary or seasonal gaps suit rope caulk. Whole-window insulation is best addressed with a film kit or exterior foam backer rod.
How Do You Apply Caulk to Seal Gaps Around a Window Frame?
Caulking is the most effective permanent solution for sealing gaps between the window frame and the surrounding wall, and it takes approximately 30 to 60 minutes per window when done properly. The key steps are surface preparation, caulk selection, application, smoothing, and curing.
Choosing the right caulk type matters significantly for durability:
- Silicone caulk: Best for exterior applications and areas exposed to temperature extremes. It is waterproof, flexible, and lasts 20 or more years, but it cannot be painted and requires mineral spirits for cleanup.
- Latex acrylic caulk: Ideal for interior use, easy to smooth with a wet finger, paintable within one to two hours, and cleans up with water. It lasts five to ten years before needing reapplication.
- Polyurethane caulk: Offers the strongest adhesion and flexibility, suitable for both interior and exterior use, and bonds well to wood, metal, and masonry. It is more difficult to tool and requires solvent cleanup.
Step-by-step caulk application process:
- Remove all old caulk using a utility knife and caulk removal tool. Pull the old bead away cleanly and scrape any residue.
- Clean the surface with rubbing alcohol on a clean rag and allow it to dry completely. Caulk adhesion fails on dusty, oily, or damp surfaces.
- Load the caulk tube into the gun and cut the tip at a 45-degree angle to create an opening slightly smaller than the gap width.
- Apply steady, even pressure to the trigger while moving the gun along the gap at a consistent speed, filling the entire void without gaps or excess buildup.
- Smooth the bead immediately with a wet finger or caulk finishing tool, pressing it into the gap to create a good seal and a clean beveled profile.
- Allow the caulk to cure fully before painting or exposing it to moisture. Silicone cures in 24 hours, latex in one to two hours.
Common mistakes to avoid include: applying caulk over old, failed caulk without removing it first; caulking over a damp or cold surface in winter (which prevents adhesion); and cutting the tip too wide, which deposits excess caulk that pulls away from the surface during curing.
How Does Weather Stripping Work and How Do You Install It on a Window?
Weatherstripping works by creating a compressible barrier between the movable sash and the stationary window frame, filling the gap that appears when the sash closes and eliminating the air channel that allows drafts to pass through. It is the primary solution for air leaks at the sash-to-frame interface, which caulk cannot address because those surfaces need to move.
Types of weatherstripping for windows:
- Self-adhesive foam tape (closed-cell): The easiest to install, it sticks directly to the frame stop and compresses when the sash closes. It is affordable and effective but flattens out within one to three years with regular use.
- Felt weatherstripping: A traditional option that is soft and quiet but absorbs moisture and loses its seal faster than foam. It is best for rarely opened windows.
- Silicone or rubber door sweep style: A more durable gasket material that maintains its shape through thousands of compression cycles. It is the preferred choice for high-traffic windows.
- V-strip or tension seal weatherstripping: A metal or plastic strip folded into a V shape that installs inside the sash channel. It provides a tight seal that increases with wind pressure rather than failing under it.
Installation steps for self-adhesive foam weatherstripping:
- Open the window fully and wipe the frame stop surface with rubbing alcohol. Allow to dry for five minutes.
- Measure the length of each side of the frame stop perimeter and cut the foam tape to exact length using scissors.
- Peel back the adhesive backing two to three inches at a time and press the foam firmly onto the frame stop surface, working your way around all four sides.
- Close the window and check that the sash compresses the foam evenly across its full length. If you see a gap, add a second layer of foam tape in that section.
The average lifespan of foam tape weatherstripping is one to three years. Replace it when you can see visible flattening, tearing, or when the paper slip test shows resistance has diminished.
Can Window Sealant Foam Stop Air Leaks Around Large Window Gaps?
Yes, minimal-expanding spray foam sealant can effectively stop air leaks around large window gaps, specifically gaps wider than one-quarter inch that caulk cannot bridge without sagging or cracking. However, the type of foam you use and where you apply it are critical factors that determine whether the repair succeeds or damages your window frame.
When to use spray foam instead of caulk:
Use spray foam when the gap between the window frame and the rough framing around it is wide enough that caulk would fall through or cure in a thin, unsupported bridge that cracks immediately. This typically occurs in older homes where the window was installed without adequate shimming, or in cases where the surrounding framing has shifted over time.
Choosing the right foam product:
- Minimal-expanding or “window and door” foam: This is the only appropriate type for use around window and door frames. Standard “big gap” expanding foam exerts significant outward pressure as it cures, which is strong enough to bow a window frame inward, binding the sash and making the window impossible to open.
- “Big gap” or standard expanding foam: Reserve this exclusively for large voids in non-structural locations, such as behind wall plates, around plumbing penetrations, or in attic areas where frame distortion is not a concern.
Application process for foam around windows:
- Clear the gap of any loose debris, old foam, or deteriorated insulation.
- Lightly mist the gap with water using a spray bottle. Polyurethane foam cures through moisture, and dampening the surface speeds curing and improves adhesion.
- Insert the straw applicator tip into the gap and apply foam in a continuous bead, filling the cavity approximately halfway. The foam will expand to fill the rest.
- Allow the foam to cure fully (typically one to four hours) before trimming the excess flush with the frame using a utility knife.
- Cover the exposed, cured foam surface with caulk or paint, as polyurethane foam degrades rapidly when exposed to ultraviolet light.
Do not apply foam along the interior edge where the window trim meets the wall casing. That narrow, visible joint is a caulk application point, not a foam application point.
How Do Draft Snakes and Door Seals Help Reduce Window Drafts?
Draft snakes placed along the bottom sill of a window provide an immediate, tool-free barrier that blocks cold air infiltration at the most common entry point at the base of the window unit. They are a practical temporary or supplemental solution that requires no adhesives, no tools, and no surface preparation.
A draft snake is a fabric tube filled with insulating material such as sand, rice, or foam beads, sized to sit snugly against the bottom rail of the window sash. When placed on the interior window sill against the sash, it physically blocks the channel through which cold air enters at floor level. Commercial versions are available at hardware stores, or you can make one from a rolled towel or a fabric tube sewn from scrap material.
For casement and awning windows, which open outward and have different seal points, a foam compression seal along the bottom frame stop provides a more permanent version of the same protection. Self-adhesive foam strips cut to the width of the sill and pressed against the frame stop compress when the sash closes, eliminating the gap without any visual intrusion. This approach works well as a complement to caulking the frame-to-wall junction, addressing the sash-to-frame gap that caulk cannot fill on an operable window.
Do Interior Window Insulation Kits Really Keep Cold Air Out?
Yes, interior window insulation film kits do effectively reduce cold air infiltration and heat loss, particularly for single-pane windows in winter. They work by creating a secondary layer of trapped, still air between the plastic film and the glass surface. This dead air space acts as a thermal buffer that slows conductive heat transfer through the glass, reducing drafts and condensation on the interior surface.
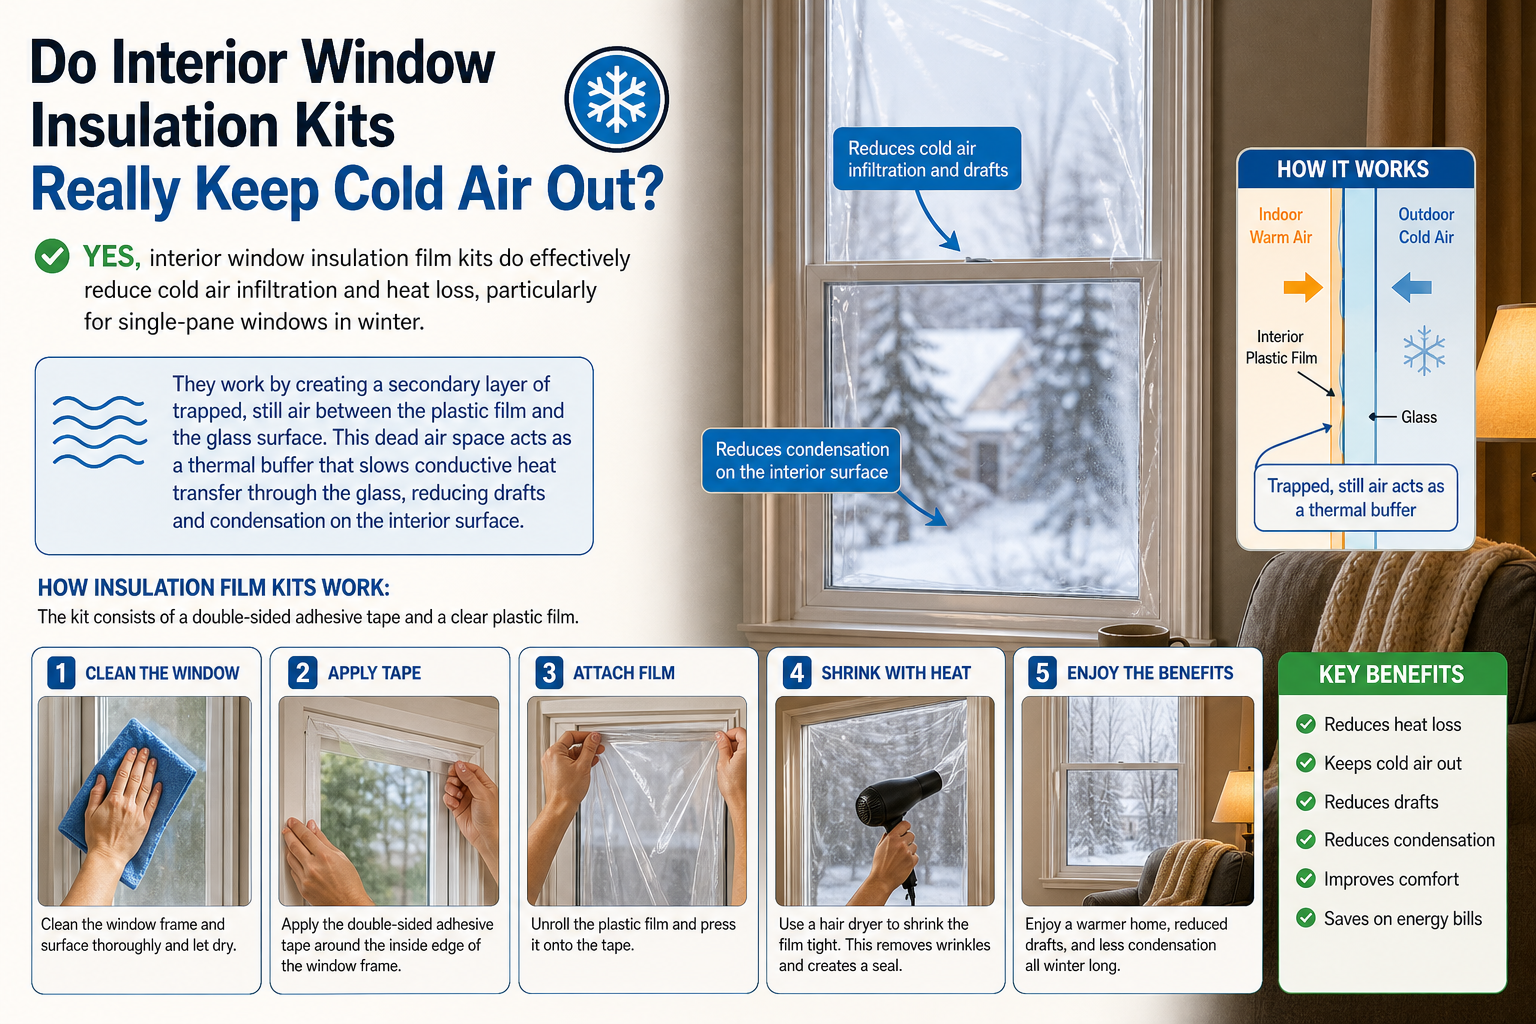
How insulation film kits work:
The kit consists of a double-sided adhesive tape applied to the window frame perimeter and a thin, transparent polyolefin or polyethylene film that stretches across the entire window opening. After you attach the film loosely to the tape frame, you apply heat from a hair dryer to the film surface. The film shrinks and becomes taut as it heats, creating a smooth, nearly invisible barrier. The air pocket trapped between the film and the glass, typically one-half to two inches deep, reduces the U-value (thermal conductance) of a single-pane window significantly.
Step-by-step installation:
- Clean the window frame surface with rubbing alcohol and allow it to dry completely.
- Apply the double-sided tape from the kit around the entire perimeter of the window frame, pressing it firmly.
- Unroll the film and press it onto the tape, starting at the top and working downward. Leave one to two inches of extra film on all sides.
- Set a hair dryer to medium-high heat and hold it four to six inches from the film surface. Move it in slow, sweeping passes across the film. Watch the wrinkles disappear as the film shrinks.
- Trim excess film around the edges with scissors or a utility knife after the film is fully taut.
Insulation film kits are most effective for:
- Single-pane windows in cold climates where heating bills are the primary concern.
- Rooms that are rarely used in winter and where aesthetics are not a priority.
- Rental properties where permanent modifications to the window frame are not permitted.
Film kits are a seasonal solution. Remove them in spring by pulling the tape away from the frame, then clean any residue with adhesive remover.
How Do You Use Rope Caulk as a Temporary Window Draft Fix?
Rope caulk is applied by pressing a soft, pliable putty-like cord into gaps and cracks around a window frame using only your fingers, with no caulk gun required, and it can be peeled away cleanly at the end of the heating season without leaving damage on the frame or wall surface. This reversibility makes it the preferred choice for renters, for windows that need to be opened occasionally during winter, and for anyone who wants a seasonal solution that can be reapplied annually.
Characteristics of rope caulk:
Rope caulk (also sold as window glazing strip or putty rope) is a non-drying, flexible compound sold in coiled rolls, typically in gray or white. Unlike silicone or latex caulk, it never fully cures, which allows it to be removed without cutting or scraping. It adheres through light pressure contact and conforms to irregular surfaces without requiring a smooth, clean substrate the way adhesive-backed products do. Its temperature range for application is broader than standard caulk, making it usable during cold months when other sealants fail to adhere.
How to apply rope caulk:
- Open the roll and pull off a length of rope caulk equal to the gap you need to fill.
- Press the rope firmly into the gap with your fingers, working it into the void and flattening it against both sides of the joint.
- At corners, press two lengths together and smooth the joint with your thumb.
- No finishing tool is needed. The slightly rough surface that results is not visible from a normal viewing distance once the window is closed.
Compared to permanent caulk, rope caulk lasts one heating season before it begins to dry and crack. It does not bond as strongly as silicone, so it is not appropriate for exterior gaps where wind and rain can dislodge it. Use it for interior joints around window trim, along the junction between the window sash and the frame stop, or anywhere you need a fast, mess-free seal that can be reversed easily.
Can Adding a Window Insulation Layer From the Outside Reduce Air Leaks?
Yes, adding a foam backer rod and exterior caulk layer to the outside of the window frame reduces air leaks significantly, particularly in cases where interior sealing alone has not solved the problem because the primary air infiltration pathway runs through the gap between the window frame and the exterior wall sheathing. Exterior sealing addresses leaks at their source and is generally more effective than interior sealing for stopping wind-driven infiltration.
Foam backer rod for large exterior gaps:
Foam backer rod is a closed-cell polyethylene foam cord available in diameters ranging from one-quarter inch to one inch, designed to be pressed into wide gaps before caulk is applied. It serves two functions: it fills the void so caulk does not sag or crack as it tries to bridge a wide opening, and it creates a backing surface that gives the caulk a proper two-point bond (to both sides of the gap) rather than a three-point bond (which restricts natural movement and causes caulk to fail prematurely).
Application steps for exterior window sealing:
- Work in temperatures above 40 degrees Fahrenheit, ideally between 50 and 90 degrees, as caulk adhesion drops sharply in cold conditions.
- Remove all old exterior caulk from the frame-to-wall junction using a utility knife and putty knife.
- Press foam backer rod into any gaps wider than one-quarter inch, sized so it sits snugly without falling through.
- Apply a continuous bead of exterior-grade silicone or siliconized latex caulk over the foam backer rod and along all frame-to-wall joints.
- Tool the caulk bead with a wet finger or caulk finishing tool within five minutes of application.
- Allow full cure time (24 hours for silicone) before exposing the caulk to rain or temperature extremes.
Because exterior caulk is exposed to ultraviolet radiation, temperature cycling, and precipitation, plan to inspect and reapply it every three to five years depending on your climate. Inspect it each autumn before the heating season begins, looking for cracks, shrinkage, or sections that have pulled away from the frame.
When Should You Stop DIY-ing and Consider Replacing or Upgrading a Drafty Window Entirely?
You should consider replacing or upgrading a drafty window entirely when DIY sealing methods no longer deliver measurable improvement, when structural damage to the frame makes sealing ineffective, or when the cost of ongoing repairs approaches the value of a new window installation that would eliminate the problem permanently. Three specific conditions signal that DIY has reached its practical limit.
First, if your window frame is soft, discolored dark brown or black, or crumbles when pressed, the wood has rotted from chronic moisture infiltration. Caulk applied over rotted wood will not bond reliably and will separate within one season. The rot needs to be cut out and rebuilt before any sealant can perform correctly.
Second, if you have a double-pane insulated glass window and you see persistent fogging or condensation between the two panes, the hermetic seal of the insulating glass unit has failed. The argon or krypton gas fill that provides insulating value has leaked out and been replaced by humid air, eliminating the thermal benefit of the double pane. No exterior caulk or interior film will restore the unit’s R-value. In this case, replacing the glass unit or the entire window is the only effective solution.
Third, if you have sealed all detectable air leaks at a window and your energy bills have not improved after a full heating season, the window’s glass itself may be the dominant heat loss pathway rather than air infiltration. This is common with older double-pane windows that were manufactured with low-quality glass or no low-emissivity coating. In this situation, upgrading to a window with a low-E coating and a gas fill will reduce radiant heat loss through the glass, which sealing alone cannot address.
How Does Adding a Storm Window Compare to DIY Sealing for Energy Efficiency?
A storm window outperforms most DIY sealing methods for overall thermal performance, but costs significantly more and is best suited for historic homes where replacing original windows would damage architectural character. A well-fitted storm window reduces heat loss by 25 to 50 percent compared to the primary window alone, according to the National Trust for Historic Preservation. By contrast, a comprehensive DIY sealing job (caulk, weatherstripping, and film kit combined) typically reduces air infiltration by 20 to 40 percent.
For rental properties or historic districts where exterior modifications are restricted, interior secondary glazing with magnetic or compression-fit frames offers storm-window-level performance without permanent installation. These systems use a thin acrylic or glass panel that clips inside the window reveal and can be removed seasonally. They cost between $100 and $400 per window depending on size, placing them above DIY consumables but well below the $300 to $800 cost of a professionally installed exterior storm window.
Can a Thermal Imaging Camera Help You Find Hidden Air Leaks That DIY Detection Misses?
Yes, a thermal imaging camera reveals air leak locations that candle testing and manual inspection routinely miss, particularly in areas where the air gap is hidden behind window trim, behind the interior casing, or distributed across a surface without a single obvious crack. Thermal imaging shows temperature differentials across surfaces, displaying cold infiltration zones as blue or purple areas on a color-coded heat map, even when the gap producing them is invisible to the naked eye.
A professional energy audit with thermal imaging is worth the cost, typically $200 to $500 for a full home assessment, when your heating or cooling bills are significantly higher than comparable homes in your area and DIY inspection has failed to explain why. The audit identifies not just window leaks but also gaps at electrical outlets, attic hatches, and wall penetrations that compound the overall infiltration load.
For a lower-cost alternative, smartphone-compatible thermal imaging attachments from manufacturers such as FLIR and Seek Thermal connect to your phone’s charging port and provide real-time thermal maps at a resolution suitable for identifying window-level air leaks. These devices cost between $200 and $400 and allow DIY-level thermal inspection that, while less precise than professional equipment, is far more revealing than any manual detection method.