Replacing door weatherstripping is one of the most effective DIY home improvements you can complete in under two hours, sealing air leaks around your door frame to stop drafts, block moisture, and reduce heating and cooling costs. The process involves removing the worn-out strip, cleaning the surface, measuring and cutting a new strip to fit, and securing it firmly around all four edges of your door. Whether your current weatherstripping is cracked, compressed flat, or simply missing, this guide walks you through every step with clarity.
Before you pick up a tool, it helps to know whether your existing weatherstripping actually needs replacing. The most obvious signs include visible cracking or hardening of the material, a noticeable draft when you hold your hand near the door edge, light peeking through the frame gap, or a sudden spike in your electricity bill. Once you spot at least one of these warning signals, replacement is the right call rather than a temporary patch.
Choosing the correct type of weatherstripping matters just as much as the installation itself. Foam tape, V-strip, rubber, vinyl, and felt each perform differently depending on the door location, traffic level, and local climate. For an exterior front door exposed to rain and temperature swings, EPDM rubber delivers the best long-term seal. For an interior door or low-traffic closet, foam tape is a practical and budget-friendly choice. This guide covers both selection and installation so you finish the project confidently the first time.
What Is Door Weatherstripping and How Does It Work to Seal a Door?
Door weatherstripping is a flexible sealing material installed along the edges of a door frame to create an airtight and watertight barrier between the moving door and its stationary frame, covering the top, two side jambs, and the bottom threshold. It works by compressing slightly when the door closes, filling the gap that would otherwise allow air, water, dust, insects, and sound to pass through. Understanding what weatherstripping is and where it sits on your door frame gives you the foundation you need before attempting any removal or installation.
Specifically, the mechanism relies on controlled compression. When you push the door shut, the weatherstripping material deforms just enough to conform to the irregular surface of the door stop or door edge, eliminating the micro-gaps that are invisible to the naked eye but large enough for a significant volume of conditioned air to escape. A properly sealed door can reduce household energy loss by a measurable margin, which is why the U.S. Department of Energy identifies weatherstripping as one of the simplest and highest-return improvements a homeowner can make.
Door weatherstripping is installed at three distinct zones on a standard hinged door. The top seal (also called the door header seal) runs horizontally along the top of the door frame. The side seals run vertically down both the hinge side and the latch side of the door jamb. The bottom seal, commonly referred to as a door sweep, attaches to the bottom edge of the door itself and drags or compresses against the threshold when the door closes. It is worth distinguishing the door sweep from the other three: the sweep is mounted on the door slab, not the frame, and it must be selected and installed separately from the jamb weatherstripping.
According to the U.S. Department of Energy, drafts caused by gaps around doors and windows can account for 5 to 30 percent of a home’s total energy use, making a $10–$30 weatherstripping replacement one of the highest return-on-investment home improvements available.
How Do You Replace Door Weatherstripping Step by Step?
Replacing door weatherstripping follows a six-stage process: preparing your workspace and gathering tools, removing the old weatherstripping, cleaning the door frame surface, measuring and cutting the new material, installing the new strips on all four edges, and performing a seal test to confirm the job is done correctly. Each stage builds directly on the one before it, so skipping a step, especially the cleaning phase, often leads to poor adhesion and a repeat project within months.
Dưới đây is a breakdown of every stage with the tools you need at each point:
Tools and materials required:
- Utility knife or box cutter
- Flathead screwdriver or putty knife
- Tape measure
- Scissors or aviation snips (for metal-backed strips)
- Isopropyl alcohol or a mild degreaser
- Clean rags or paper towels
- Replacement weatherstripping (correct type and length for your door)
- Hammer and nails, or a drill with screws (for nail-in or screw-in types)
- Pencil or marker for cutting marks
Common mistakes to avoid before you start:
- Purchasing weatherstripping without measuring the door first
- Skipping the surface cleaning step, which causes adhesive-backed strips to peel off within weeks
- Cutting all strips to the same length without accounting for corner overlaps
- Installing the bottom door sweep while the door is hanging open rather than in the closed position, which leads to incorrect clearance adjustment
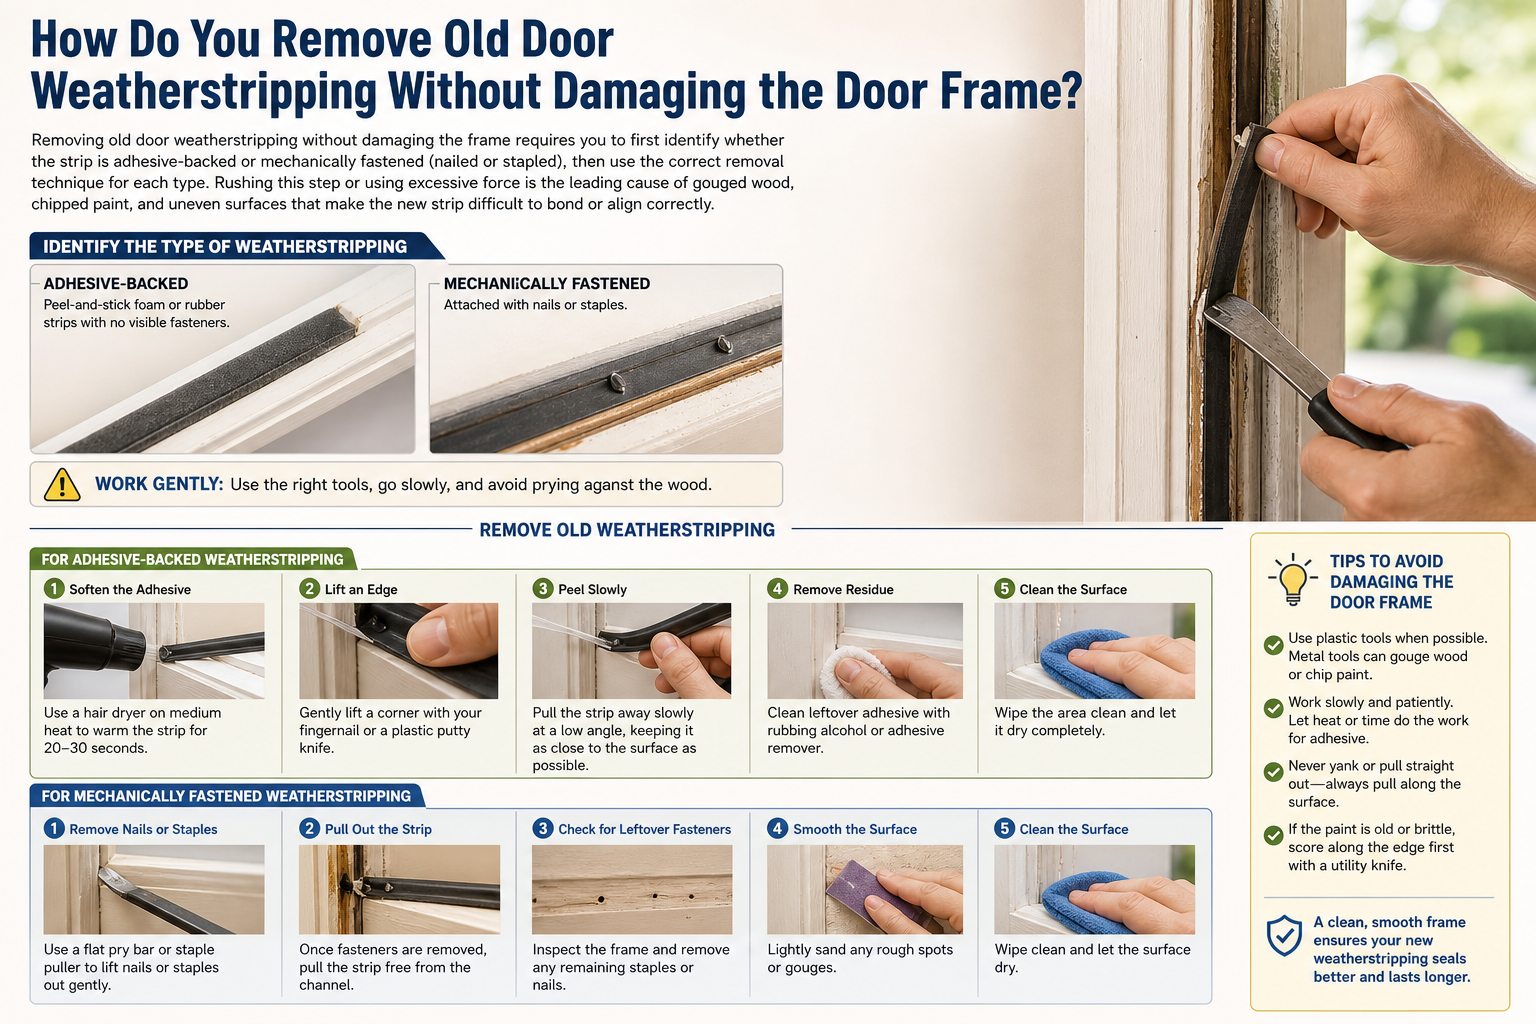
How Do You Remove Old Door Weatherstripping Without Damaging the Door Frame?
Removing old door weatherstripping without damaging the frame requires you to first identify whether the strip is adhesive-backed or mechanically fastened (nailed or stapled), then use the correct removal technique for each type. Rushing this step or using excessive force is the leading cause of gouged wood, chipped paint, and uneven surfaces that make the new strip difficult to bond or align correctly.
Cụ thể, follow these steps for each removal type:
For adhesive-backed weatherstripping:
- Grip the end of the strip firmly and pull slowly at a low angle (roughly 30 degrees from the surface) rather than pulling straight outward. A low angle reduces the chance of the adhesive tearing paint or gouging soft wood.
- If the strip resists, use a flathead screwdriver or plastic putty knife to gently work behind the material and lift it away from the frame incrementally.
- Once the strip is off, a layer of dried adhesive residue will remain on the frame. Saturate a clean rag with isopropyl alcohol or an adhesive remover, press it against the residue for 30 seconds to soften it, then wipe in a single direction until the surface is completely clean and smooth.
For nailed or stapled weatherstripping:
- Use a flathead screwdriver to pry the strip away from the door stop, starting at one end and working along the length.
- Remove any remaining nails or staples with pliers or a nail puller, pressing the tool flat against the wood to avoid dents.
- Wipe the surface with a damp cloth to remove sawdust and debris, then allow it to dry fully before applying new material.
Surface preparation tip: After cleaning, run your finger along the frame. The surface should feel smooth and slightly tacky if you used alcohol. Any remaining bumps or adhesive lumps will create air gaps under the new strip. Sand lightly with 120-grit sandpaper if needed, then wipe again with a clean rag.
How Do You Install New Weatherstripping on a Door to Stop Drafts?
Installing new weatherstripping to stop drafts requires measuring each of the four door edges individually, cutting the material cleanly to length, and securing the strip flush against the door stop so it compresses evenly when the door closes. Attempting to use a single continuous piece or estimating lengths without measuring is the fastest route to a leaking seal and wasted material.
Step-by-step installation for all four edges:
Step 1: Measure each side separately. Open the door fully and measure the height of both vertical jambs (hinge side and latch side) from the top of the frame down to the threshold. Measure the width of the top header. Measure the width of the door slab at the bottom for the door sweep. Write each measurement down before cutting.
Step 2: Cut the strips. Using a utility knife guided by a straightedge, or scissors for foam and felt types, cut each piece to the exact length recorded. For corners, cut the vertical pieces first and allow them to run the full height, then cut the top piece to fit between them. This overlap at corners prevents drafts from sneaking through the joint.
Step 3: Install the two vertical side strips. Starting at the top of the hinge-side jamb, peel back several inches of the adhesive backing (or position the first nail hole) and press the strip firmly against the door stop. Work downward in six-inch sections, pressing firmly as you go to eliminate air bubbles. Repeat on the latch side.
Step 4: Install the top header strip. Apply the top piece between the two vertical strips, pressing it firmly from one end to the other. On compression-type or V-strip designs, make sure the open side of the V faces the exterior.
Step 5: Install the door sweep. Close the door fully, then hold the door sweep against the bottom of the door slab so the flexible fin just touches the threshold without creating resistance when you open or close the door. Mark the screw holes in pencil, open the door, drill pilot holes, and screw the sweep into place.
Step 6: Perform a seal test using three methods:
- Paper test: Slide a standard sheet of paper into the closed door at several points around the frame. You should feel slight resistance when pulling it out. If the paper slides freely with no resistance, the seal is insufficient at that location.
- Flashlight test: At night, have someone shine a flashlight along the exterior of the closed door while you observe from inside. No light should be visible around the frame edges.
- Hand test: With the door closed and the heating or air conditioning running, run your palm slowly around the perimeter of the door frame. You should feel no air movement at any point.
Is Door Weatherstripping Easy Enough for a DIY Beginner to Replace?
Yes, replacing door weatherstripping is an ideal DIY project for beginners because it requires no specialized skills, no power tools for most installations, and no structural modifications to the door or frame. The majority of homeowners complete a standard single door in 30 to 60 minutes on their first attempt, with a full exterior door including a new door sweep taking up to 90 minutes.
Bên cạnh đó, the cost comparison strongly favors the DIY approach. Materials for a full door (all four edges including a door sweep) typically cost between $10 and $30 depending on the weatherstripping type chosen. A professional handyman charges between $75 and $200 for the same job, meaning a DIY installation pays for itself immediately and leaves you with the confidence and knowledge to repeat the job on additional doors without assistance.
Time breakdown by door type:
- Standard interior hinged door: 30 to 45 minutes
- Standard exterior front door with door sweep replacement: 60 to 90 minutes
- Patio or French door (two slab panels): 90 to 120 minutes
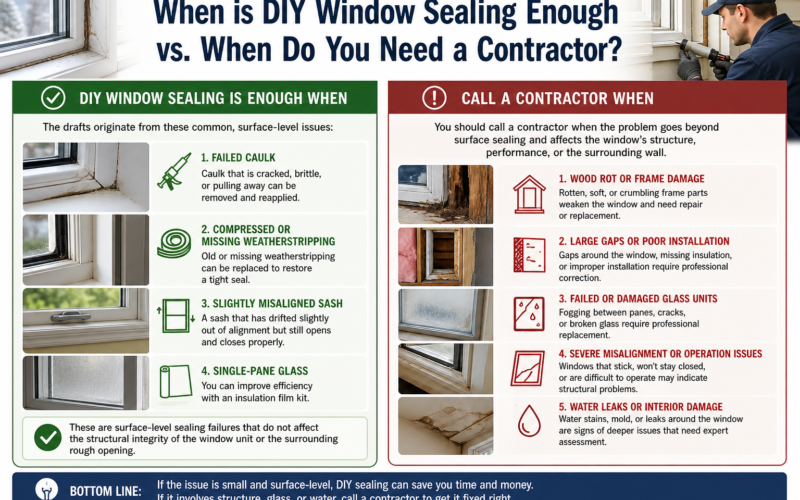
When you should call a professional instead of DIY:
- The door frame itself is warped, rotted, or structurally compromised. Weatherstripping cannot compensate for a frame that is no longer square.
- The door slab has swollen or shifted and no longer closes flush with the stop. This requires planing or rehinging before new weatherstripping will seal correctly.
- You are working on a historic or specialty door where improper removal could cause irreversible damage to irreplaceable materials.
- The project involves a commercial-rated door with multi-point locking hardware and high-compression seal systems that require calibrated installation tools.
According to a 2022 report by the National Association of the Remodeling Industry (NARI), weatherstripping and door seal replacement ranked among the top five DIY home maintenance tasks completed successfully by first-time homeowners, with a project satisfaction rate of 94 percent.
What Are the Signs That Your Door Weatherstripping Needs to Be Replaced?
There are six primary signs that your door weatherstripping needs replacing, grouped into three categories: visible physical damage, sensory indicators you can feel or hear, and indirect evidence such as rising energy costs. Recognizing the right combination of these signs helps you decide whether a repair, a partial replacement, or a full door weatherstripping replacement is necessary.
Visible signs of wear and damage:
- Cracking or hardening: Rubber and vinyl weatherstripping that has been exposed to UV light and temperature cycles for several years loses its flexibility and develops surface cracks. A strip that no longer compresses when pressed firmly with a finger is no longer functioning.
- Compression deformation: Foam and felt strips that have been flattened permanently by years of door contact no longer spring back to create a seal. If the strip looks paper-thin in the middle, it has reached the end of its useful life.
- Peeling or detachment: Adhesive-backed strips may separate from the frame partially or entirely, leaving visible gaps. Even a one-millimeter gap is enough to allow significant air infiltration over 24 hours.
- Missing sections: Physical gaps in the weatherstripping, caused by improper removal, pest damage, or deterioration, are immediate replacement triggers.
Sensory indicators:
- A noticeable draft when you hold your hand near the door edges on a windy day or when the HVAC system is running.
- Sounds from outside (traffic noise, wind, rain) that are louder than they used to be or that enter the home through the door gap rather than through the walls.
- A visible line of light around the door frame perimeter when you dim the interior lights at night.
Indirect evidence:
- An unexplained 10 to 20 percent increase in monthly heating or cooling bills during peak season, without a corresponding change in usage habits, often traces back to air leaks at doors and windows.
- Higher than normal indoor humidity or moisture on the interior door frame during rainy periods, indicating that water vapor is entering through the weatherstripping gap rather than through the door material itself.
How Do You Test if Your Door Weatherstripping Is Still Sealing Properly?
You can test whether your door weatherstripping is still sealing properly using three simple at-home methods that require no special equipment: the paper test, the flashlight test, and the candle or smoke test. Together, these three tests take less than five minutes and give you a reliable indication of where the seal has failed before you purchase replacement materials.
Cụ thể hơn, here is how to perform each test:
Paper test (most reliable for locating specific gaps):
Close your door on a standard sheet of copy paper so the paper is sandwiched between the door and the frame. Try to pull the paper out slowly. If you feel clear resistance and the paper requires noticeable effort to remove, the seal is adequate at that location. If the paper slides out freely with no drag, there is insufficient compression at that spot. Repeat at six to eight positions around the full perimeter of the door, including the top corners, which are frequently overlooked.
Flashlight test (best performed at night):
On a dark evening, have a second person stand outside the closed door and shine a high-powered flashlight slowly along all four edges of the door frame. Stand inside with the interior lights off. Any point where light is visible from inside indicates a gap in the seal that is large enough to allow meaningful air infiltration.
Candle or smoke test (best for detecting active airflow):
Light a candle or incense stick and hold it approximately one inch from the door edge at multiple points around the frame while the door is fully closed. Watch the flame or smoke column carefully. Any deflection or wavering indicates that air is moving through a gap at that location. Perform this test on both a hot day with the air conditioning running and on a cold day with the heat on to capture drafts moving in both directions.
What Types of Door Weatherstripping Should You Choose for Your Door?
There are five main types of door weatherstripping available for residential use: foam tape, V-strip (also called tension seal), felt, rubber (EPDM), and vinyl. Each type is suited to specific door locations, levels of traffic, climate conditions, and budget ranges. Choosing the wrong type for your application results in premature failure, even if the installation itself is flawless.
Tiếp theo is a summary of where each type performs best before the detailed comparison below:
Overview of the five types:
- Foam tape: Self-adhesive, easiest to install, lowest cost, lowest durability. Best for low-traffic interior doors or temporary fixes.
- V-strip (tension seal): Metal or plastic strip folded into a V shape that springs open to fill the gap. Highly durable, excellent for the hinge-side and latch-side jambs of frequently used doors.
- Felt: Inexpensive and easy to cut, but absorbs moisture and degrades quickly. Suitable only for dry interior applications.
- Rubber (EPDM): Most durable outdoor option, resistant to UV, heat, cold, and moisture. Ideal for exterior front doors and garage doors.
- Vinyl: Mid-range cost and durability, available in various profiles (bulb, D-strip, O-strip). Widely used for standard exterior and interior doors as a balance between cost and performance.
Selection criteria matrix:
| Type | Best Location | Durability | Cost | Ease of Install |
|---|---|---|---|---|
| Foam Tape | Interior, low-traffic | 1 to 3 years | Lowest | Easiest |
| V-Strip | Side jambs, high-traffic doors | 5 to 10 years | Low to mid | Easy |
| Felt | Interior, dry areas only | 1 to 2 years | Lowest | Easiest |
| Rubber (EPDM) | Exterior doors, garage doors | 10 to 20 years | Mid to high | Moderate |
| Vinyl | Exterior and interior doors | 3 to 7 years | Mid | Easy to moderate |
The table above compares the five weatherstripping types across the criteria most relevant to a purchasing decision: ideal location, expected service life, relative cost, and installation difficulty. Use this table to match the type to your specific door before purchasing.
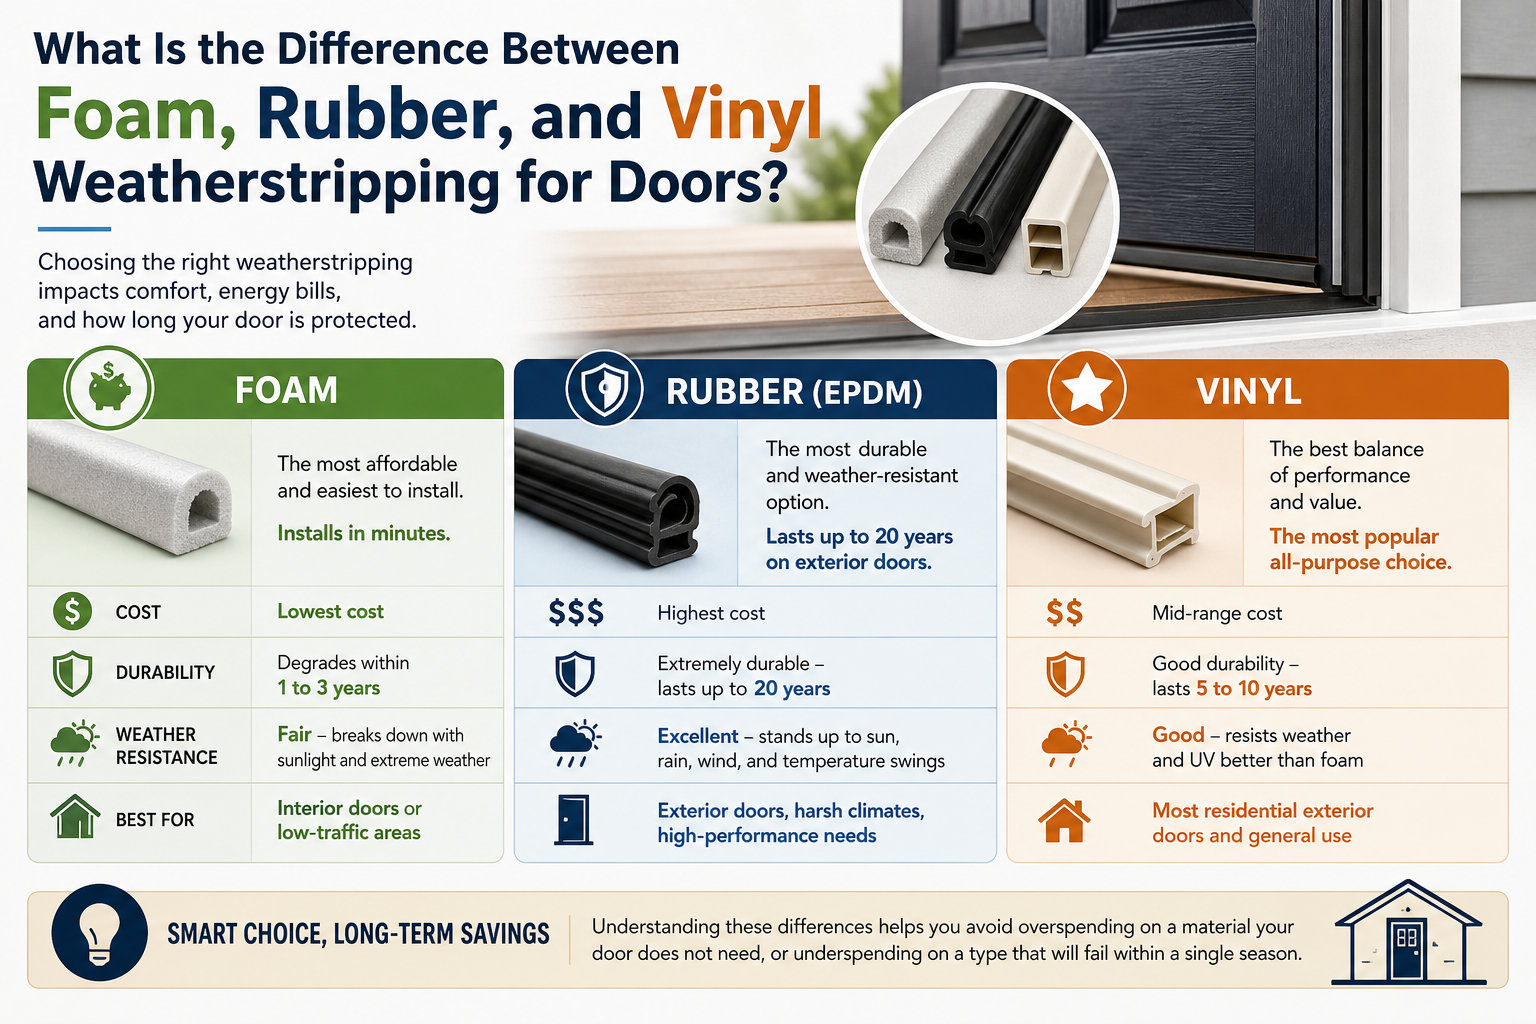
What Is the Difference Between Foam, Rubber, and Vinyl Weatherstripping for Doors?
Foam weatherstripping costs the least and installs in minutes, but degrades within one to three years; rubber (EPDM) is the most durable and weather-resistant option and lasts up to 20 years on exterior doors; vinyl sits between the two in both cost and lifespan, making it the most popular all-purpose choice for residential exterior doors. Understanding these differences helps you avoid overspending on a material your door does not need, or underspending on a type that will fail within a single season.
Dưới đây is a detailed comparison across four performance dimensions:
Durability comparison:
Rubber (EPDM) is the clear winner in longevity. It resists ultraviolet radiation, ozone, extreme cold down to minus 40 degrees Fahrenheit, and high heat up to 250 degrees Fahrenheit without losing its elasticity. Vinyl holds up well under normal weather but begins to crack in climates with severe UV exposure or repeated freeze-thaw cycles after roughly three to five years. Foam compresses permanently within 12 to 24 months under the daily pressure of door closing and should be treated as a short-term solution only.
Thermal insulation performance:
Rubber and high-density foam provide the best compression seal, which directly translates to the greatest reduction in air infiltration. Vinyl bulb and D-strip profiles also perform well because they create a positive contact seal against the door edge rather than relying solely on compression. Thin foam tape has the lowest insulation performance per unit of thickness because it flattens over time, reducing the compressed contact area.
Price comparison (approximate retail cost for a standard 84-inch door):
- Foam tape: $3 to $8 per door
- Felt: $3 to $10 per door
- Vinyl (bulb or D-strip): $10 to $20 per door
- V-strip (metal): $8 to $15 per door
- Rubber EPDM: $15 to $35 per door
Ease of installation:
Foam tape and felt require only scissors and the adhesive already on the back of the strip, making them the most accessible for absolute beginners. Vinyl profiles vary: adhesive-backed vinyl is nearly as easy as foam, while screw-in vinyl bulb requires pre-drilled pilot holes but still takes under 30 minutes per door. EPDM rubber in nail-in or screw-in versions takes slightly more time due to the need for mechanical fastening.
Which Type of Weatherstripping Is Best for an Exterior Door vs an Interior Door?
EPDM rubber or silicone-based weatherstripping is best for exterior doors because they must endure rain, UV exposure, and temperature extremes; foam or felt is adequate for interior doors because those environments are dry, temperature-stable, and subject to far less mechanical wear. Matching the weatherstripping type to the door’s exposure conditions is the most important single factor in achieving a long-lasting seal without overspending.
Exterior door recommendations:
Exterior front doors, back doors, and side entry doors face the most demanding conditions. The primary threats are moisture infiltration, UV degradation, and temperature-driven expansion and contraction of the door frame. EPDM rubber in a compression or bulb profile handles all three threats simultaneously. Silicone-based weatherstripping is an alternative that performs comparably to EPDM in high-UV coastal environments and offers slightly better flexibility at low temperatures. V-strip (tension seal) made from stainless steel or aluminum is also an excellent choice for the side jambs of exterior doors because it does not compress permanently and handles high door-closing frequency without degrading.
Interior door recommendations:
Interior doors are protected from weather, see dramatically less mechanical stress, and rarely need to achieve the same level of airtight sealing as an exterior door. The goal for interior weatherstripping is typically noise reduction and privacy rather than energy efficiency. Foam tape or felt provides more than adequate performance for bedroom, bathroom, and closet doors, at a fraction of the cost of exterior-grade materials.
Garage doors and utility entry doors:
A garage door or a door connecting the garage to the living space requires a different approach. The bottom seal is a heavy-duty rubber or vinyl garage door bottom seal designed to conform to uneven concrete floors. The sides and top of the door opening in the garage-to-house connection should use EPDM or vinyl compression weatherstripping to prevent carbon monoxide, fumes, and cold air from entering the living space. A door sweep with a neoprene fin is also strongly recommended at the bottom threshold of this door.
Does Door Weatherstripping for Sliding Glass Doors Differ From Standard Doors, and When Should You Upgrade to Commercial-Grade?
Yes, weatherstripping for sliding glass doors is fundamentally different from compression-style weatherstripping used on hinged doors, and commercial-grade weatherstripping becomes relevant when a door experiences high traffic frequency, extreme climate stress, or must meet ASTM performance standards. These two scenarios involve unique attributes that fall outside the standard DIY replacement described above, but understanding them helps homeowners and property managers make more informed long-term decisions.
Hơn nữa, both situations, sliding glass doors and commercial-grade upgrades, involve selecting materials and installation methods that are not found on standard home improvement center shelves and may require measurements or specifications not typically needed for a basic DIY weatherstripping replacement.
How Is Weatherstripping Installation Different for Sliding Glass Doors?
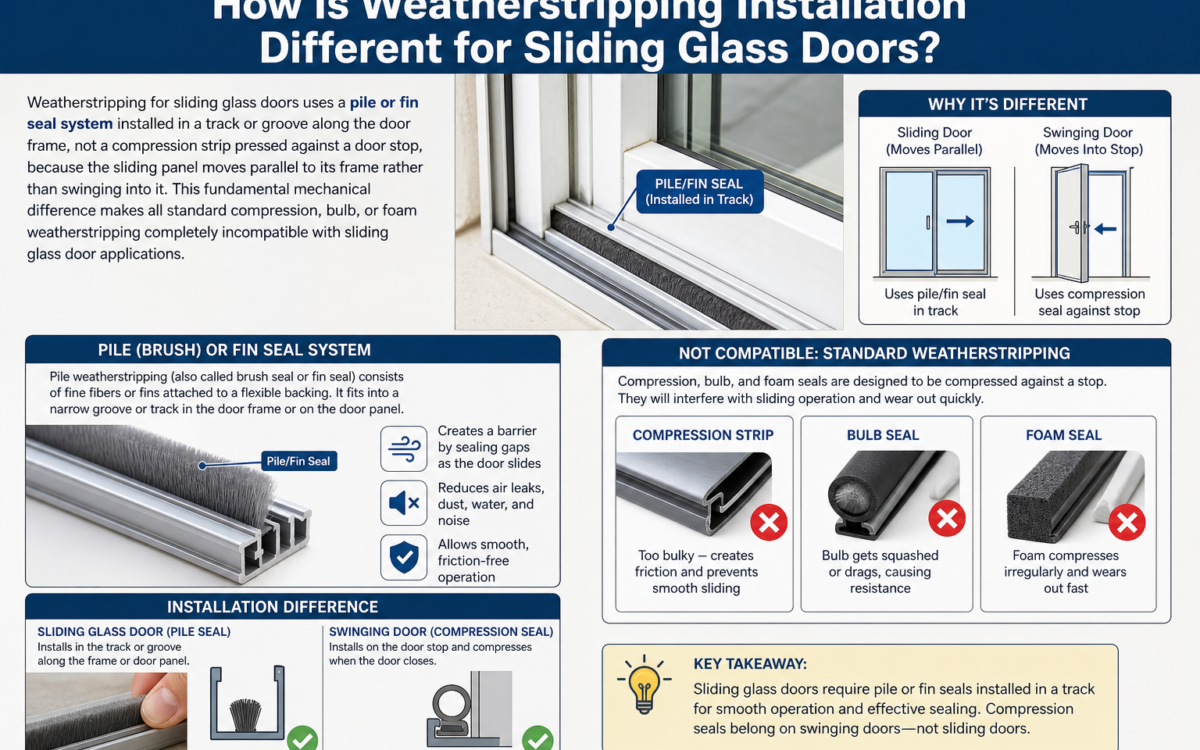
Weatherstripping for sliding glass doors uses a pile or fin seal system installed in a track or groove along the door frame, not a compression strip pressed against a door stop, because the sliding panel moves parallel to its frame rather than swinging into it. This fundamental mechanical difference makes all standard compression, bulb, or foam weatherstripping completely incompatible with sliding glass door applications.
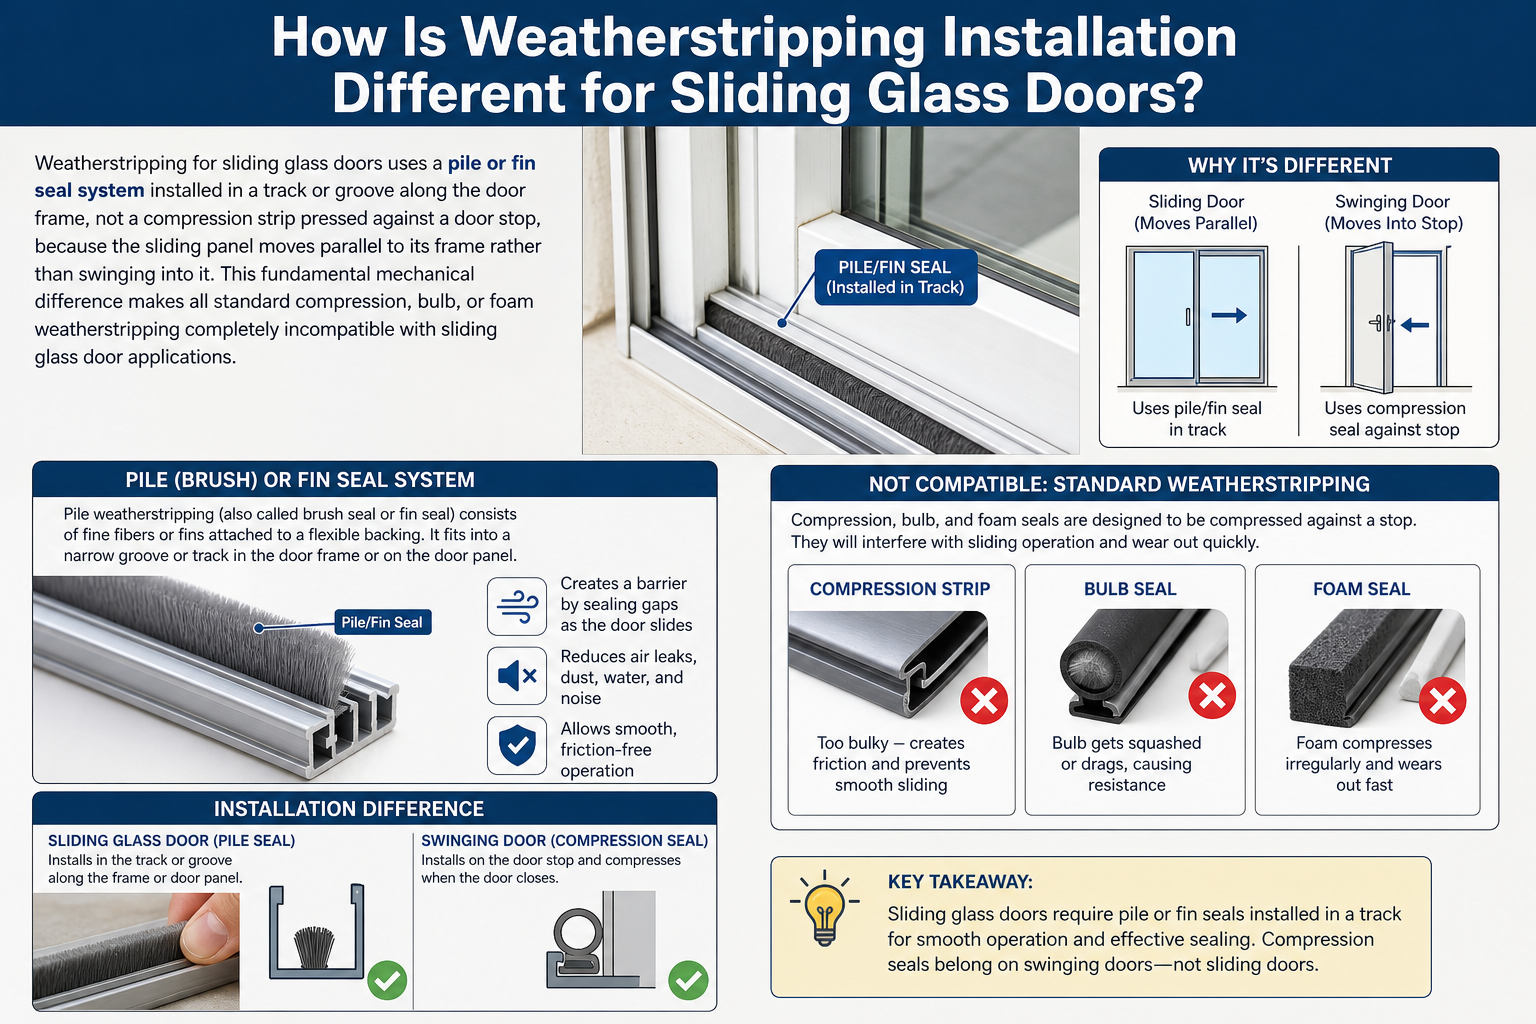
Cụ thể, pile weatherstripping (also called brush seal or fin seal) consists of densely packed fibers attached to a rigid spine that slots into a machined groove along the vertical edges of the sliding panel. As the panel travels past the fixed frame, the pile fibers maintain continuous contact with the door frame surface, creating a dragging seal rather than a compression seal.
The specific locations requiring weatherstripping on a sliding glass door include: the two vertical edges of the sliding panel (inner and outer faces), the bottom of the sliding panel where it contacts the track, and the meeting point between the sliding panel and the fixed panel (called the interlock). Cleaning the track channel thoroughly before inserting new pile weatherstripping is essential, as debris in the track compresses the pile fibers and reduces their sealing effectiveness.
When Does Door Weatherstripping Fail Faster in Extreme Climates, and How Do You Choose Accordingly?
Weatherstripping fails faster in extreme climates when the material is not rated for the specific thermal and UV stress of that environment, and commercial-grade weatherstripping (meeting ASTM standards) is the appropriate choice when residential-grade materials degrade within 12 to 24 months under those conditions. This distinction matters most in climates with sustained temperatures above 100 degrees Fahrenheit, below minus 20 degrees Fahrenheit, or in coastal environments with constant salt air and UV exposure.
Foam and felt materials begin degrading in high-humidity tropical climates within 12 to 18 months due to moisture absorption and mold growth within the material. In high-UV desert climates, vinyl and standard rubber crack and stiffen within two to four years. EPDM and silicone are the two material categories rated for sustained performance in these extreme conditions, with service lives of 10 to 20 years even in harsh environments.
Commercial-grade weatherstripping carries ASTM International performance ratings (most commonly ASTM E283 for air infiltration resistance and ASTM E547 for water penetration resistance). These products feature a higher durometer (material hardness rating), greater compression recovery, and construction tolerances tighter than residential products. Their service life is typically three to five times longer than residential equivalents, which makes the higher upfront cost economically justified for high-traffic commercial entry doors, apartment building common entry doors, or any residential door that opens and closes more than 20 to 30 times per day. For standard single-family residential use, residential-grade EPDM or silicone weatherstripping provides sufficient performance without the added cost of commercial specifications.