You can fix a rotted fence post without replacing the whole fence in most cases of mild to moderate rot, using three proven DIY methods: the sister post technique, metal post repair brackets, or epoxy wood consolidant and filler. These approaches allow you to restore structural integrity to a single damaged post while leaving the surrounding fence panels completely undisturbed. The key is acting early, before rot spreads to the rails and pickets above.
Knowing whether to repair or replace depends on how deep the damage goes. A fence post that is spongy only at the base, wobbles slightly under pressure, or shows surface discoloration can typically be saved with a weekend’s worth of work and materials costing between $15 and $50 per post. A post that has snapped at ground level or has lost more than half its core to fungal decay is past saving and will need full replacement. Understanding the difference is the first and most important step before buying a single tool.
Before picking up a shovel, you also need to know which repair method matches the damage you have. The sister post method works best for posts rotted at the buried section. Metal repair brackets suit homeowners who want a quick fix without digging. Epoxy wood repair is ideal for surface rot that has not compromised the structural core. Each approach has a clear set of tools, materials, and steps, all of which are covered in full detail below.
What Are the Signs That a Fence Post Is Rotted and Needs to Be Fixed?
A fence post is rotted and needs repair when it shows at least one of these physical indicators: soft or spongy wood when pressed with a screwdriver, dark discoloration ranging from brown to black, a musty or earthy smell near the base, visible cracking running along the grain, or noticeable lateral movement when pushed by hand. Identifying these signs early is what separates a simple DIY repair from a full fence replacement project.
To assess your post accurately, walk along the fence line and give each post a firm push sideways. A healthy post will resist movement. A compromised post will shift, lean, or feel loose at the base. Follow this with a physical probe test using a flat-head screwdriver.
How Can You Tell If a Fence Post Is Slightly Rotted or Too Damaged to Repair?
Surface rot is repairable, but structural rot requires full replacement. The distinction comes down to how much of the post’s cross-section remains sound. If more than 50% of the post’s diameter is still firm wood, the post can be saved. If the rot has consumed more than 50% of the wood’s cross-section, or if the post has already snapped or cracked through at ground level, replacement is the only safe option.
To test this, drive a flat-head screwdriver firmly into the wood at several points around the post’s base. Compare the resistance you feel:
- Firm resistance with minimal penetration: The wood is structurally sound. Surface treatment or epoxy repair is sufficient.
- Moderate penetration with some crumbling: Mild to moderate rot. The sister post or metal bracket method is appropriate.
- The screwdriver sinks in easily with little resistance: Deep structural rot. The post cannot bear load safely and must be replaced.
- The post visibly leans more than 15 degrees from vertical: The structural failure has already begun. Replacement is unavoidable.
As a practical rule, if more than two-thirds of the post’s length is compromised by decay, or if the post has broken at or below ground level, do not attempt to repair it.
Which Parts of a Fence Post Are Most Likely to Rot First?
Three distinct zones on a fence post are most vulnerable to rot, ranked from highest risk to lowest: the ground-line zone (the area just above and below where the post meets the soil surface), the section buried inside concrete footings, and the top cut end of the post exposed to rain. Understanding which zone is failing helps you choose the right repair strategy before you buy materials.
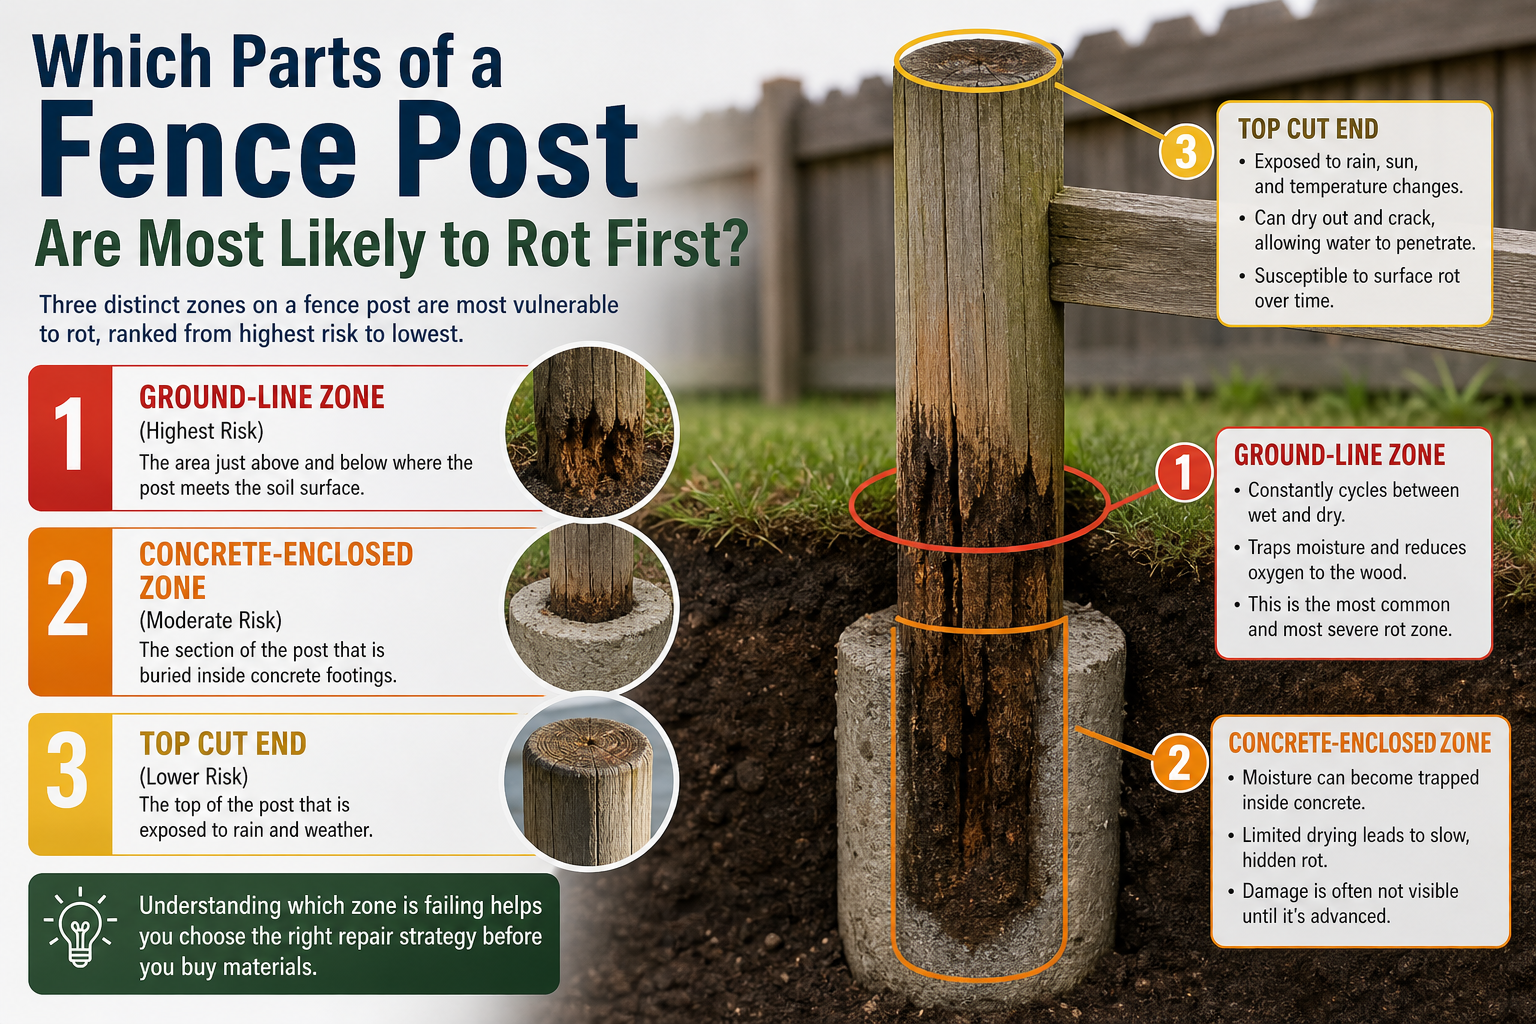
The ground-line zone is by far the most dangerous. At this point, the wood cycles repeatedly between wet and dry conditions as rain soaks the soil and then the surface dries. This wet-dry cycling is the ideal environment for the fungi that cause wood rot. Unlike the section deeper in the ground, which stays consistently moist, the ground-line section experiences oxygen, moisture, and temperature fluctuation simultaneously, creating conditions that accelerate fungal growth.
The concrete-encased section comes second in vulnerability. Contrary to popular belief, concrete does not protect wood from rot. Concrete can trap moisture against the wood surface, and if the concrete has cracked, water pools directly at the post’s base with no drainage, accelerating decay from below. The top end of the post, particularly if it has been cut flat without a cap, absorbs water through the end grain and slowly rots downward, though this process is slower than ground-line rot.
What Tools and Materials Do You Need to Fix a Rotted Fence Post?
Fixing a rotted fence post requires a set of basic digging and fastening tools combined with method-specific repair materials. For tools, you will need a pointed spade or post-hole digger, a hand saw or reciprocating saw, a hammer and mallet, a cordless drill with bits, an adjustable wrench or socket set, a spirit level, and a wooden or steel prop for temporary support. The materials vary depending on which of the three repair methods you use.
Gathering everything before you begin prevents mid-job trips to the hardware store, which can cause concrete to set prematurely or leave a fence unsupported overnight.
Universal tools needed for all three methods:
- Pointed spade or post-hole digger
- Reciprocating saw or hand saw (for cutting rotted wood cleanly)
- Cordless drill and assorted bit set
- Spirit level (minimum 24 inches)
- Rubber mallet
- Safety gloves and eye protection
- Temporary support prop (a stake and clamp, or ratchet strap tied to a tree)
Materials for the Sister Post Method:
- One pressure-treated 4×4 or 4×6 lumber post (same dimensions as the original, cut to appropriate length)
- Minimum 3 carriage bolts, nuts, and washers (3/8 inch diameter, galvanized)
- Rapid-set concrete or post-mix concrete (one 60 lb bag per post typically sufficient)
- Gravel for drainage layer at the base
Materials for the Metal Post Repair Bracket or Spike Method:
- Galvanized metal post repair bracket or ground spike (brands such as Oz-Post, Metpost, or equivalent)
- Appropriately sized lag screws or bolts included with or compatible with the bracket
- Sledgehammer or post driver (for driving spike-style brackets)
Materials for the Epoxy Wood Repair Method:
- Epoxy wood consolidant, liquid form (such as Minwax High Performance Wood Hardener or LiquidWood by Abatron)
- Epoxy wood filler, paste form (such as Minwax Wood Filler or WoodEpox by Abatron)
- 80-grit and 120-grit sandpaper
- Plastic mixing board and wooden stir sticks
- Exterior wood primer and paint or wood preservative sealer
A note on lumber standards: Any new wood used in ground contact must be rated for ground contact, labeled UC4A or UC4B (Ground Contact or Heavy Duty Ground Contact). Standard construction lumber or untreated timber will begin rotting within two to three years if buried, defeating the purpose of the repair entirely.
How Do You Fix a Rotted Fence Post Step by Step?
Fixing a rotted fence post follows a structured three-phase process: assess and prepare the site, execute the chosen repair method, and secure and finish the installation. There are three distinct repair methods suited to different levels of damage, and choosing the correct one before you start saves significant time and rework. Each step in the process must be fully completed before moving to the next, particularly when working with concrete or epoxy materials that have strict set-time windows.
How Do You Repair a Rotted Fence Post Using the Sister Post Method?
The sister post method repairs a rotted fence post by installing a new pressure-treated timber post directly alongside the damaged one, bolting the two together, and setting the new post in concrete. This method is the most structurally robust of the three options and is best suited to posts where the rot is concentrated in the buried section while the aboveground portion of the original post remains sound enough to support the fence panels.
Follow these steps in order:
Step 1: Temporarily support the fence. Before disturbing the damaged post, prop the fence section adjacent to it. Drive a wooden stake into the ground nearby and use a ratchet strap or heavy clamp to hold the fence rail level. This prevents the fence panel from sagging and twisting during the repair.
Step 2: Expose the base of the damaged post. Use a pointed spade to dig around the base of the post, exposing a minimum of 150mm to 200mm below the rot line. If the post is set in concrete, break up the concrete footing using a cold chisel and hammer, or a small reciprocating saw blade. Remove concrete fragments from the hole.
Step 3: Cut away the rotted section. Using a reciprocating saw or hand saw, cut through the original post horizontally just above the highest point of visible rot. Remove the rotted stump. Inspect the remaining aboveground section of the original post by pressing firmly with a screwdriver. It must be firm and solid before proceeding.
Step 4: Prepare and position the sister post. Cut your pressure-treated 4×4 lumber to a length that allows it to be buried at least 600mm into the ground (a third of the total post height is the standard minimum depth). Lower the sister post into the hole alongside the existing post’s remaining aboveground section, keeping both faces flush and parallel.
Step 5: Bolt the two posts together. Using a drill, bore at least three holes evenly spaced along the overlapping section of both posts. Insert galvanized 3/8-inch carriage bolts through both posts at each hole, add washers, and tighten the nuts firmly with a socket wrench. The minimum overlap between the sister post and the original above-ground post should be 300mm.
Step 6: Check vertical alignment. Hold a spirit level against both faces of the sister post. Adjust the positioning by adding gravel or soil to the base of the hole until the post reads plumb (perfectly vertical) on both the face and the side.
Step 7: Set in concrete. Pour rapid-set post-mix concrete into the hole around the base of the sister post. Follow the mixing instructions on the bag, or pour the dry mix directly into the hole and add water if using a self-setting product. Slope the top surface of the concrete slightly away from the post to direct water runoff away from the wood.
Step 8: Allow full cure time. Keep the temporary fence prop in place for the curing period specified on the concrete packaging, typically 24 to 48 hours for rapid-set mixes. Do not apply lateral load to the post during curing.
How Do You Fix a Rotted Fence Post with Metal Post Repair Spikes or Epoxy Filler?
Metal post repair spikes and epoxy wood repair each address rotted fence posts through entirely different mechanisms. Metal spikes work by mechanically replacing the buried portion of the post with a durable galvanized anchor, while epoxy repair chemically reconstitutes the wood fiber in posts suffering from surface-level decay. The method you choose depends on where the rot is located and how deep it has penetrated.
Metal Post Repair Bracket or Ground Spike Method:
This approach is particularly fast because it eliminates excavation entirely in many cases.
Step 1: Cut the post cleanly above the rot line. Using a reciprocating saw or handsaw, cut horizontally through the post at a point that is clearly above any soft or discolored wood. The cut face must be flat and square. Sand it lightly if needed.
Step 2: Select the correct bracket size. Metal post repair brackets come in sizes corresponding to standard post dimensions (3×3, 4×4, 6×6). Select a galvanized or hot-dipped galvanized bracket rated for ground contact. Spike-style versions (such as Oz-Post or Metpost) are driven directly into the soil. Plate-style versions are bolted to an existing concrete footing.
Step 3: Drive the spike into position. Place the spike directly below the cut post end, aligning it with the post’s footprint. Using a post driver or heavy sledgehammer with a protective cap, drive the spike vertically into the ground to the marked depth (usually 400mm to 600mm, depending on post height and local soil conditions). Check vertical alignment with a spirit level at multiple points during driving.
Step 4: Seat the post in the bracket socket. Lift the trimmed post section and lower it into the socket on top of the spike. On spike-style brackets, the post sits in a square collar. On plate-style brackets, the post rests in a U-channel and is secured with bolts or screws through pre-drilled holes.
Step 5: Secure and check plumb. Tighten all fasteners. Re-check with a spirit level. The repair is structurally complete at this stage, with no cure time required.
Epoxy Wood Repair Method:
This method is appropriate only when rot is limited to the surface layers of the post and has not reached the structural core.
Step 1: Remove all soft wood. Using a wood chisel, screwdriver, or stiff wire brush, excavate all spongy, discolored, or crumbling wood from the affected area. Work until you reach firm wood on all sides. Do not leave any soft material behind, as the epoxy will not bond correctly to decayed fiber.
Step 2: Apply the liquid epoxy consolidant. Following the manufacturer’s mixing instructions, blend the two-part liquid epoxy consolidant and brush it generously onto all exposed wood surfaces, including the cavity walls. The consolidant penetrates the remaining wood fibers and hardens them, creating a firm substrate for the filler. Allow it to cure to a tacky, not fully dry, state, which typically takes 20 to 30 minutes depending on temperature.
Step 3: Mix and apply the epoxy wood filler. Blend the two-part paste filler according to instructions. Press it firmly into the prepared cavity using a putty knife or gloved hands, working out any air pockets. Build the filler up slightly proud of the final surface. Epoxy filler has a working time of approximately 15 to 30 minutes before it becomes too stiff to shape.
Step 4: Shape and cure. While the filler is still workable, use a putty knife dampened with water to shape it to match the original post profile. Allow it to fully cure. Most products reach working hardness in 4 to 6 hours and full cure in 24 hours.
Step 5: Sand and seal. Once fully cured, sand the repaired area smooth using 80-grit followed by 120-grit sandpaper. Apply an exterior wood primer, then finish with exterior paint or a penetrating wood preservative to protect the repair from further moisture exposure.
Can You Fix a Rotted Fence Post Without Replacing the Whole Fence?
Yes, you can fix a rotted fence post without replacing the whole fence in the majority of cases involving mild to moderate rot. The sister post method and metal repair bracket method both allow you to restore a single post to full structural integrity without removing, cutting, or disturbing the fence rails, pickets, or panels attached to it. The fence remains standing throughout the repair, and the finished result is indistinguishable from a new installation.
The key conditions that make this possible are: the rot is limited to the post itself, not the horizontal rails connecting posts; the fence panels attached to the damaged post are not under chronic tension or misalignment; and the rot has not spread to adjacent posts in a way that has shifted the fence line out of plumb.
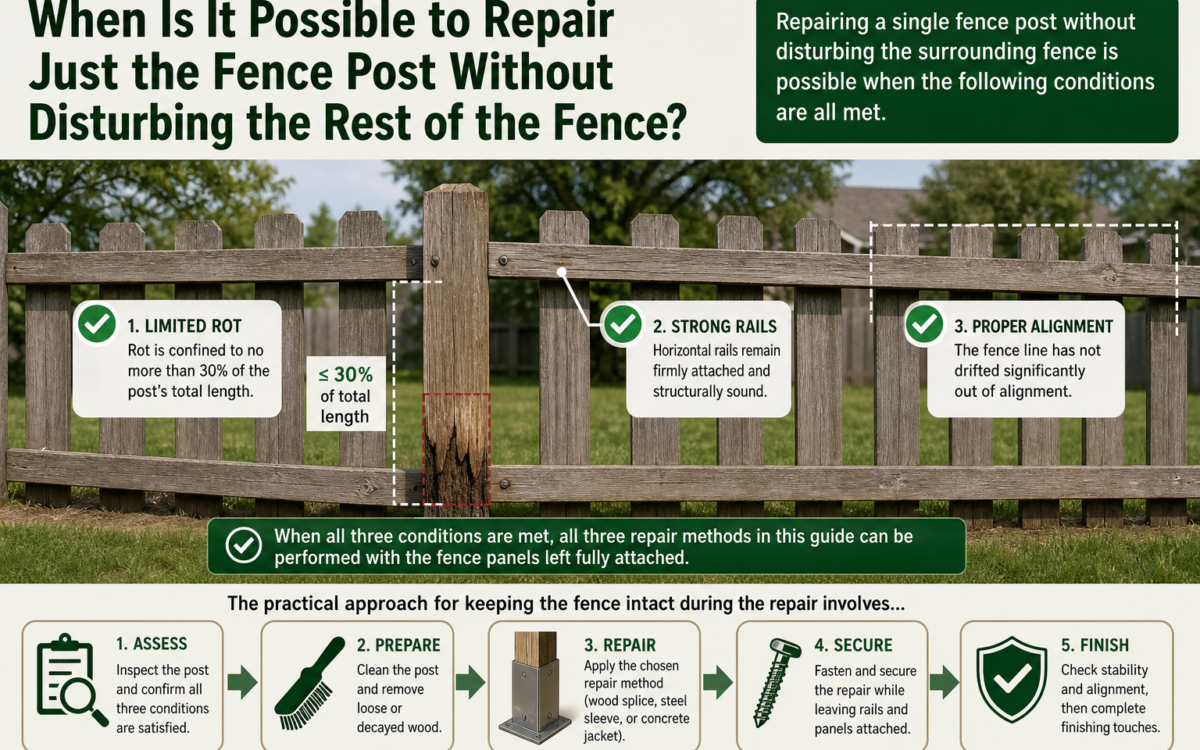
When Is It Possible to Repair Just the Fence Post Without Disturbing the Rest of the Fence?
Repairing a single fence post without disturbing the surrounding fence is possible when the rot is confined to no more than 30% of the post’s total length, the horizontal rails remain firmly attached and structurally sound, and the fence line has not drifted significantly out of alignment. Under these conditions, all three repair methods described in this guide can be performed with the fence panels left fully attached.
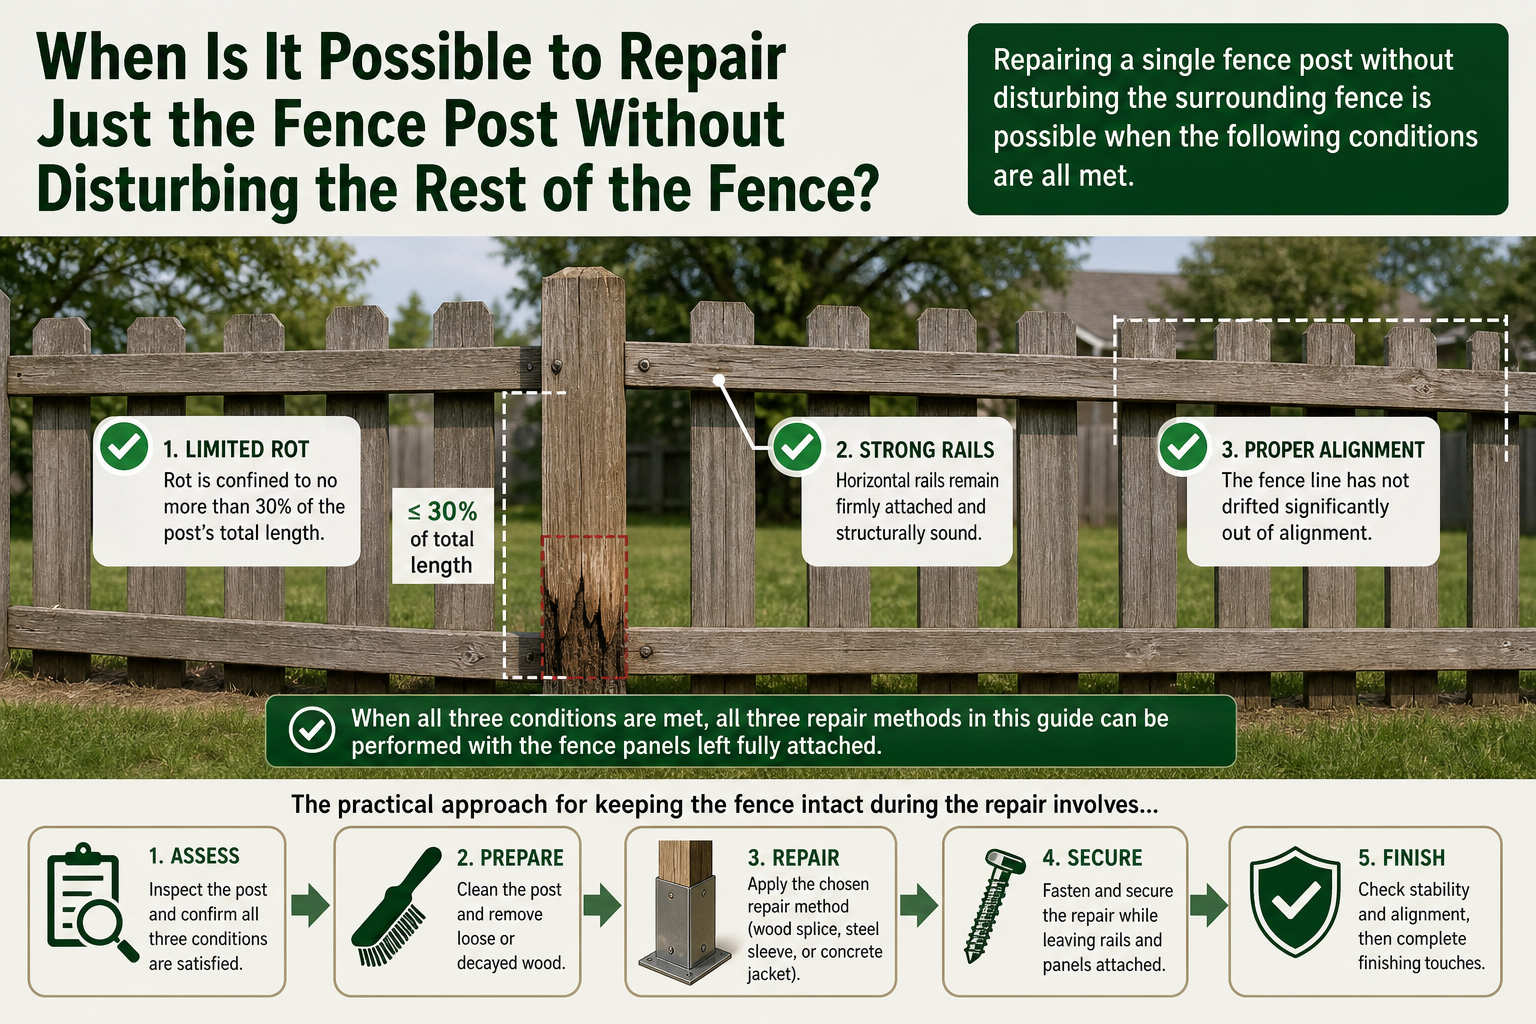
The practical approach for keeping the fence intact during the repair involves a temporary support:
- Drive a wooden stake or steel pin into the ground approximately 300mm from the damaged post.
- Attach a ratchet strap or heavy-duty clamp from the stake to the fence rail directly above the damaged post.
- Tighten until the fence is held firmly at its correct height and angle.
- Proceed with the chosen repair method while the fence remains supported.
- Remove the temporary prop only after the concrete has fully cured or the bracket has been fully fastened.
In real-world terms, this method is extremely cost-effective. A 10-post garden fence with one or two rotted posts can be repaired locally for $30 to $100 in materials, compared to $1,500 or more for a full fence replacement. That represents a saving of 60% to 80% without compromising the finished result.
When Is Full Fence Post Replacement Unavoidable?
Full fence post replacement becomes unavoidable when the structural damage has progressed beyond what any repair method can safely address. Attempting to repair a post that is past this threshold creates a false sense of security and leads to fence failure, sometimes suddenly and under load.
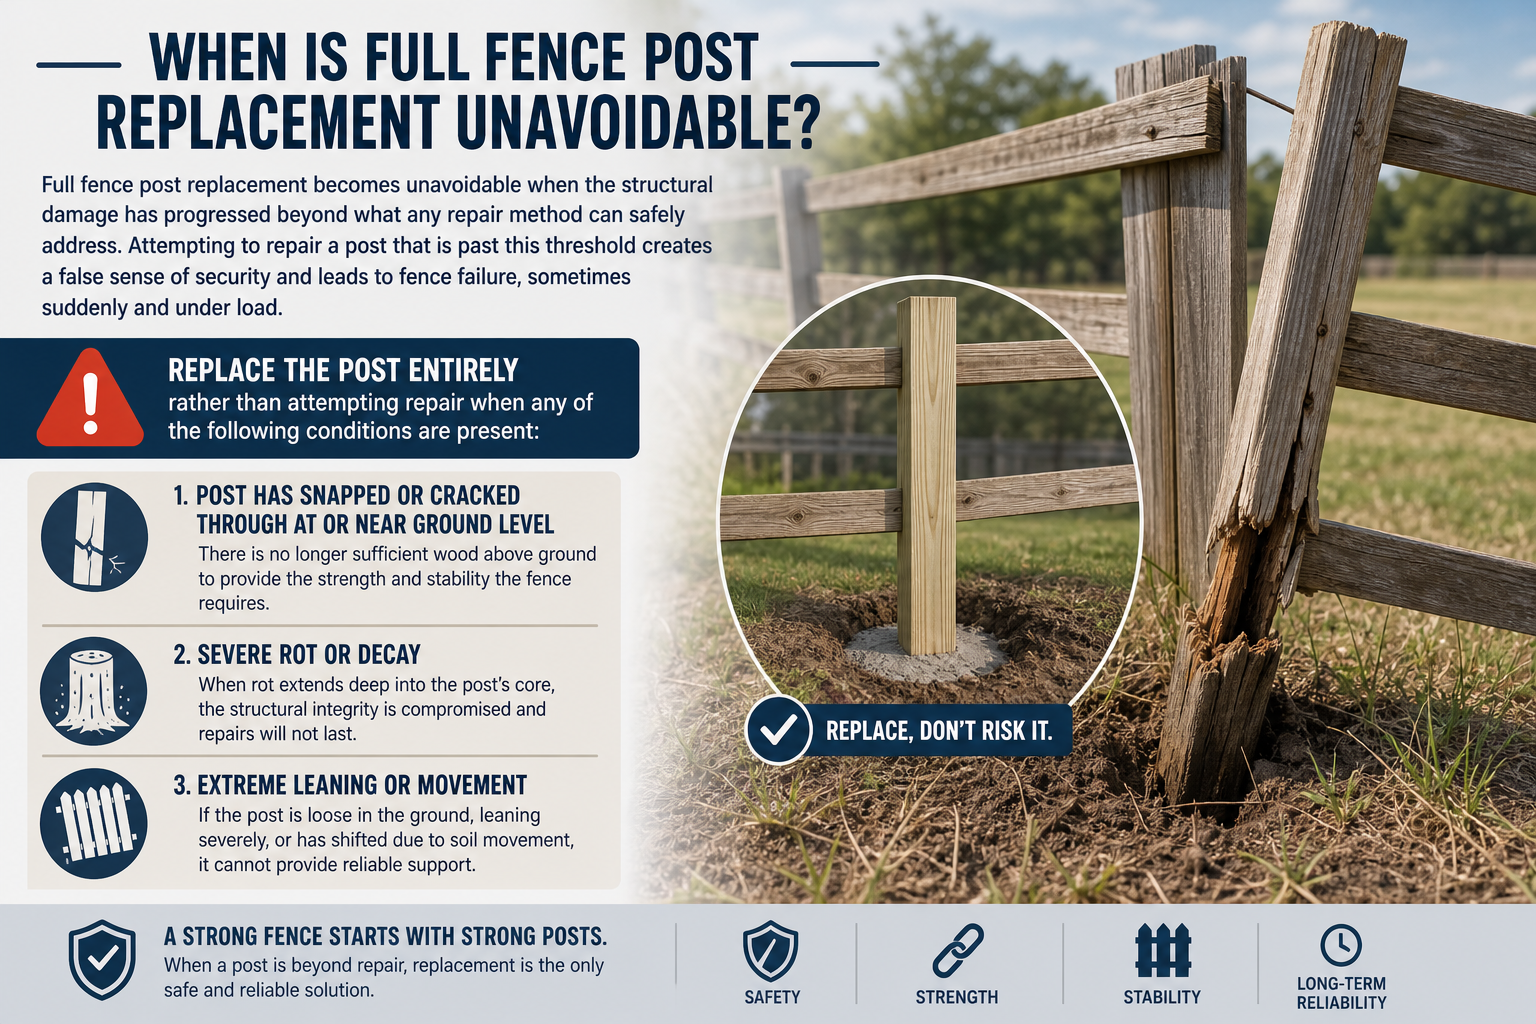
Replace the post entirely rather than attempting repair when any of the following conditions are present:
- The post has snapped or cracked through at or near ground level. There is no longer sufficient wood to anchor a sister post or bracket with, and epoxy cannot restore load-bearing capacity to a full fracture.
- Rot has consumed more than 50% of the post’s cross-sectional diameter. Even with a sister post bolted alongside, the original post is no longer contributing structural support and its presence may actually trap moisture against the new timber.
- Full-length fungal decay is visible. If soft, discolored wood extends from the base of the post all the way up through the section above ground, the post has experienced systemic decay and cannot be consolidated.
- The post leans more than 15 degrees from vertical. This degree of lean indicates the post has already failed at its footing, and the fence structure attached to it has been placed under chronic stress that may have damaged the rails and connections above.
- Three or more consecutive posts in a fence line show severe rot. When multiple adjacent posts have failed heavily, the fence structure as a whole has likely been compromised. Replacing the full run of posts in that section is more cost-effective and structurally sound than attempting individual repairs along the run.
If you are unsure whether a post has crossed the threshold from repairable to replaceable, apply the screwdriver test described in the first section of this guide. If the tool sinks in more than 25mm with light pressure at three or more points around the post’s base, the structural rot is severe enough to warrant replacement.
How Much Does It Cost to Fix a Rotted Fence Post Compared to Full Professional Replacement?
DIY fence post repair costs between $15 and $50 per post in materials, while professional replacement of a single post runs $150 to $400, and full professional fence replacement costs $1,500 to $4,000 or more depending on fence length and materials. This means a DIY repair saves between 70% and 85% compared to hiring a contractor for the same work.
The table below summarizes cost estimates across each scenario to help you make a direct comparison before deciding which approach suits your situation and budget.
| Repair Approach | Estimated Cost Per Post | Who Does the Work | Time Required |
|---|---|---|---|
| DIY epoxy wood repair | $15 to $30 | Homeowner | 2 to 4 hours |
| DIY sister post method | $30 to $50 | Homeowner | 3 to 5 hours |
| DIY metal bracket method | $25 to $45 | Homeowner | 1 to 2 hours |
| Professional single post replacement | $150 to $400 | Licensed contractor | Half to full day |
| Professional full fence replacement | $1,500 to $4,000 | Licensed contractor | 1 to 3 days |
This table reflects material and labor costs for a standard 6-foot 4×4 post in a residential timber fence. Costs vary based on the following factors: the type of wood selected (pressure-treated pine is the most affordable at approximately $12 to $20 per 8-foot post; cedar and redwood cost $25 to $50 per post), the soil conditions and depth of the original footing, and whether the existing concrete footing must be broken out and replaced. Breaking out an old concrete footing adds approximately $50 to $100 to a professional job and an additional hour or two to a DIY repair, depending on how much concrete was originally poured.
The conclusion is straightforward: for any fence post where the damage is localized and the repair methods described in this guide are applicable, DIY repair is consistently the more economical choice, with savings averaging $120 to $350 per post compared to hiring a professional.
What Wood Preservative Treatments Should You Apply After Fixing a Rotted Fence Post?
After completing any fence post repair, apply a penetrating wood preservative to all exposed wood surfaces, especially any freshly cut end grain, to prevent moisture reabsorption and fungal regrowth. The three most effective product types for post-repair treatment are copper naphthenate solution (applied by brush in two coats, penetrates deeply into wood fiber), borate-based wood preservatives (particularly effective against fungal decay and insect activity), and bituminous or rubberized sealant for the below-ground section where the post meets soil.
End grain, the flat cut face at the top and bottom of any trimmed post, is the most critical area to treat. End grain absorbs moisture up to 14 times faster than side grain due to the open structure of the wood’s vascular channels. Apply two coats of copper naphthenate or a purpose-made end-grain sealer to every cut face before installation. Reapply preservative treatment to aboveground post surfaces every two to three years as part of routine fence maintenance to significantly extend the life of the repair.
What Types of Fence Post Materials Are Most Resistant to Rot in the Long Run?
Composite or vinyl posts offer complete rot immunity but carry the highest upfront cost, pressure-treated ACQ or CA lumber balances rot resistance and affordability for most climates, and naturally durable hardwoods such as cedar, redwood, or teak provide excellent long-term performance through natural oils without chemical treatment. Understanding the trade-offs between these material types is a useful step in preventing future rot rather than repeatedly repairing it.
The comparison below covers the four primary material options:
- Pressure-treated pine (ACQ or CA rated UC4B): The most widely used and most affordable ground-contact option at $12 to $20 per post. Rated for 15 to 25 years in ground contact when installed correctly. Requires protective gloves during handling due to chemical preservatives.
- Galvanized or powder-coated steel posts: Completely immune to fungal rot but susceptible to corrosion if the protective coating is scratched or damaged. Ideal in dry climates. Avoid in high-humidity or coastal environments without additional corrosion protection.
- Composite or vinyl posts: No rot, no corrosion, no maintenance beyond cleaning. Cost is $40 to $90 per post, making them approximately three times the cost of pressure-treated pine. The most appropriate choice for permanently high-moisture environments.
- Naturally rot-resistant hardwood (cedar, redwood, teak, black locust): Contains natural oils and resins that inhibit fungal growth without chemical treatment. Cedar and redwood perform well for 15 to 20 years in most climates. Teak and black locust can last 30 years or more. Cost ranges from $25 to $80 per post depending on species and region.
For most residential homeowners in temperate climates with moderate rainfall, pressure-treated lumber rated UC4B remains the best balance of cost, durability, and availability. In regions with consistently high humidity or in coastal areas with salt-laden air, upgrading to composite posts or hot-dipped galvanized steel posts is the more cost-effective long-term decision, even at higher upfront cost.