Staining a wood deck is a multi-step process that includes cleaning the surface, allowing it to dry fully, sanding raised wood grain, applying the appropriate stain in even coats, and allowing adequate curing time before use. When done correctly, this process protects outdoor timber from ultraviolet damage, moisture penetration, mildew growth, and structural cracking, extending the life of your deck by several years. Whether you are working with a brand-new installation or restaining weathered boards, understanding each phase of the process is what separates a long-lasting finish from one that peels and fails within a single season.
Choosing the right type of stain is equally important. Oil-based stains penetrate deeply into older or drier wood fibers, while water-based formulas cure faster and perform better on newer or moisture-prone timber. Beyond the base formula, the opacity level you select, ranging from transparent to solid, determines how much of the natural wood grain remains visible and how frequently you will need to reapply.
Before picking up a brush or roller, you need to understand exactly what cleaning and prepping your deck surface requires. Skipping or rushing these stages is the single most common reason deck stains fail prematurely. The sections below walk you through every step in sequence, from identifying the right stain for your deck to knowing when the surface is fully cured and safe for foot traffic and furniture.
What Is Wood Deck Staining and Why Does Your Outdoor Timber Surface Need It?
Wood deck staining is the process of applying a pigmented, penetrating protective formula directly into the fiber structure of outdoor timber to shield it from UV radiation, moisture, mold, and physical wear. Unlike surface-level coatings that sit on top of the wood, stain absorbs into the grain, creating protection from within while preserving the natural texture and movement of the timber beneath. This distinction is what makes staining the preferred finishing method for outdoor decks exposed to seasonal weather changes.
Outdoor timber faces a unique set of degradation forces that indoor wood does not. To understand why staining is necessary rather than optional, consider the following threats that untreated or improperly protected deck surfaces face on a regular basis:
- UV radiation: Prolonged sun exposure breaks down lignin, the natural binder in wood fibers, causing the surface to turn gray, dry out, and crack over time.
- Moisture penetration: Rain, morning dew, and ground humidity cause wood to expand and contract repeatedly, leading to warping, splitting, and structural weakening.
- Mold and mildew growth: Damp, shaded areas of a deck provide ideal conditions for fungal growth, which discolors the surface and begins decomposing the wood if left untreated.
- Foot traffic and abrasion: High-traffic zones lose their surface integrity faster when unprotected, leading to splintering and surface erosion.
Deck stain versus deck paint is a distinction that homeowners frequently overlook. Paint forms an opaque film on top of the wood surface. While it offers strong color coverage, it is also prone to peeling, bubbling, and chipping because the film cannot flex with the natural expansion and contraction of outdoor timber. Stain, by contrast, penetrates below the surface, so there is no film to peel. This makes stain significantly more durable and lower maintenance for horizontal outdoor surfaces like decks, which face much heavier moisture and abrasion exposure than vertical siding or trim.
Deck staining is available in several formulas, each suited to different timber conditions and aesthetic preferences. The two primary categories are oil-based and water-based stains, which can each be found in four opacity levels: transparent, semi-transparent, semi-solid, and solid. Understanding these options is the essential next step before purchasing any product or beginning work.
What Types of Wood Deck Stain Are There and Which One Should You Choose?
There are two primary formula categories for wood deck stain: oil-based and water-based, and within each category, four opacity levels: transparent, semi-transparent, semi-solid, and solid. Each combination offers different levels of wood grain visibility, durability, surface preparation requirements, and maintenance cycles. Selecting the wrong type for your deck’s condition is one of the most frequent causes of premature stain failure, so matching product to surface is a critical decision before any application begins.
Cụ thể, understanding how each formula and opacity level performs in real-world conditions will help you narrow your selection to the one that suits your deck’s current state, your local climate, and how much maintenance you are willing to commit to each year.
What Is the Difference Between Oil-Based and Water-Based Wood Deck Stain?
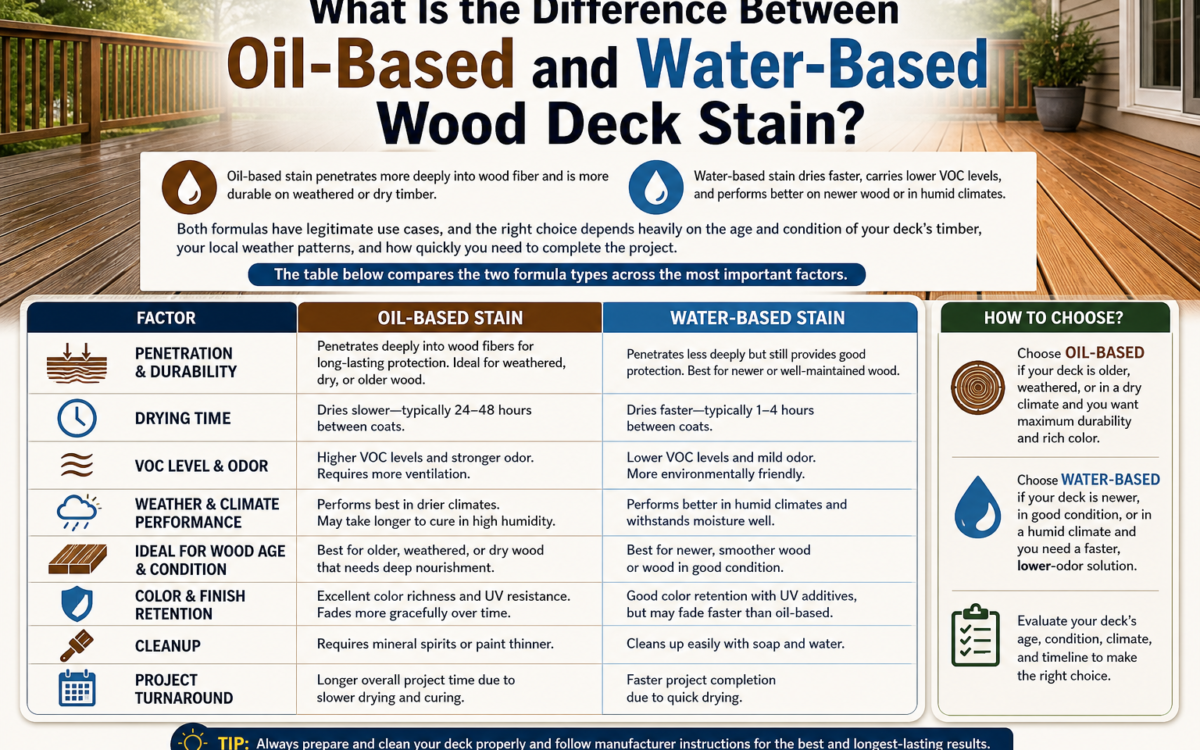
Oil-based stain penetrates more deeply into wood fiber and is more durable on weathered or dry timber, while water-based stain dries faster, carries lower VOC levels, and performs better on newer wood or in humid climates. Both formulas have legitimate use cases, and the right choice depends heavily on the age and condition of your deck’s timber, your local weather patterns, and how quickly you need to complete the project.

The table below compares the two formula types across the most important performance categories to help you decide which is right for your project:
| Performance Factor | Oil-Based Stain | Water-Based Stain |
|---|---|---|
| Penetration depth | Deeper, better for dry/weathered wood | Adequate, better for newer or denser wood |
| Dry to touch | 6–12 hours | 1–2 hours |
| Full cure time | 48–72 hours or longer | 24–48 hours |
| VOC level | Higher (stronger odor, ventilation needed) | Lower (safer for enclosed or residential areas) |
| Tool cleanup | Requires mineral spirits or paint thinner | Soap and water |
| Durability on aged wood | Excellent | Good to moderate |
| Best climate application | Dry climates, older timber | Humid climates, newer timber |
This table shows performance across penetration, drying, VOC content, cleanup, and climate suitability, giving you a direct side-by-side reference before committing to a formula.
Hơn nữa, if your deck is newly installed pressure-treated lumber, water-based stain is generally the safer choice because new wood still retains moisture and chemicals that can interfere with oil-based formulas. Conversely, if you are working with a deck that has aged for several years and shows dry, gray, or cracked boards, oil-based stain will penetrate and nourish those fibers more effectively.
What Is the Difference Between Transparent, Semi-Transparent, and Solid Deck Stain?
Transparent stain offers minimal color and maximum grain visibility; semi-transparent balances color with grain show-through; semi-solid provides stronger pigment while still hinting at wood texture; and solid stain delivers full, opaque color coverage similar to paint but without forming a surface film. The opacity level you choose should match both the aesthetic outcome you want and the actual condition of your deck boards.
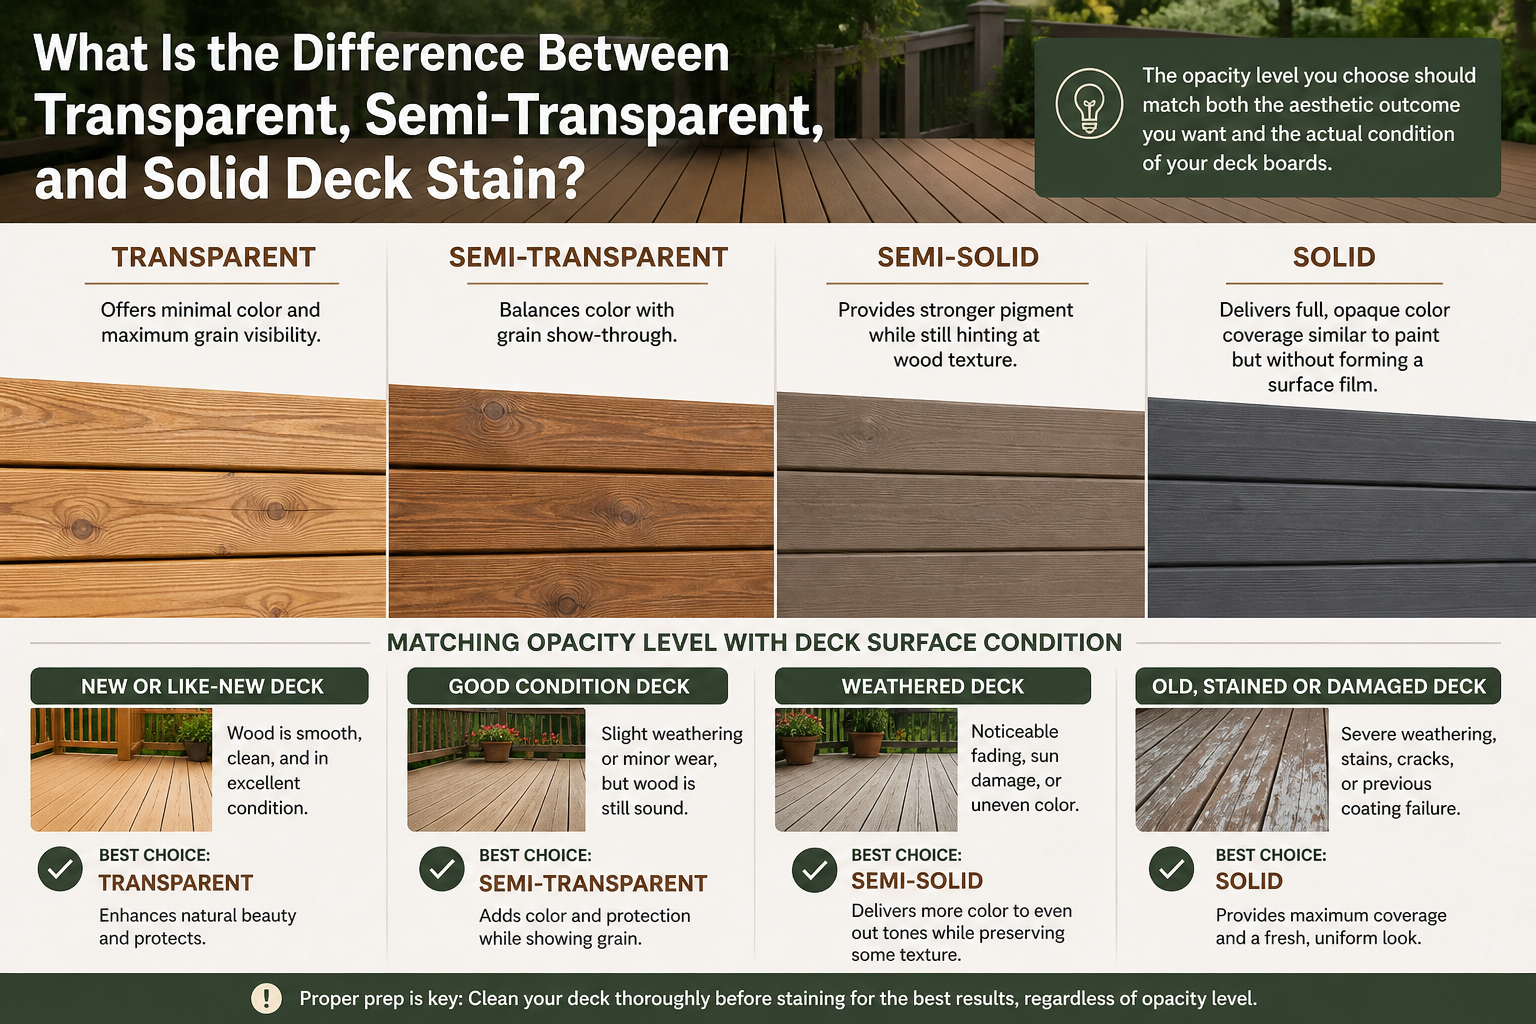
Below is a practical guide to matching opacity level with deck surface condition:
- Transparent stain: Best for new or high-quality timber with attractive natural grain. Offers the least UV protection and requires reapplication every 1–2 years. Shows every flaw, blemish, and discoloration in the wood.
- Semi-transparent stain: The most widely used option for decks in good to fair condition. Allows natural grain to show while providing meaningful UV and moisture protection. Reapplication typically needed every 2–3 years.
- Semi-solid stain: Recommended for decks showing minor discoloration, surface weathering, or slight inconsistency in board color. Hides imperfections while still revealing wood texture. Lasts 3–4 years with proper prep.
- Solid stain: Best for decks with significant weathering, staining, or boards that lack visual appeal. Provides the highest protection and the longest maintenance interval (4–5 years), but completely conceals the natural wood grain.
A practical rule is to match the opacity level to the deck’s surface flaws: the more imperfections you need to conceal, the higher the opacity you should select. However, keep in mind that once you apply a solid or semi-solid stain, returning to a transparent or semi-transparent finish in the future will require full stripping of the old stain.
How Do You Clean a Wood Deck Before Staining?
Cleaning a wood deck before staining involves removing all surface debris, applying a dedicated deck cleaner or oxygen bleach solution, scrubbing the boards thoroughly, rinsing with a pressure washer, and allowing the surface to dry completely before any stain is applied. This step is not optional. Stain cannot penetrate through dirt, mildew, oils, or residue from old finishes, and any contamination left on the surface will trap the stain above the wood fiber rather than allowing it to absorb into it.
Dưới đây is the full cleaning sequence broken into clear stages:
- Clear the deck surface: Remove all furniture, planters, grills, and any objects resting on the deck boards. Sweep away loose debris including leaves, dirt, and accumulated dust.
- Choose your cleaning agent: Use a purpose-formulated deck cleaner, an oxygen bleach solution (sodium percarbonate), or a TSP (trisodium phosphate) substitute. Avoid chlorine bleach as it can damage wood fibers and kill surrounding plants.
- Mix and apply the cleaning solution: Follow the product’s dilution ratio and apply evenly across the deck surface using a garden sprayer or a stiff-bristle brush.
- Scrub the boards: Work the solution into the wood grain using a long-handled scrub brush, paying extra attention to joints between boards, shaded corners, and any areas showing visible mildew or staining.
- Rinse with pressure washing: Use a pressure washer set between 1,200 and 1,500 PSI with a fan-tip nozzle. Hold the nozzle 6–12 inches from the surface and always work in the direction of the wood grain to avoid raising fibers unnecessarily.
- Allow to dry completely: Do not rush this phase. The deck must reach below 15% moisture content before any stain is applied.
Can You Stain a Wood Deck Without Cleaning It First?
No, you cannot stain a wood deck without cleaning it first, because stain requires direct contact with bare wood fiber to penetrate properly, and any surface contamination acts as a barrier that prevents absorption. This is not a recommendation; it is a technical requirement of how penetrating stains work at a molecular level.
Specifically, the consequences of skipping the cleaning step are significant and often irreversible without full stripping:
- Adhesion failure: Stain applied over dust, oils, or old finish residue will not bond to the wood surface and will begin peeling or flaking within weeks of application.
- Blotchy, uneven color: Mildew, tannins, and surface contaminants cause the stain to absorb unevenly, resulting in streaks, dark patches, and inconsistent tone across the deck.
- Reduced lifespan: A stain that cannot penetrate properly will degrade much faster than manufacturer specifications indicate, meaning you will be redoing the project in one season rather than three.
The time investment in cleaning is directly proportional to the lifespan of the finished stain job. Skipping it is never cost-effective.
How Do You Remove Old Stain or Mildew from a Wood Deck Before Restaining?
To remove old stain or mildew from a wood deck before restaining, apply a chemical deck stripper to dissolve the old finish, treat mildew-affected areas with an oxygen bleach solution, scrub both thoroughly, and rinse clean before assessing the surface condition. This process is necessary when the existing stain is peeling, flaking, or significantly degraded, because restaining over a compromised finish layer produces the same adhesion failures as staining over dirt.
Step-by-step process for stripping and mildew removal:
- Apply deck stripper: Use a brush or pump sprayer to saturate the old stain with a dedicated chemical deck stripper. Allow it to dwell according to the product instructions (typically 15–30 minutes) until the old finish visibly softens.
- Scrub and lift the old stain: Use a stiff deck brush to agitate and lift the softened finish from the grain. Work in manageable sections to prevent the stripper from drying before you scrub.
- Treat mildew areas: Mix an oxygen bleach solution (approximately 1 cup per gallon of warm water) and apply it directly to any gray, black, or green-stained areas. Allow it to sit for 10–15 minutes before scrubbing.
- Rinse the entire deck: Pressure wash the full surface after stripping and bleach treatment, working with the grain at the same PSI range used during standard cleaning.
- Assess the surface: After the deck dries, inspect the boards. A properly stripped deck should show a natural, consistent wood color without patches of old stain or discoloration. This is the baseline surface condition required for successful restaining.
How Do You Prep a Wood Deck for Staining After Cleaning?
Prepping a wood deck for staining after cleaning involves testing the wood’s moisture level, repairing any damaged boards or fasteners, and sanding the surface to open the wood grain and create a smooth, fiber-free face that accepts stain evenly. The prep stage is what bridges cleaning and application. A clean but improperly prepped deck will still produce an uneven, blotchy, or prematurely failing stain job.
Cụ thể, there are three core tasks in this phase: moisture testing, structural repair, and surface sanding.
Moisture testing is the most frequently skipped step in deck prep, yet it is one of the most important. Wood that retains more than 15% moisture content will not absorb stain effectively because the water molecules in the fiber occupy the same spaces that the stain needs to penetrate. Use a pin-type moisture meter pressed into the surface of several boards across the deck to confirm readiness. Do not rely on elapsed time alone, as thick, dense, or shaded boards can retain moisture long after lighter or more exposed sections appear dry.
Structural repair should be completed before sanding. Walk the deck carefully and look for: loose or raised nail and screw heads (countersink or replace them), split or cracked boards (fill hairline cracks with a flexible wood filler rated for exterior use), and any boards showing rot or severe structural damage (replace them entirely before proceeding).
Surface sanding follows repair and addresses raised wood grain, which occurs naturally after pressure washing and is a common cause of surface roughness and uneven stain absorption.
Do You Need to Sand a Wood Deck Before Staining?
Sanding is not mandatory for every deck, but it is necessary when the surface shows raised wood grain after washing, visible rough texture, uneven patches from old stain, or splinter-prone boards. After pressure washing, almost all decks will develop some degree of raised grain as the water causes wood fibers to swell and stand upright. These raised fibers absorb stain inconsistently and create a rough surface that is both aesthetically poor and physically uncomfortable underfoot.
To sand a deck correctly before staining:
- Use 60–80 grit sandpaper for general grain leveling. Coarser grits can scratch the wood unnecessarily, while finer grits may not remove enough raised fiber.
- Always sand in the direction of the wood grain, never across it. Cross-grain sanding leaves scratch marks that become highly visible once stain is applied.
- Use a pole sander for flat board faces and a detail sander or hand-sand for edges, corners, and baluster areas.
- After sanding, vacuum or blow away all dust thoroughly. Dust residue left on the surface will interfere with stain penetration just as other contaminants would.
- Wipe down the sanded surface with a clean, dry cloth to confirm all loose material has been removed before staining begins.
How Long Should You Wait After Cleaning a Wood Deck Before Staining?
You should wait a minimum of 24 to 48 hours after cleaning a wood deck before applying stain, though in cooler or more humid conditions, this drying period may extend to 72 hours or longer. The goal is not simply for the surface to appear dry; the wood fiber throughout the depth of each board needs to release enough moisture to drop below the 15% threshold required for proper stain absorption.
The water bead test is the most reliable field method for confirming readiness: sprinkle a small amount of water onto several boards in different areas of the deck. If the water beads and sits on the surface, the wood is still too saturated to accept stain. If the water absorbs into the wood within 30 seconds, the deck is ready for staining. This simple test takes less than a minute and can save you from a failed stain job caused by applying product too soon.
Factors that extend the required drying time include: cool temperatures below 60°F (15°C), high ambient humidity above 70%, shaded deck areas that receive limited sun exposure, and dense hardwood species that hold moisture longer than softwoods like pine or cedar.
How Do You Stain a Wood Deck Step by Step?
Staining a wood deck step by step requires preparing your tools and workspace, applying stain in the direction of the wood grain starting from the far end of the deck, working in small manageable sections, and maintaining a wet edge throughout the application to prevent lap marks. This is the phase where all previous preparation pays off. A well-cleaned, well-prepped surface will accept stain evenly and consistently. A poorly prepared one will reveal every shortcut in the finished result.
Trước tiên, gather and prepare everything you need before opening the stain container:
Tools required:
- A wide, natural-bristle brush (4–6 inches) for applying stain into gaps between boards and along edges
- A roller with a 3/8-inch nap for covering large flat board surfaces efficiently
- A pad applicator as an alternative to the roller for faster, more controlled coverage on smooth, even boards
- A stain sprayer for very large decks (follow up immediately with a brush to work the stain into the grain)
- Drop cloths or plastic sheeting to protect adjacent siding, plant beds, and structures
Workspace preparation:
- Cover all plants, grass, and adjacent surfaces that could receive stain overspray or drips
- Stir (do not shake) the stain thoroughly to blend any settled pigment
- Pour stain into a wide tray for roller or pad application, or work directly from the can when using a brush
Application sequence:
- Begin at the far end of the deck (the end farthest from the entry point) and work back toward the door or exit so you never paint yourself into a corner.
- Start with the areas that are hardest to reach: baluster gaps, stair risers, and the edges of boards against the house.
- Apply stain along the full length of 2–3 boards at a time, working with the grain from one end of the board to the other without stopping midway.
- Apply a generous but not excessive coat. On porous, weathered wood, the stain will absorb quickly. On newer or denser wood, you may see pooling; wipe away any excess within 5 minutes to prevent a tacky, uneven finish.
- Work continuously without taking extended breaks, as stopping mid-section allows stain to dry at an inconsistent rate.
How Do You Apply Stain to a Wood Deck Without Getting Streaks or Lap Marks?
The key technique for avoiding streaks and lap marks when staining a wood deck is maintaining a wet edge throughout the entire application by working on parallel groups of 2–3 boards simultaneously and always connecting each new brush stroke into still-wet stain from the previous pass. Lap marks form when stain from a new stroke is applied over a section that has already begun to dry, creating a visible doubling of pigment concentration at the overlap point.
Cụ thể hơn, follow these application techniques to achieve a streak-free, professional-quality finish:
- Work in board-length sections: Apply stain along the complete length of 2–3 boards before moving to the next group. Never apply stain to one small patch and then move laterally to an adjacent spot, as the first patch will dry before you connect back to it.
- Use the wet edge technique: Your brush or applicator must always contact an area where stain is still wet. This blends the overlap smoothly rather than creating a doubled-up line of pigment.
- Do not over-brush: Apply the stain in long, smooth, even strokes and then leave it. Going back over partially dry stain with a brush drags the setting product and creates streaks.
- Wipe excess immediately: On lower-porosity boards where stain puddles rather than absorbing, use a clean rag to wipe away the excess within 5 minutes. Dried excess stain creates a sticky, darkened patch that cannot be blended once set.
- Work in shade when possible: Direct sunlight causes stain to dry faster at the leading edge of your work, narrowing the window for maintaining a wet edge and increasing lap mark risk.
How Many Coats of Stain Does a Wood Deck Need and How Long Between Coats?
Most wood decks require one to two coats of stain, with the first coat serving as the primary penetrating layer and the second coat adding depth of color and additional protection where the wood has fully absorbed the first application. Whether a second coat is needed depends on the porosity of the wood, the opacity level of the stain, and the finished color depth you are targeting.
Regarding timing between coats:
- Water-based stain: Wait 2–4 hours between coats. The surface should be dry to the touch but not fully cured.
- Oil-based stain: Wait 4–8 hours between coats, and in cooler temperatures, err toward the longer end of this range.
To test whether the first coat is ready for a second application, press your fingertip lightly against the stained surface. If no stain transfers to your finger and the surface feels dry but slightly tacky, it is ready. If your finger picks up stain, wait another hour and test again.
On highly weathered or porous decks, the first coat may absorb almost completely into the wood within minutes. In this case, a second coat is strongly recommended to achieve meaningful surface-level protection. On newer, denser timber, one coat may be sufficient if the wood appears to have absorbed the stain evenly without any dry or light patches remaining.
How Long Does Wood Deck Stain Take to Dry and Cure Before Use?
Wood deck stain typically reaches a dry-to-touch state within 1–3 hours, allows light foot traffic after 24 hours, and reaches full cure between 72 hours and 7 days depending on the stain formula, ambient temperature, and humidity level. Understanding the difference between “dry” and “cured” is essential, because using the deck before the stain has fully cured can compromise the protective film, leave footprints embedded in the finish, and reduce the overall lifespan of the application.
Dry to touch (1–3 hours): At this stage, the surface no longer transfers wet stain to the touch. However, the stain has not fully bonded within the wood fiber structure. This is not a safe threshold for foot traffic.
Light foot traffic (24 hours): After approximately 24 hours under normal temperature and humidity conditions, most deck stains are sufficiently dry to allow careful foot traffic with soft-soled shoes. Avoid dragging furniture, placing planters directly on the surface, or any activity that involves concentrated weight or friction.
Full cure (72 hours to 7 days): Full curing means the stain has completed its chemical hardening process throughout the depth of the wood fiber. Until this point is reached, the stain remains vulnerable to water marking, scratching, and indentation from furniture legs. Most water-based stains reach full cure within 72 hours, while oil-based stains may require 5–7 days in ideal conditions.
The following variables can extend curing time significantly beyond these baseline estimates:
- Low temperature: Stain cures through a chemical process that slows considerably in temperatures below 50°F (10°C). Applying stain in cool weather dramatically extends curing time.
- High humidity: Moisture in the air competes with the stain’s evaporation and curing process. Humidity above 70% will extend both drying and curing time.
- Thick application: Applying stain too heavily causes the lower layers to cure more slowly, even when the surface appears dry to the touch.
- Dense wood species: Hardwoods like ipe, teak, or cumaru absorb stain more slowly and may require longer curing intervals between coats and before use.
- Oil-based formula: Oil-based stains inherently require more time to cure than water-based formulas due to the oxidation-based drying mechanism.
Protect the freshly stained deck from rain for at least 24–48 hours after application. Rain during the curing phase can wash surface pigment away, cause water spotting, or introduce moisture that interferes with proper bond formation.
When Is the Best Time to Stain a Wood Deck and What Weather Conditions Should You Avoid?
The best time to stain a wood deck is during late spring through early fall, when temperatures consistently remain between 50°F and 90°F (10°C to 32°C), humidity is moderate, and no rain is forecast for at least 24–48 hours following application. Weather conditions have an outsized influence on stain penetration, drying time, and final finish quality, yet this variable is often overlooked in favor of focusing solely on technique and product selection.
Cụ thể, the following weather conditions should be actively avoided when scheduling a deck staining project:
- Temperatures below 50°F (10°C): Cold slows the curing process, prevents proper penetration, and can cause the stain to become too thick to apply evenly.
- Temperatures above 90°F (32°C): Extreme heat, especially combined with direct sunlight, causes stain to dry faster than it can penetrate into the wood grain, leading to lap marks, uneven absorption, and surface film formation.
- Rain within 24–48 hours: Any moisture that contacts uncured stain can wash away pigment, cause streaking, and interrupt the bonding process. Check a reliable 48-hour weather forecast before beginning any application.
- Direct midday sunlight: Staining a deck in direct sun during the hottest part of the day causes the leading edge of application to dry too quickly, making the wet edge technique nearly impossible to execute properly and increasing lap mark risk.
- High humidity above 85%: Excessive moisture in the air prevents proper evaporation from the stain surface and extends drying time unpredictably.
The optimal staining window is an overcast day or during the cooler morning hours of a clear day, with temperatures in the mid-range, low to moderate humidity, and no precipitation forecast for at least 48 hours. In many regions, late May through early September provides the most reliable windows, with the exception of peak summer heat waves.
Can You Stain a Pressure-Treated Wood Deck and How Is It Different from Regular Timber?
Yes, you can stain a pressure-treated wood deck, but only after the lumber has had sufficient time to dry out and stabilize chemically, which typically takes between 6 months and 1 year after installation. Pressure-treated lumber is infused with chemical preservatives under high pressure during manufacturing. These preservatives, combined with high residual moisture content in newly treated wood, prevent stain from penetrating properly and can cause adhesion failure if staining is attempted too early.
To confirm that pressure-treated lumber is ready for staining, perform the water bead test described earlier: if water absorbs into the surface within 30 seconds, the wood is ready. If it beads, the timber still needs more time to dry and stabilize. Water-based stains are generally preferred for pressure-treated wood because they are less likely to interact negatively with the residual chemical compounds in the lumber.
Are There Eco-Friendly or Low-VOC Wood Deck Stain Options That Still Perform Well?
Yes, low-VOC and zero-VOC water-based deck stains are widely available and perform well for most residential outdoor applications, making them a viable choice for households with children, pets, or environmental concerns. VOC stands for Volatile Organic Compounds, which are the chemical solvents that evaporate from oil-based stains during application and curing. High VOC levels contribute to air quality degradation and can cause respiratory irritation during and after application.

Modern water-based low-VOC formulas have improved substantially in recent years and now offer competitive durability. The primary trade-off is that they typically require more frequent reapplication than oil-based alternatives, and on very porous or weathered wood, they may need an additional coat to achieve equivalent penetration depth. For households prioritizing environmental and health considerations, the reduced chemical exposure during application and the easier cleanup with soap and water represent meaningful practical advantages that outweigh the slightly shorter maintenance cycle.