Patching a concrete crack in your driveway requires identifying the crack type first, then cleaning the surface, applying the right repair material, and allowing full curing before driving on it. The process differs significantly depending on whether you are dealing with a hairline crack under 1/4 inch or a deep structural crack that compromises the slab’s integrity. Understanding this distinction before picking up any tool is the single most important decision you will make throughout the entire repair.
Concrete driveways crack for many reasons, including shrinkage during curing, freeze-thaw cycles, tree root pressure, and heavy vehicle loads. The good news is that most cracks are fully repairable as a DIY project when you have the correct materials on hand, including concrete crack filler, vinyl patch compound, or epoxy injection kits, matched precisely to the crack’s width and depth. Choosing the wrong filler for the wrong crack type is the leading reason DIY repairs fail within one season.
Beyond the repair itself, sealing the patched driveway afterward is a critical step that most homeowners skip, leaving fresh patches exposed to water infiltration and accelerated deterioration. This guide walks you through every stage of the process, from diagnosing the crack type to choosing your tools, preparing the surface, completing the patch, and protecting your work with a final sealant coat.
What Are the Different Types of Cracks in a Concrete Driveway?
There are five main types of cracks in a concrete driveway: hairline cracks, shrinkage cracks, heaving cracks, spalling cracks, and structural cracks, each classified by width, depth, pattern shape, and underlying cause.
Correctly identifying the crack type you are dealing with determines which repair material you buy, which technique you use, and how urgent the repair is. Misidentifying a structural crack as a simple hairline crack and applying a surface filler will result in the patch failing within weeks while the underlying problem worsens. Use a tape measure and a bright flashlight to inspect the crack’s width at its widest point, probe its depth with a thin screwdriver, and observe whether the two sides of the crack are level with each other or offset vertically.
Here is a breakdown of each crack type to help you classify what you are seeing:
| Crack Type | Typical Width | Depth | Pattern | Primary Cause |
|---|---|---|---|---|
| Hairline crack | Less than 1/16 inch | Surface only | Thin, straight or slightly curved | Normal concrete curing shrinkage |
| Shrinkage crack | 1/16 to 1/4 inch | Shallow to mid-slab | Random map or diagonal pattern | Rapid moisture loss during cure |
| Heaving crack | 1/4 inch or wider | Full slab depth common | Raised edge on one side | Tree root pressure or soil frost heave |
| Spalling crack | Varies | Surface layer only | Flaking, pitting, peeling surface | Freeze-thaw damage, deicing salt |
| Structural crack | Greater than 1/4 inch | Full slab depth | Diagonal, wide, with vertical offset | Foundation settlement, overload |
This table summarizes the five crack types by their observable characteristics so you can match your driveway’s damage to the correct repair method before purchasing any materials.
What Is a Hairline Crack vs. a Structural Crack in Concrete?
A hairline crack is less than 1/4 inch wide, confined to the surface layer, and poses no structural threat, while a structural crack runs through the full depth of the slab, is often wider than 1/4 inch, and indicates a failure in load distribution or foundation support.
Comparing these two crack types reveals a sharp difference in urgency and repair complexity. A hairline crack typically appears within the first few years of a driveway’s life as the concrete finishes its long-term curing process and shrinks slightly. The two sides of a hairline crack sit perfectly flush with each other, with no vertical displacement between them. You can often run your fingernail across the crack and barely feel it.
A structural crack, by contrast, tells a very different story. When you inspect the edges, one side is frequently elevated above the other, a condition called vertical displacement or differential settlement. The crack may also grow wider over time, especially after freeze-thaw cycles in winter. A structural crack requires more than filler: it demands that you investigate and address the root cause, whether that is unstable subgrade soil, a nearby tree root system, or an overloaded section of slab, before any patching material will hold long term.
Key visual identifiers to distinguish the two:
- Hairline crack: width under 1/16 inch, edges flush and level, consistent along its length
- Structural crack: width greater than 1/4 inch, vertical offset between edges, widening pattern toward one end
- Structural crack warning: diagonal orientation running from a corner of the slab at roughly 45 degrees
Is a Concrete Driveway Crack a Sign of Serious Foundation Damage?
Not necessarily. Most driveway cracks are not a sign of serious foundation damage. However, certain crack characteristics, including diagonal orientation, vertical edge displacement greater than 1/4 inch, and a spider-web pattern spreading outward from one point, do indicate that foundation soil movement or settlement may be occurring beneath the slab.
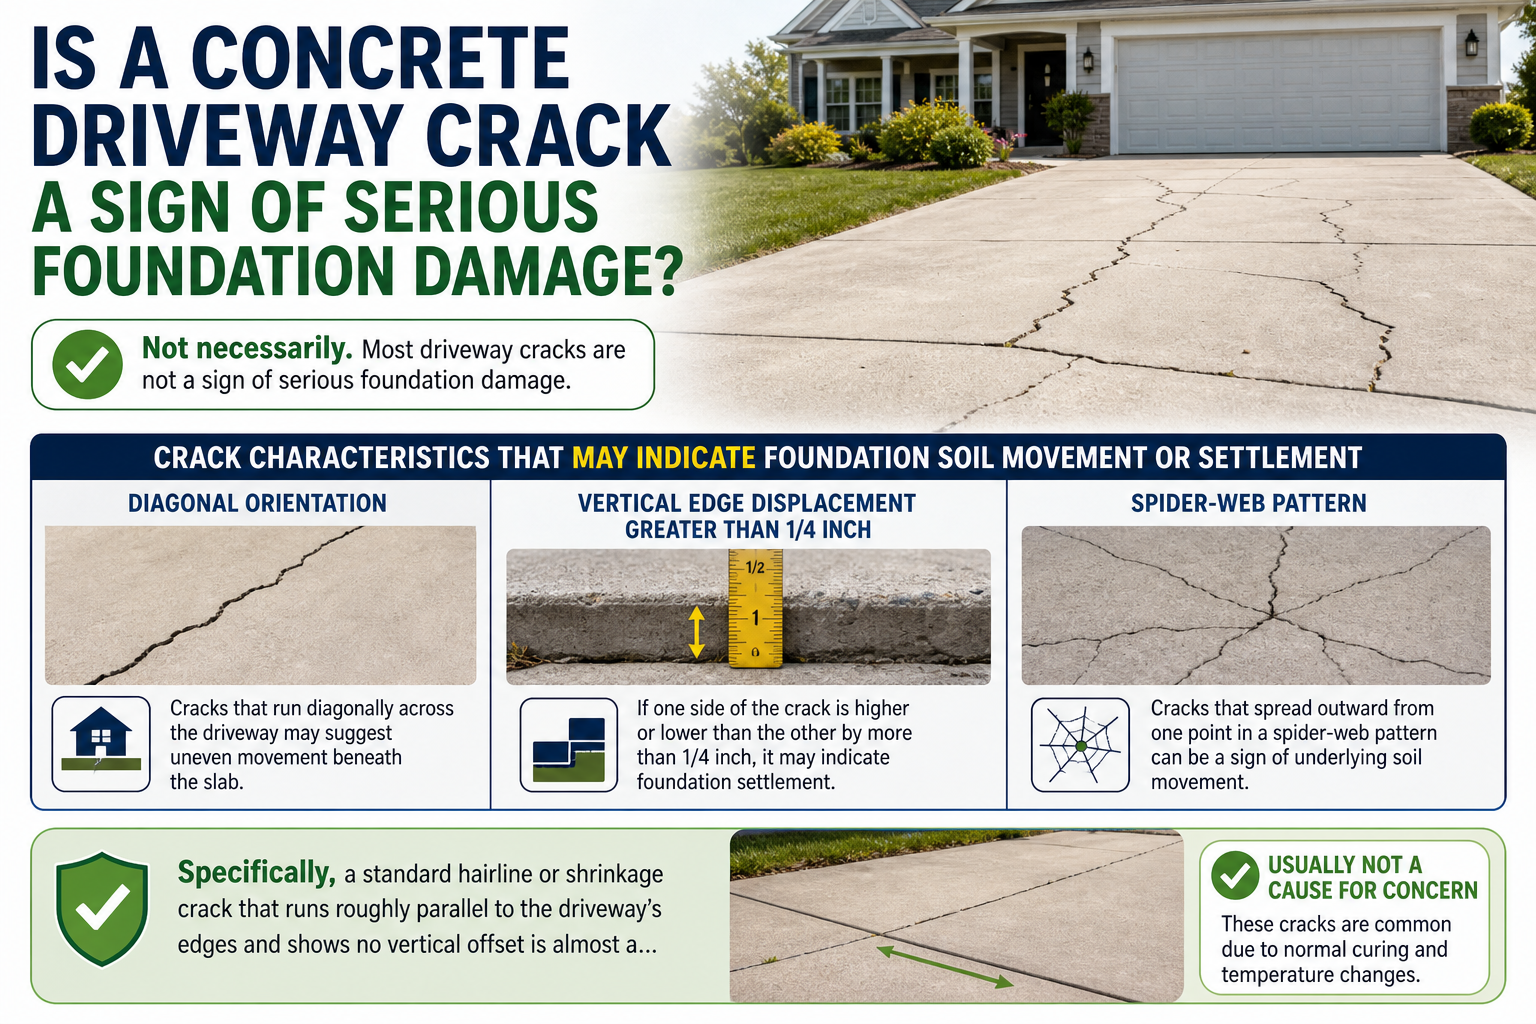
Specifically, a standard hairline or shrinkage crack that runs roughly parallel to the driveway’s edges and shows no vertical offset is almost always cosmetic. The concrete simply shrank during curing or expanded and contracted through seasonal temperature changes. These cracks do not threaten your home’s foundation and do not require professional intervention.
You should treat the situation as a potential foundation concern when you observe one or more of these warning signs:
- The crack runs diagonally from a corner of the slab at 45 degrees or greater
- One edge of the crack sits visibly higher than the other by more than 1/4 inch
- A sunken or raised section of driveway accompanies the crack
- Multiple cracks form a web pattern across a large area of the slab
- The crack has grown noticeably wider or longer since you first noticed it
If two or more of these conditions are present, consult a structural engineer or foundation specialist before attempting any DIY repair. Patching over active foundation movement will not stop the cracking and may delay detection of a more serious problem.
What Tools and Materials Do You Need to Patch a Concrete Driveway Crack?
You need seven core tools and a crack-specific repair material to patch a concrete driveway crack: a cold chisel, a hammer, a wire brush, a wet-dry vacuum, a margin trowel, a caulk gun for tube-applied products, and painter’s tape for edge control.
Gathering the right tools and materials before you begin saves time and prevents the common mistake of stopping mid-repair to make a hardware store run while the open crack collects debris. Below is a complete list organized by tool category and then by material type matched to crack size.
Tools you will need for every repair:
- Cold chisel and hammer: for widening the crack opening and removing loose concrete
- Wire brush (stiff bristle): for scrubbing debris and loose aggregate from inside the crack
- Wet-dry vacuum or air compressor: for removing all dust and debris after brushing
- Margin trowel or putty knife: for pressing material into the crack and smoothing the surface
- Caulk gun: for tube-packaged fillers and sealants
- Painter’s tape: applied along both edges to keep filler contained and produce clean lines
- Safety glasses and gloves: mandatory for chiseling and when working with epoxy or cement
Repair materials matched to crack type and size:
| Crack Size | Recommended Material | Notes |
|---|---|---|
| Less than 1/4 inch (hairline to small) | Concrete crack filler (liquid pour) or polyurethane sealant | Self-leveling; no mixing required |
| 1/4 inch to 1/2 inch (medium) | Vinyl concrete patch compound | Pre-mixed or powder; requires troweling |
| Greater than 1/2 inch (large or structural) | Epoxy injection or hydraulic cement | Epoxy for dry conditions; hydraulic cement for wet or actively leaking cracks |
| Spalling surface | Concrete resurfacer | Feathers to a thin layer over pitted areas |
This table maps crack dimensions to the correct product category so you can make an informed purchase decision at the hardware store before starting any work.
Additional material considerations:
- Always check the product label for the minimum and maximum ambient temperature range for application. Most concrete repair compounds require temperatures between 50°F and 90°F.
- For driveways exposed to deicing salts, choose a polyurethane-based sealant over an acrylic-based product because polyurethane is more flexible and more resistant to chloride penetration.
- Purchase 10 to 15 percent more material than your volume estimate to account for settling and the second-layer application that many repairs require.
How Do You Prepare a Concrete Driveway Crack Before Patching?
Preparing the concrete crack before patching involves four steps: removing all loose material, widening the crack with an undercutting technique, cleaning out every particle of debris, and verifying that the surface meets the moisture requirements of your chosen repair product.
Surface preparation determines approximately 70 percent of the final repair quality. Even the most expensive epoxy injection system will debond within months if it is applied over a crack that still contains dust, oil residue, or loose concrete edges. Skipping or rushing this phase is the primary reason DIY driveway patches fail. The following two sections cover the two most important preparation sub-tasks in detail.
How Do You Clean and Widen a Concrete Crack for Better Adhesion?
Clean and widen a concrete crack by using a cold chisel and hammer to create an inverted-V profile inside the crack, then scrub the interior thoroughly with a wire brush, and finish by vacuuming out all dust and loose particles.
The undercutting technique, which creates that inverted-V or dovetail shape inside the crack channel, is the single most effective way to improve mechanical adhesion between the patch material and the surrounding concrete. When the inside of the crack is wider than the surface opening, the hardened repair material is physically locked into place rather than simply sitting on a flat surface. This prevents the patch from popping out under thermal expansion and contraction stress.
Step-by-step cleaning and widening process:
- Position the cold chisel at a slight inward angle along one wall of the crack, not straight down into it
- Strike the chisel with a hammer using controlled, moderate force to chip away the crack wall, widening the base of the crack beyond its surface opening
- Repeat on the opposite wall to create the undercutting profile on both sides
- Use a stiff wire brush to scrub the entire interior of the crack, including the walls and the bottom, in a back-and-forth motion
- Run the wet-dry vacuum nozzle along the full length of the crack to pull out all dust and chipped concrete
- If the crack shows any oil or grease staining from vehicle drippings, apply a mild muriatic acid solution diluted to a 1:10 ratio with water, let it react for two minutes, then rinse thoroughly and vacuum again
Does a Concrete Crack Need to Be Dry Before Applying Patch Material?
Yes and no. Whether the crack needs to be dry depends entirely on the type of repair material you are using, and selecting the wrong product for a wet or moist crack is a common and costly mistake.
Epoxy-based repair compounds and polyurethane sealants require the crack to be completely dry before application. Moisture on the concrete surface breaks the chemical bond between these products and the substrate, causing premature delamination. For these materials, allow the crack interior to dry for a minimum of 24 hours after cleaning, or use a heat gun or propane torch on a low setting to accelerate drying in the crack channel before applying the product.
Hydraulic cement is the exception. It is specifically designed to be applied to wet surfaces and can even set while in contact with actively flowing water. This makes it the correct choice for cracks that are showing visible moisture, weeping water after rain, or are located in areas where the soil below retains moisture for extended periods.
Moisture requirements by product type:
- Concrete crack filler (liquid pour): surface should be dry but can tolerate slight surface dampness if the product label permits
- Vinyl concrete patch compound: requires a damp (not wet) surface to improve bond; lightly mist the crack with water just before applying
- Epoxy injection: requires fully dry surface; 24-hour minimum dry time after cleaning
- Hydraulic cement: can be applied to wet or actively leaking cracks; no dry time required
- Polyurethane sealant: requires dry surface; follow manufacturer’s specified dry time, typically 24 to 48 hours
How Do You Patch a Hairline or Small Concrete Driveway Crack Step by Step?
Patch a hairline or small concrete driveway crack in five steps: clean and prepare the crack, apply painter’s tape along both edges, pour or inject the crack filler, smooth the surface with a trowel, and allow the material to cure fully before exposing it to foot or vehicle traffic.
This process applies to cracks narrower than 1/4 inch, which are the most common type found on residential driveways. The repair materials for this crack size are liquid or semi-liquid, self-leveling, and require no mixing, which makes this a straightforward one-person job that typically takes under two hours of active work.
Step-by-step repair process for small and hairline cracks:
Step 1: Clean and prepare the surface. Use a wire brush to scrub the crack interior, then vacuum out all dust and debris. If the crack is in a low spot where water pools, dry it completely before proceeding. Allow the surface to reach ambient temperature if it has been in direct sunlight, as hot concrete can cause filler to cure too quickly and shrink.
Step 2: Apply painter’s tape along both edges. Run a strip of painter’s tape on each side of the crack, leaving just the crack opening exposed. This prevents filler from spreading onto the surrounding driveway surface and produces a clean, professional-looking finished edge.
Step 3: Apply the concrete crack filler. Cut the tip of the tube or bottle at a 45-degree angle to create an opening slightly narrower than the crack width. For a caulk-gun tube, hold the gun at a 45-degree angle and move at a steady pace along the crack, slightly overfilling the channel to account for settling. For liquid pour filler in a bottle, pour it slowly and allow it to flow naturally into the crack by gravity.
Step 4: Smooth and feather the surface. Within two to three minutes of application, before the filler begins to skin over, use a margin trowel or a putty knife to press the material firmly into the crack and smooth the top surface flush with the surrounding concrete. Feather the edges gently so there is no raised lip that could become a trip hazard or catch a snow shovel blade in winter.
Step 5: Remove tape and allow curing. Pull the painter’s tape off at a low angle immediately after smoothing, before the filler cures, to get the cleanest edge. Allow the repair to cure according to the product label, typically 24 to 48 hours before vehicle traffic.
Pro tip: If the hairline crack is in a high-traffic area exposed to direct sunlight, drape a piece of burlap or a damp cloth over the fresh repair during the first four hours of curing to slow the drying process and prevent surface shrinkage cracks from forming in the filler itself.
How Do You Repair a Large or Deep Concrete Driveway Crack Step by Step?
Repair a large or deep concrete driveway crack in five steps: chisel and clean the crack, insert a foam backer rod for depth control, prepare and apply your patch compound in layers, compact each layer thoroughly, and finish the surface flush with the surrounding slab.
This process applies to cracks wider than 1/4 inch or deeper than 1/2 inch. Deep cracks require a fundamentally different approach than hairline repairs because simply filling a deep void in one pass causes the material to shrink as it cures, leaving a sunken, hollow, or cracked repair that fails quickly. The layered application method and the foam backer rod technique described below are the two techniques that separate a durable repair from a temporary one.
Step 1: Chisel open and clean the crack thoroughly. Use a cold chisel and hammer to apply the undercutting technique described in the preparation section. For large cracks, you may also need to use an angle grinder with a diamond blade to create clean, uniform walls. Remove all loose concrete, vacuum the crack completely, and wipe the interior walls with a damp cloth to remove fine dust.
Step 2: Insert a foam backer rod. For any crack deeper than 1/2 inch, press a closed-cell foam backer rod into the crack before adding any repair material. The backer rod, available at hardware stores in diameters from 3/8 inch to 1 inch, fills the lower portion of the crack void and provides a firm base for the patch material. Choose a backer rod slightly larger in diameter than the crack width so it compresses slightly and stays in place. Position it so its top sits approximately 1/4 to 3/8 inch below the slab surface.
Step 3: Prepare the patch material. For cracks between 1/4 and 1/2 inch wide, use a pre-mixed vinyl concrete patch compound or a powder-based compound mixed with water according to the package directions. For cracks wider than 1/2 inch or those with structural displacement, use an epoxy mortar compound or a two-part polyurethane foam injection system. Mix only as much material as you can use within the product’s open working time, typically 15 to 30 minutes for most compounds.
Step 4: Fill the crack in layers. Apply the first layer of patch compound to a maximum depth of 1/2 inch, pressing it firmly into the crack walls with a margin trowel to eliminate air voids. Compact the layer by tamping it with the flat face of the trowel. Allow this layer to set until it is firm but not fully hard, typically 30 to 60 minutes depending on temperature and humidity, then apply the second layer. Repeat until the patch material is slightly proud of the surrounding surface.
Step 5: Finish the surface. Once the final layer is in place, use a margin trowel to strike the surface flush with the surrounding concrete, matching the existing texture as closely as possible. For a broom-finish texture, drag a stiff-bristle brush lightly across the still-soft surface in one direction before the material begins its final set.
How Do You Fill a Deep Crack in a Concrete Driveway Without It Sinking?
Fill a deep crack without sinking by using a foam backer rod to control fill depth and applying patch compound in multiple thin layers of no more than 1/2 inch each, allowing each layer to partially set before adding the next.
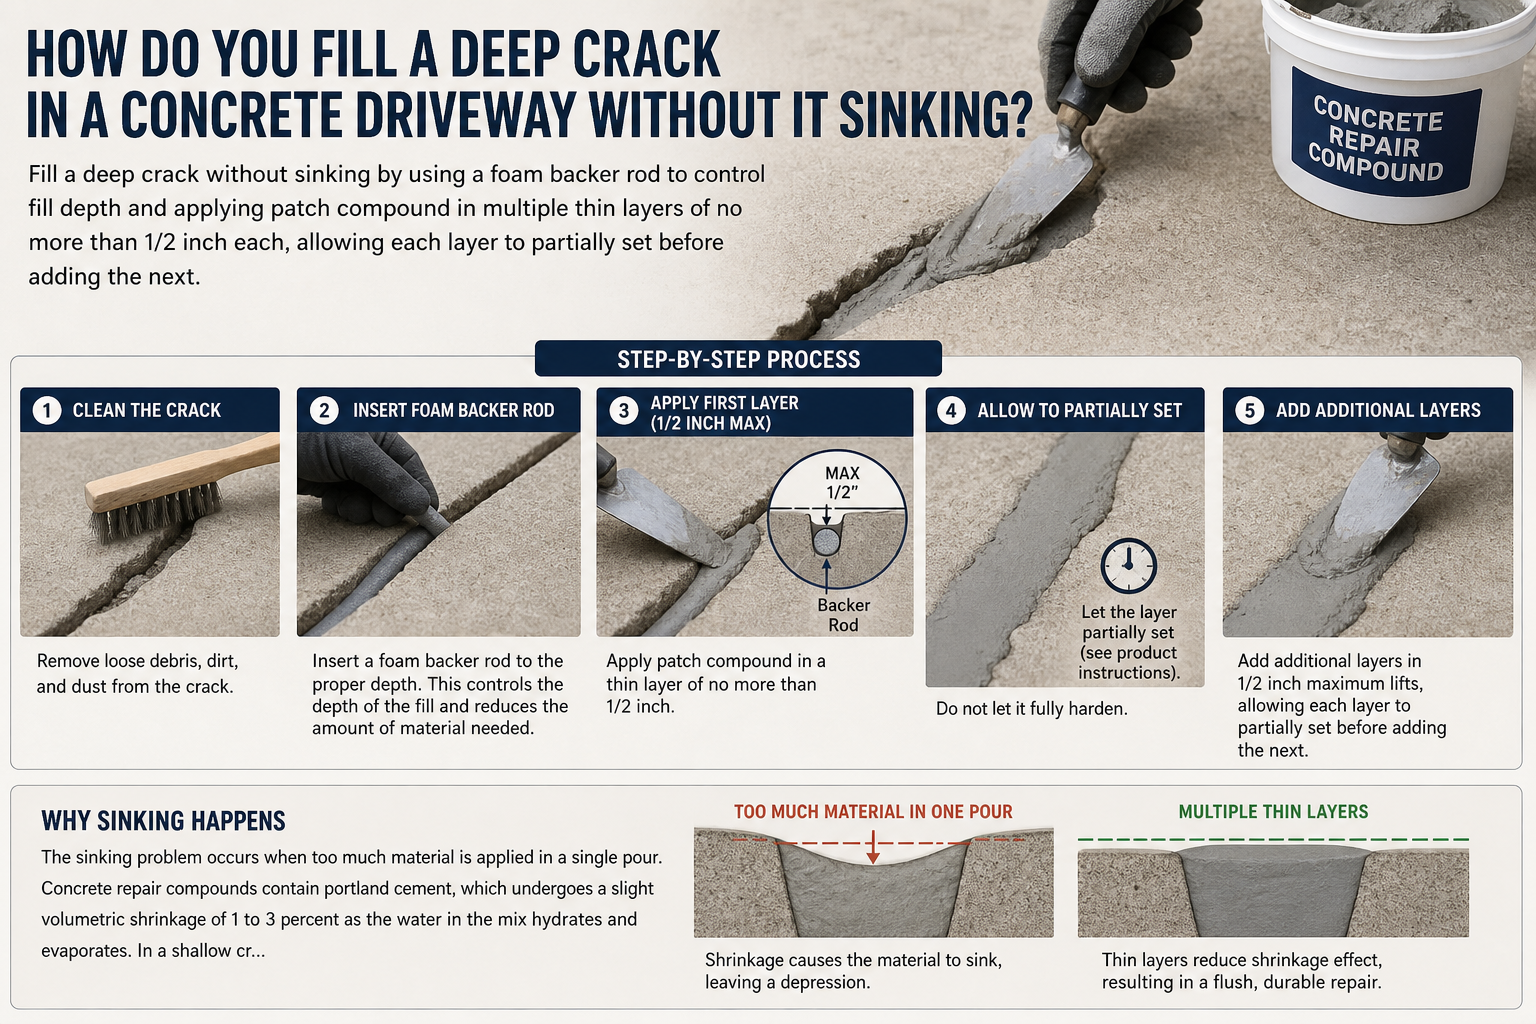
Specifically, the sinking problem occurs when too much material is applied in a single pour. Concrete repair compounds contain portland cement, which undergoes a slight volumetric shrinkage of 1 to 3 percent as the water in the mix hydrates and evaporates. In a shallow crack, this shrinkage is negligible. In a crack that is 2 or 3 inches deep filled in a single pass, the cumulative shrinkage pulls the surface of the patch down 1/4 inch or more below the surrounding slab, creating a trench that collects water and accelerates further cracking.
Layering protocol to prevent sinking:
- Maximum single-layer depth: 1/2 inch per application
- Wait time between layers: 30 to 60 minutes at 70°F, or until the layer resists a fingernail indentation
- Final layer: apply slightly proud of the surface to allow for minimal finishing shrinkage, then strike flush with a trowel
- Never add the next layer to a fully hardened previous layer without first roughening the surface with a wire brush and applying a bonding adhesive coat
How Long Does It Take for Concrete Crack Filler to Cure Before Driving on It?
Curing time varies by material: concrete crack filler typically requires 24 to 48 hours, epoxy injection cures in 4 to 8 hours for light foot traffic and 24 hours for vehicle traffic, and hydraulic cement sets hard in 1 to 3 hours but reaches full structural strength after 28 days.
These times assume ideal curing conditions of 70°F and 50 percent relative humidity. Temperature and moisture significantly influence actual curing time. Cold weather slows the chemical hydration reaction dramatically: at 50°F, expect curing times to increase by 50 to 100 percent compared to the package-stated time at 70°F. At temperatures below 40°F, most repair compounds will not cure properly at all and may remain permanently soft or delaminate when temperatures drop further.
Curing time reference by material type:
| Material | Light Foot Traffic | Vehicle Traffic | Full Structural Strength |
|---|---|---|---|
| Liquid concrete crack filler | 4 to 6 hours | 24 to 48 hours | 7 days |
| Vinyl concrete patch compound | 2 to 4 hours | 24 hours | 28 days |
| Epoxy injection | 4 to 8 hours | 24 hours | 7 days |
| Hydraulic cement | 1 to 3 hours | 24 hours | 28 days |
| Polyurethane sealant | Skin forms in 1 hour | 24 to 72 hours | 7 days |
This table provides minimum wait times before returning the driveway to use. When in doubt, wait the longer time, particularly before allowing heavy vehicles such as trucks or SUVs on the repaired area.
Can You Seal a Concrete Driveway After Patching to Prevent Future Cracks?
Yes, you can and should seal a concrete driveway after patching. Sealing is a critical protective step that reduces water infiltration, blocks chloride penetration from deicing salts, and slows the freeze-thaw cycling that causes new cracks to form in both the original slab and the fresh repair.
The most important timing rule is that the patch must cure fully before any sealant is applied. Applying sealant over uncured patch material traps moisture inside the repair and prevents complete hydration, which weakens the patch and causes it to deteriorate faster than an unsealed repair would. For most patch compounds, allow a minimum of 28 days of curing before applying sealant, even if the surface feels hard and dry to the touch much sooner.
Recommended sealant types for residential driveways:
- Acrylic-based sealer: easy to apply with a roller or squeegee, dries quickly (2 to 4 hours), good UV resistance, low cost. Best for driveways in mild climates with minimal deicing salt use. Reapply every 1 to 2 years.
- Polyurethane-based sealer: more flexible than acrylic, excellent chemical and abrasion resistance, better performance in freeze-thaw climates. Reapply every 2 to 3 years.
- Epoxy-based sealer: the most durable option, forms a hard, semi-gloss film, excellent for driveways in high-traffic or high-load applications. More difficult to apply and more expensive. Reapply every 3 to 5 years.
Application process for driveway sealant:
- Wait a minimum of 28 days after the final patch has been applied before sealing
- Clean the entire driveway surface with a pressure washer and allow it to dry completely for 24 hours
- Apply the first coat of sealer with a long-handled squeegee applicator or a 3/8-inch nap roller, working in 3-foot-wide sections
- Allow the first coat to dry according to the product label, typically 2 to 8 hours
- Apply the second coat in the perpendicular direction to the first coat for even coverage
- Keep foot traffic off for 24 hours and vehicle traffic off for 48 to 72 hours after the final coat
Should You Repair a Cracked Concrete Driveway Yourself or Hire a Professional?
DIY repair wins on cost and is appropriate for hairline and medium cracks, while professional repair wins on durability and is the better choice for structural cracks, full-slab displacement, or any crack associated with foundation settlement.
The decision between DIY and professional repair comes down to three variables: the severity of the crack you identified in the first section, your comfort level with physical tools and concrete mixing, and the long-term cost comparison between a well-executed DIY repair and a professional job that comes with a warranty.
Comparison table: DIY vs. Professional Concrete Crack Repair
| Criteria | DIY Repair | Professional Repair |
|---|---|---|
| Average cost | $20 to $100 in materials | $300 to $1,500 per repair area |
| Time required | 2 to 6 hours active work | 1 to 4 hours (professional crew) |
| Suitable crack types | Hairline, shrinkage, small to medium surface cracks | Structural, heaving, spalling over large areas |
| Skill level required | Basic, learnable in one project | Trained; uses specialized equipment |
| Durability of result | 2 to 5 years with proper technique | 5 to 10 years with professional materials |
| Warranty | None | Typically 1 to 3 years |
This table compares the two options across six criteria to help you make the right choice based on your specific situation and crack type.
DIY repair is appropriate when the crack is less than 1/4 inch wide, there is no vertical displacement between the two sides, the crack is limited to one or two localized areas of the slab, and you are comfortable using a chisel, vacuum, and trowel. The total cost for a complete DIY repair kit including filler, backer rod, trowel, and sealant typically falls between $50 and $100.
Professional repair is the correct choice when the crack is wider than 1/2 inch, shows vertical displacement, is accompanied by a sunken slab section, or has recurred multiple times after previous repairs. In these cases, a concrete contractor can diagnose the underlying cause, inject structural epoxy under pressure for a full-depth repair, or recommend mudjacking or polyurethane foam lifting to stabilize the subgrade before patching.
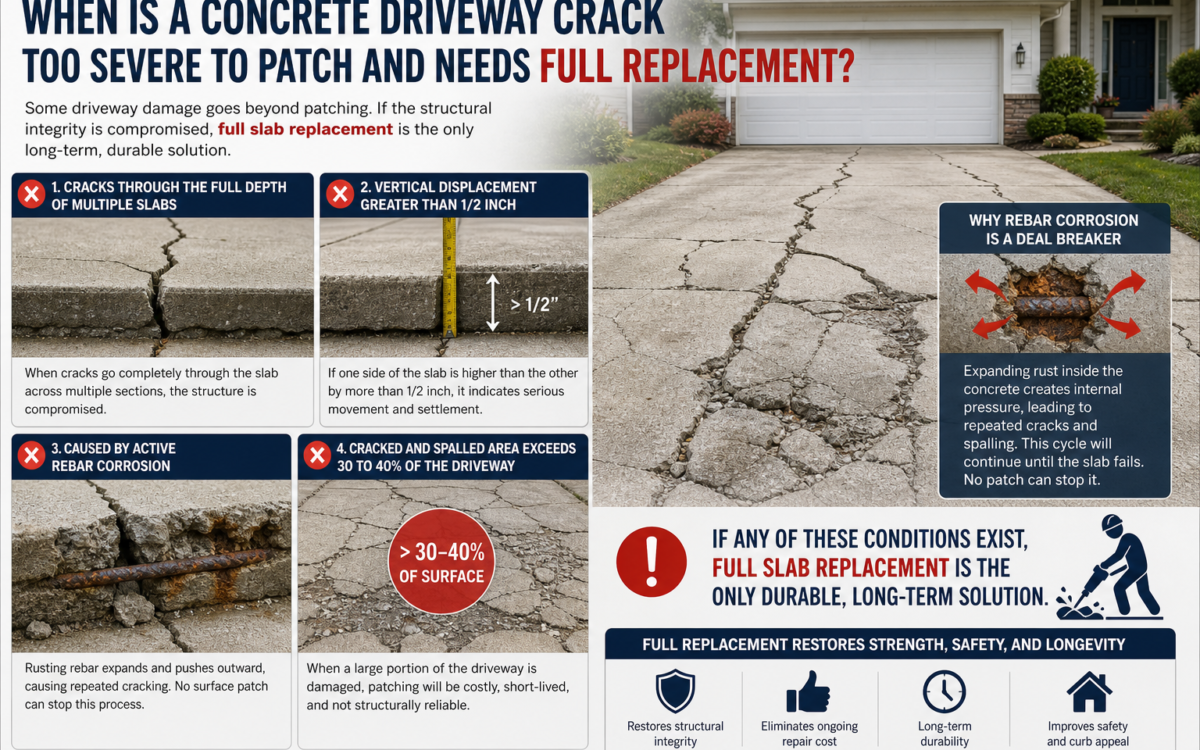
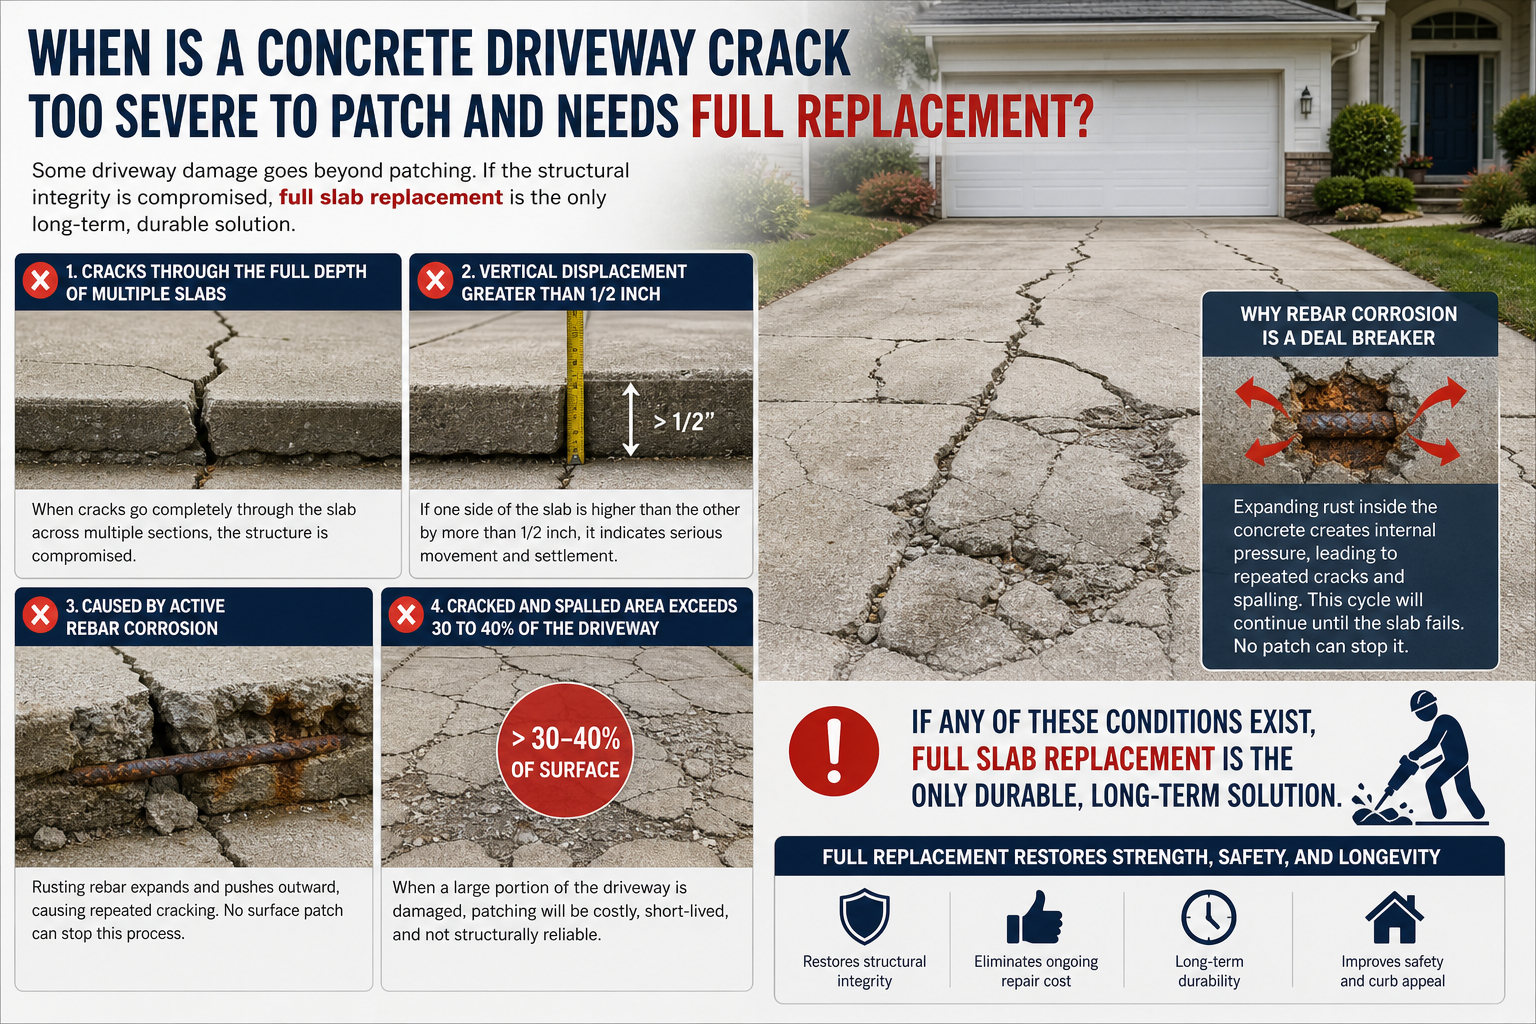
When Is a Concrete Driveway Crack Too Severe to Patch and Needs Full Replacement?
A driveway crack is too severe to patch when it runs through the full depth of multiple slabs, shows vertical displacement greater than 1/2 inch, is caused by active rebar corrosion, or when the total area of cracked and spalled concrete exceeds 30 to 40 percent of the driveway’s surface. Rebar corrosion, in particular, causes repeated cracking because the expanding rust pushes outward from inside the slab. No surface patch can stop this process. Full slab replacement becomes the only durable solution when corrosion is the root cause, typically identifiable by rust-colored staining along the crack and a hollow sound when you tap the surface with a hammer.
What Is the Best Time of Year to Repair Concrete Driveway Cracks?
The best time to repair concrete driveway cracks is spring or early fall, when ambient temperatures consistently fall between 50°F and 90°F (10°C to 32°C) and rain is not forecast for at least 24 hours after the repair. Avoid summer repairs on days above 90°F, as extreme heat accelerates surface drying and causes the patch to shrink and crack. Avoid winter repairs entirely in freeze-thaw climates: any moisture trapped in an improperly cured patch will freeze, expand, and fracture the repair before it reaches full strength. The freeze-thaw cycle is the most destructive force acting on concrete driveways in northern climates, and a crack repaired in October in a region that sees its first hard freeze in November may not survive its first winter if the curing window is cut short.