Fixing a drywall crack permanently requires cleaning the crack, applying fiber mesh tape, layering joint compound in multiple coats, sanding smooth, priming, and painting to match. Unlike quick spackle patches that fail within months, a permanent repair uses setting-type compound reinforced with mesh tape to lock the crack in place. When done correctly, this DIY process takes one to two weekends and delivers results that last for years without reappearing.
Knowing what type of drywall crack you are dealing with is just as important as knowing how to fix it. Hairline cracks need minimal preparation, while large cracks over 6mm require additional backing support and multiple compound layers. Corner bead cracks and stress cracks each follow slightly different repair methods, and identifying the correct category before you pick up a putty knife saves significant time and material costs.
Before starting any repair, gathering the right tools and materials keeps the project moving without interruption. A standard drywall crack repair kit includes joint compound, drywall mesh tape, a putty knife, sandpaper in multiple grits, drywall primer, and matching paint. Total material costs for a typical hairline-to-medium crack repair range from $20 to $60 at most hardware stores, making this one of the most cost-effective home improvement projects available to homeowners.
What Are the Steps to Fix a Drywall Crack Permanently?
Permanently fixing a drywall crack involves seven key steps: surface preparation, crack widening and cleaning, mesh tape application, joint compound layering (minimum 2 to 3 coats), sanding between coats, priming, and finish painting. The critical difference between a permanent repair and a temporary patch is the combination of fiber mesh tape and setting-type compound, which creates a rigid bridge across the crack that prevents it from reopening under normal house movement.
Drywall crack repair is a process, not a single action. Each step builds on the last, and skipping any stage, especially the multi-coat compound application, is the primary reason repairs fail and cracks reappear. Below is each stage broken down so you can execute the repair with confidence.
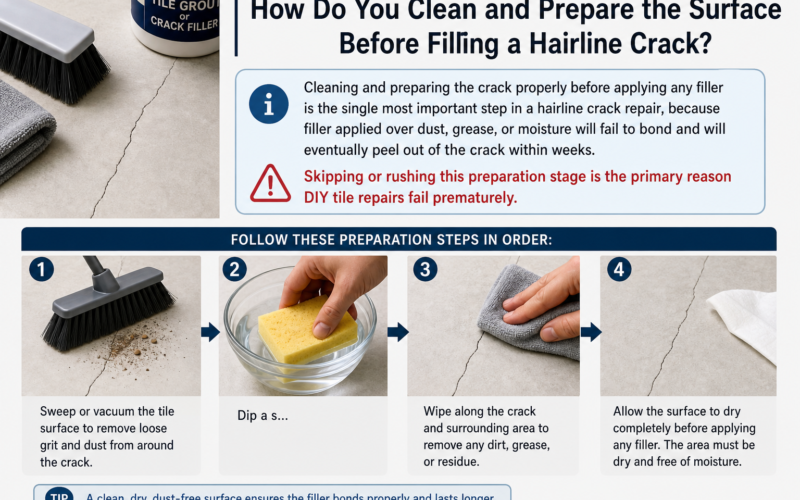
How Do You Prepare a Drywall Crack Before Applying Joint Compound?
Proper crack preparation means widening the crack slightly with a putty knife, removing all loose debris, and wiping the surface clean before any compound is applied. This process is called undercutting, and it gives the joint compound a larger, rougher surface area to grip rather than sitting on top of a narrow, dusty gap.
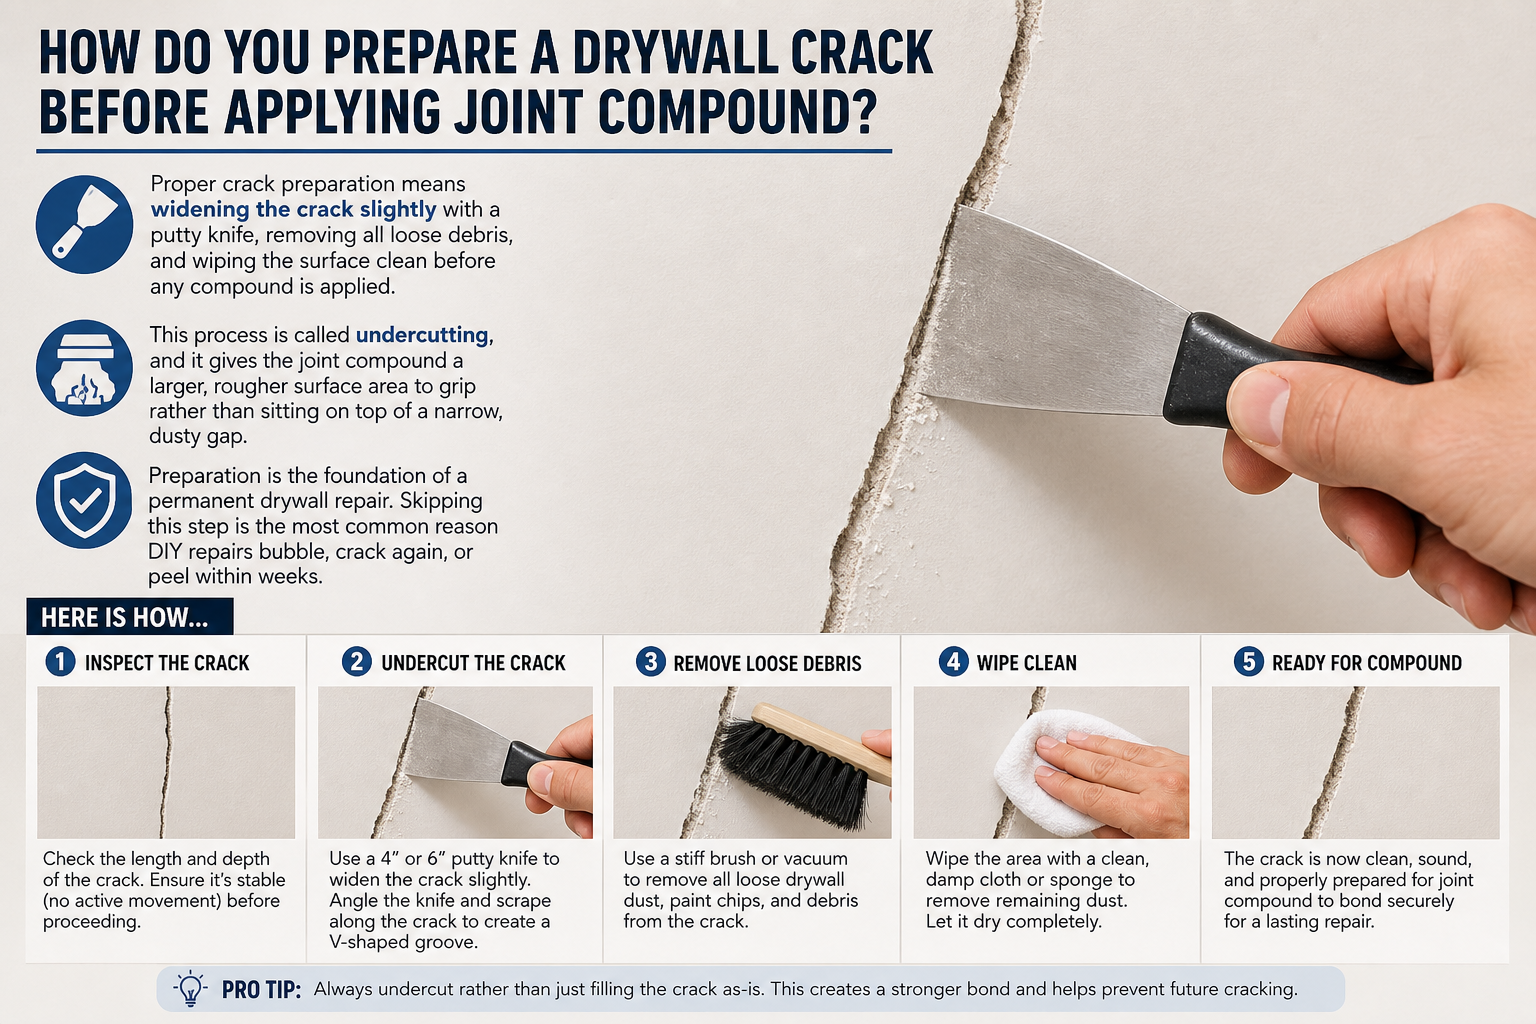
Preparation is the foundation of a permanent drywall repair. Skipping this step is the most common reason DIY repairs bubble, crack again, or peel within weeks.
Here is how to prepare a drywall crack correctly:
- Widen the crack slightly: Use a putty knife or utility knife to scrape along the crack at a slight angle, creating a V-shaped groove. This undercutting technique ensures compound fills the crack from the inside rather than sitting only on the surface.
- Remove all loose material: Pick out any crumbling drywall paper, loose compound chunks, or paint flakes along the crack edge. Loose material prevents proper adhesion.
- Vacuum the area: Use a shop vac or a brush to remove all dust from inside and around the crack. Dust acts as a barrier between the compound and the drywall surface.
- Wipe with a damp cloth: Lightly dampen the crack area with a clean cloth to remove remaining fine dust. Allow the surface to dry completely before proceeding, typically 30 to 60 minutes.
- Check for moisture: Press the wall around the crack gently. If the drywall feels soft or spongy, moisture may be present. Identify and eliminate the moisture source before attempting any repair, or the crack will return.
According to guidance from the United States Gypsum Company (USG), one of North America’s leading drywall manufacturers, surface cleanliness and proper undercutting are the two most critical factors in achieving long-term joint compound adhesion on repaired cracks.
How Do You Apply Joint Compound and Drywall Tape to Seal a Crack?
Applying joint compound and drywall tape to seal a crack requires pressing fiber mesh tape directly over the crack first, then spreading a thin layer of all-purpose joint compound over the tape using a 6-inch putty knife, feathering the edges outward, and repeating for a minimum of two to three coats. Each coat must dry completely before the next is applied.
The taping and compounding stage is where the repair transitions from a temporary patch into a permanent structural fix. Fiber mesh tape embedded in compound creates a reinforced bridge across the crack that flexes slightly with the house without breaking.
Follow these steps for correct tape and compound application:
- Cut mesh tape to length: Measure and cut self-adhesive fiberglass mesh tape to cover the entire length of the crack, extending at least one inch beyond each end.
- Press tape firmly over the crack: Smooth the tape down with your fingers, ensuring it lies flat with no bubbles or lifted edges. Self-adhesive mesh tape holds in place without any pre-coat of compound needed.
- Apply the first compound coat: Load a 6-inch putty knife with all-purpose joint compound. Spread a thin, even layer directly over the tape, pressing the compound into the mesh. Feather the edges outward so the coat extends 2 to 3 inches on each side of the tape.
- Allow complete drying: Let the first coat dry for at least 24 hours, or until the compound has turned completely white with no darker wet spots remaining.
- Apply the second coat: Use a wider 10-inch knife for the second coat. Apply a slightly thinner layer and feather the edges 4 to 6 inches outward from the tape. A wider feather creates a more gradual, invisible blend with the surrounding wall.
- Apply a third coat if needed: For cracks wider than 3mm or in highly visible areas, a third skim coat of compound thinned slightly with water creates a smoother final surface and better paint adhesion.
Setting-type compound (also called hot mud) is recommended over pre-mixed all-purpose compound for the first fill coat on large or structural cracks because it hardens chemically rather than by drying, creating a harder and less shrinkage-prone base layer.
How Do You Sand, Prime, and Paint Over a Repaired Drywall Crack?
Sanding, priming, and painting a repaired drywall crack involves three sequential finishing steps: dry-sanding from 120-grit to 220-grit until the surface is flush, applying a drywall-specific primer to seal the compound, and then painting with matched wall paint in two coats. Completing all three steps in order is what makes a repaired crack truly invisible to the eye.
Once the compound coats are fully cured, the finishing phase determines whether the repair blends seamlessly or remains visible as a patch. Rushing through the sanding or skipping primer are the two most common mistakes that leave a repair looking worse than the original crack.
How Do You Sand a Repaired Drywall Surface Without Damaging It?
Sand a repaired drywall surface by starting with 120-grit sandpaper mounted on a sanding block, working in circular motions to knock down ridges, then finishing with 220-grit sandpaper to smooth the surface to a fine, paint-ready texture without cutting through the drywall paper face. Using a sanding block rather than sanding by hand distributes pressure evenly and prevents creating low spots or gouges.

Sanding feels straightforward but causes more DIY repair failures than any other finishing step. The key is using light, consistent pressure and checking your progress frequently with a work light held at a low angle to the wall to reveal any high or low spots.
Follow this sanding sequence for best results:
- Let compound cure fully: Wait a minimum of 24 hours after the final coat before sanding. Sanding wet or semi-wet compound tears the surface and embeds paper fibers into the patch.
- Use a sanding block: Wrap 120-grit sandpaper around a hand sanding block or purchase a rubber sanding block from a hardware store. This prevents finger-pressure unevenness.
- Sand in circular motions: Work gently in small circles over the patched area, moving outward toward the feathered edges. The goal is to eliminate ridges and tool marks, not to remove material aggressively.
- Check with a raking light: Hold a flashlight or work light parallel to the wall surface after every few minutes of sanding. Any remaining high spots appear as shadows. Mark them lightly with a pencil and sand specifically those areas.
- Switch to 220-grit: Once the surface feels even to the touch, switch to 220-grit sandpaper and make one final light pass over the entire repaired area to smooth micro-scratches left by the 120-grit.
- Dust thoroughly: Wipe the entire sanded area with a slightly damp sponge or tack cloth to remove all sanding dust before priming. Dust trapped under primer creates a rough, uneven paint surface.
Critical warning: If you see the brown paper face of the drywall appearing through the compound while sanding, stop immediately and apply a thin skim coat of compound to cover that area before continuing. Sanding through the paper face creates a rough, absorptive patch that will look noticeably different under paint no matter how much primer you apply.
How Do You Match Texture and Paint After Fixing a Drywall Crack?
Matching texture and paint after fixing a drywall crack requires applying a coat of drywall primer first to seal the compound, then recreating the existing wall texture using the appropriate technique (spray, stomp, or skip trowel), and finally applying two coats of the original wall paint to blend the repair invisibly. Priming before painting is non-negotiable because bare joint compound absorbs paint at a different rate than surrounding painted drywall, causing a visible dull spot called flashing.
Texture matching is where many homeowners feel uncertain, but most residential walls use one of only a few common textures that are simple to replicate with inexpensive tools available at any hardware store.
Follow this sequence for texture and paint matching:
- Apply drywall primer first: Use a PVA drywall primer (also labeled as drywall sealer) over the entire sanded patch. Apply with a small roller for an even coat. Allow it to dry fully before any texture or paint is applied.
- Identify your existing wall texture: The most common textures are smooth, orange peel (small bumps from a spray can), knockdown (flattened random splatter), and skip trowel (hand-applied irregular trowel marks).
- Replicate the texture:
– For orange peel, use a spray texture can held 18 to 24 inches from the wall. Practice on cardboard first to match the droplet size.
– For knockdown, apply random splatters with a brush or roller, then lightly flatten the peaks with a drywall knife before they dry completely.
– For skip trowel, apply compound thinly with a curved trowel in random overlapping passes.
– For smooth walls, no texture step is needed; prime and paint directly.
- Allow texture to dry fully: Wait at least 4 hours, or overnight, before painting over new texture.
- Paint in two coats: Apply the first coat of wall paint with a small roller. Let it dry 2 to 4 hours. Apply the second coat. Two coats ensure consistent sheen and color depth that blends the repair into the surrounding wall.
If you do not have the original paint color, take a small paint chip from an inconspicuous area of the wall to a hardware store for color matching. Most major paint retailers can match existing colors within one to two shades using spectrophotometer scanning.
What Are the Different Types of Drywall Cracks You Can Fix Yourself?
There are four main types of drywall cracks homeowners can typically fix themselves: hairline cracks (under 1mm), stress cracks (1 to 6mm), corner bead cracks (along wall corners), and large cracks (over 6mm that do not indicate structural movement). Each type requires a slightly different repair approach, but all four are manageable DIY projects when the underlying cause is cosmetic rather than structural.
Understanding crack type before selecting a repair method prevents wasted materials and failed patches. Using the wrong compound or skipping tape on a large crack is why many DIY repairs reopen within a season.
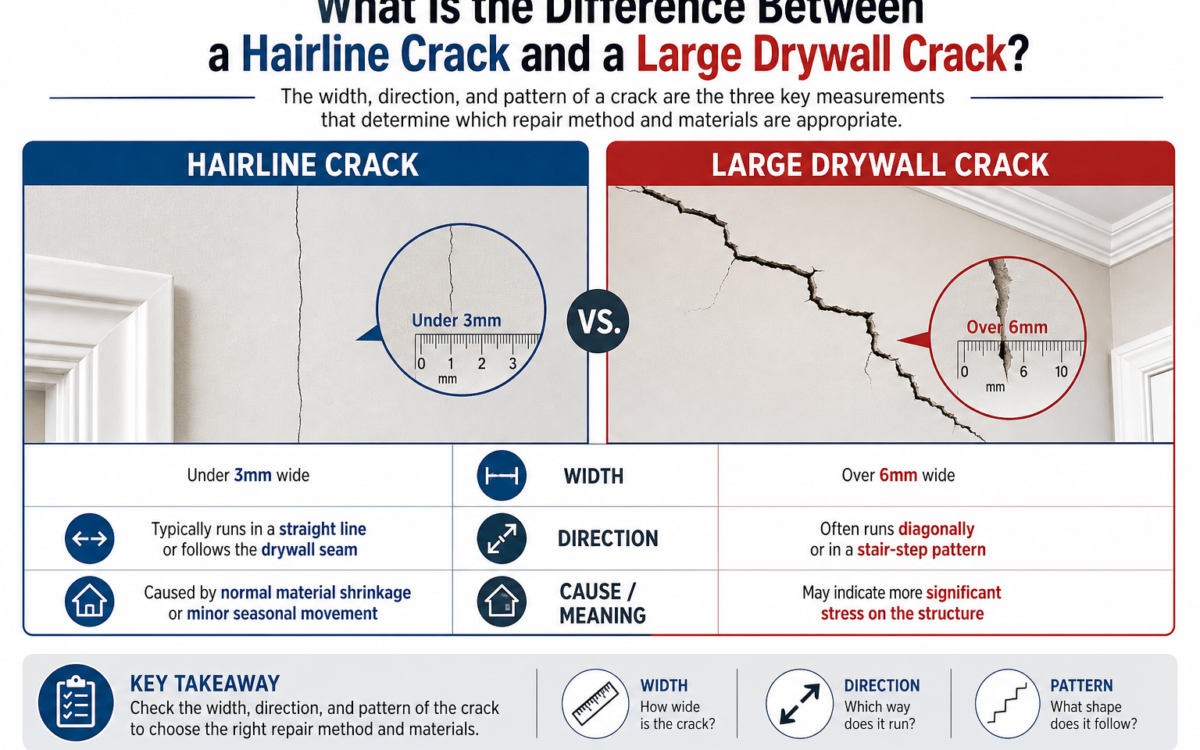
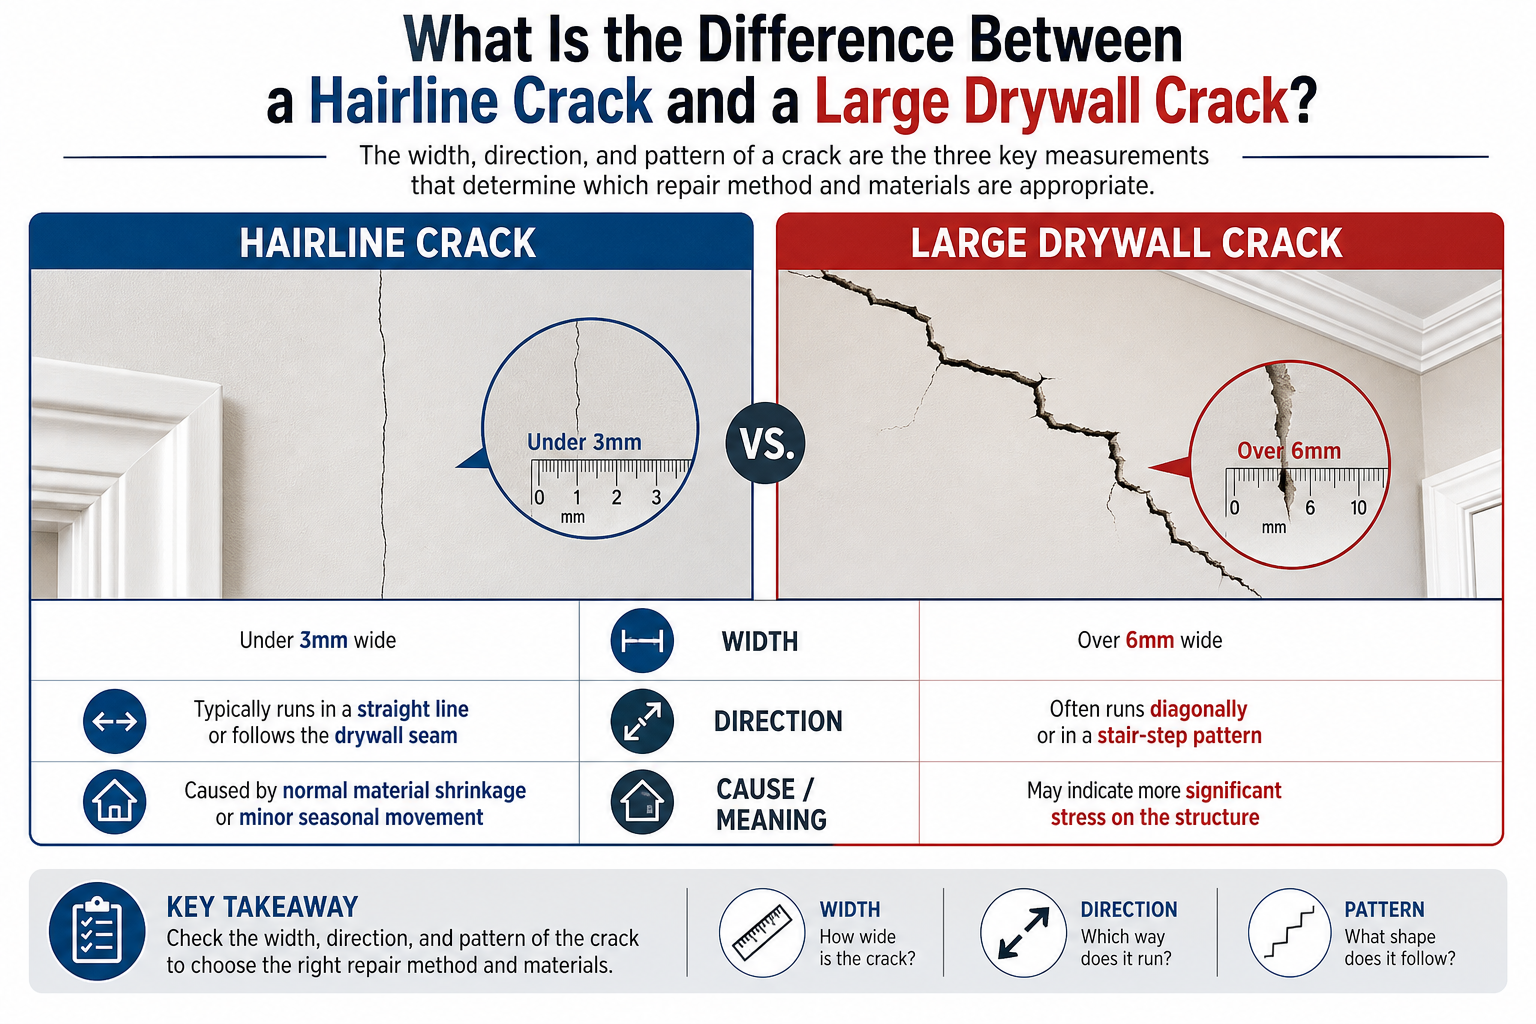
What Is the Difference Between a Hairline Crack and a Large Drywall Crack?
A hairline crack is under 3mm wide, typically runs in a straight line or follows the drywall seam, and is caused by normal material shrinkage or minor seasonal movement, while a large drywall crack is over 6mm wide, often runs diagonally or in a stair-step pattern, and may indicate more significant stress on the structure. The width, direction, and pattern of a crack are the three key measurements that determine which repair method and materials are appropriate.
Here is a comparison of the main crack types to help you identify what you are working with:
| Crack Type | Width | Common Cause | DIY Repair Method |
|---|---|---|---|
| Hairline crack | Under 1mm | Material shrinkage, paint age | Skim coat of compound, no tape needed |
| Stress crack | 1 to 6mm | Seasonal movement, minor settlement | Mesh tape + 2 to 3 compound coats |
| Corner bead crack | Variable | Damaged corner bead, impact | Replace corner bead or apply reinforcement tape |
| Large crack | Over 6mm | Heavy stress, improper framing | Backing board + mesh tape + 3 compound coats |
| Structural crack | Over 6mm, diagonal | Foundation movement, structural failure | Call a structural engineer |
This table shows crack width, typical cause, and the corresponding repair method. Use it as a quick reference before purchasing materials.
To measure a crack accurately, use a standard ruler held perpendicular to the crack at its widest point. Mark the widest measurement, not the average width, when selecting your repair method. A crack that tapers from 8mm at one end to 2mm at the other should be treated as a large crack across its full length.
For corner bead cracks specifically, check whether the metal or vinyl corner bead underneath is dented or separated from the wall. If the bead itself is damaged, no amount of compound over the top will produce a lasting repair. The bead must be re-secured with drywall screws or replaced entirely before finishing.
What Causes Drywall Cracks to Keep Coming Back After Repair?
Drywall cracks keep coming back after repair primarily because of four causes: ongoing moisture infiltration, minor foundation settlement that continues to move the wall, thermal expansion and contraction cycles, and improper repair technique such as using spackle instead of joint compound or applying only one thin coat without tape. Each of these causes produces a different crack pattern, and identifying the correct cause is essential before attempting a second repair.
Here are the four main causes and how to address each before repairing:
- Moisture: Cracks that reappear accompanied by soft drywall, discoloration, or musty odor indicate a water source nearby. Check the roof, plumbing, or HVAC condensation lines above the crack. Repair the moisture source completely before any drywall work begins.
- Foundation settlement: Diagonal cracks at window and door corners that reopen within weeks of repair suggest the house frame is still moving. A structural engineer assessment is recommended before investing in cosmetic repair. In many cases, the settlement stabilizes within a few years and repair becomes viable afterward.
- Thermal expansion: Horizontal cracks along ceiling and wall junctions often result from temperature-driven expansion and contraction between dissimilar materials. Using a flexible elastomeric caulk rated for interior use rather than rigid joint compound in these specific locations can accommodate the movement and prevent recurrence.
- Improper prior repair: If spackle was used on a crack wider than 1mm, the lightweight filler shrinks and lacks the tensile strength to bridge the gap under any wall movement. The solution is to remove all previous spackle, undercut the crack properly, and restart the repair using the correct mesh tape and joint compound method.
When Should You NOT Fix a Drywall Crack Yourself and Call a Professional Instead?
You should not fix a drywall crack yourself when the crack is wider than 6mm and runs diagonally at a 45-degree angle, when the crack has reappeared multiple times after correct repairs, when it is accompanied by sticking doors or windows, or when moisture and mold are visible behind the drywall. These signs point to structural or water damage that cosmetic drywall repair cannot address and may actively conceal from future inspection.
Most drywall cracks are cosmetic and fully safe for DIY repair. However, a small percentage of cracks are symptoms of larger problems, and attempting to patch them without addressing the root cause delays necessary professional intervention.
How Can You Tell If a Drywall Crack Is a Sign of Structural Damage?
A drywall crack is likely a sign of structural damage if it runs diagonally at roughly 45 degrees from the corners of windows or doors, follows a stair-step pattern along mortar joints in masonry walls, is wider at one end than the other (indicating differential movement), or has reappeared within weeks of a proper compound-and-tape repair. Any crack accompanied by doors or windows that have suddenly become difficult to open or close should be evaluated by a licensed structural engineer before cosmetic repair is attempted.
Key warning signs that require professional evaluation:
- Diagonal crack running from the corner of a door or window frame toward the ceiling or floor
- Crack wider than 6mm at its widest point
- Crack that has reappeared two or more times after proper mesh tape repairs
- Visible gap between the wall and ceiling or between the wall and floor
- Bulging or bowing of the wall surface around the crack
- Cracking accompanied by sounds such as popping or settling from the wall or ceiling structure
If you observe any of these signs, document the crack with photos and measurements over 30 days before calling a structural engineer. If the crack is actively growing or changing shape within that period, contact a professional immediately.
How Is Fixing a Drywall Crack Different from Fixing a Plaster Wall Crack?
Fixing a drywall crack is different from fixing a plaster wall crack in terms of materials, tools, and technique: drywall repair uses self-adhesive fiber mesh tape combined with all-purpose joint compound, while plaster wall repair requires a bonding agent applied first to the substrate, followed by a plaster patching compound or base coat plaster, then a finish coat. Applying drywall joint compound directly to a plaster wall without a bonding agent causes the repair to shrink away from the edges and eventually fall out.
Key differences between drywall and plaster crack repair:
- Drywall repair: Uses mesh tape plus joint compound. No bonding agent needed. Three compound coats maximum. Dries by evaporation.
- Plaster repair: Requires PVA bonding agent applied to the exposed lath or substrate first. Uses setting-type plaster or patching plaster, not drywall compound. Setting-type plaster hardens chemically and is significantly harder than joint compound when cured.
- How to identify your wall type: Knock gently on the wall. Drywall sounds hollow and slightly resonant. Plaster sounds dense and solid. Plaster walls also feel noticeably heavier and harder if you attempt to push a thumbtack in by hand.
Applying drywall techniques to a plaster wall, or plaster techniques to drywall, is one of the most common reasons crack repairs fail on the first attempt. Confirming your wall material before purchasing any repair product saves both time and cost.