Yes, you can repair a cracked floor tile without replacing it, and doing so saves you significant time, money, and the headache of tearing up surrounding tiles. Whether you are dealing with a fine hairline fracture barely visible to the naked eye or a dramatic full break splitting the tile into two pieces, the right repair method exists for your situation. The key is matching your approach to the type and severity of the crack.
Understanding the difference between a hairline fracture and a full break is the first step toward a successful repair. A hairline crack is a shallow, narrow split that has not penetrated the full depth of the tile, while a full break means the tile has fractured completely through, often separating into distinct pieces. Each type requires a different repair material and technique, so correctly identifying your crack determines which method you will follow in this guide.
Before you pick up any tools, knowing exactly what materials and equipment you need prevents frustrating mid-project interruptions. For hairline cracks, a thin liquid tile filler or low-viscosity epoxy works best. For full breaks, a two-part structural epoxy provides the bonding strength needed to hold separated pieces firmly in place. This guide walks you through every preparation step, application technique, and finishing detail so your repaired tile blends seamlessly with the surrounding floor.
Can You Really Repair a Cracked Floor Tile Without Replacing It?
Yes, you can repair a cracked floor tile without replacing it in most situations, provided the tile remains in its original position, the subfloor underneath is structurally sound, and no pieces are missing from the break. Repairing instead of replacing saves on material costs, avoids the risk of cracking adjacent tiles during removal, and preserves the original aesthetic of your floor, especially important for older or discontinued tile patterns that are no longer available for purchase.
Specifically, three key conditions determine whether a repair is viable rather than a full replacement. Cracks that qualify for repair typically fall into the following categories:
- The tile is still firmly bonded to the subfloor with no hollow sound when tapped
- All broken pieces are present and have not shifted significantly out of alignment
- The subfloor shows no signs of moisture damage, rot, or structural deflection that caused the crack in the first place
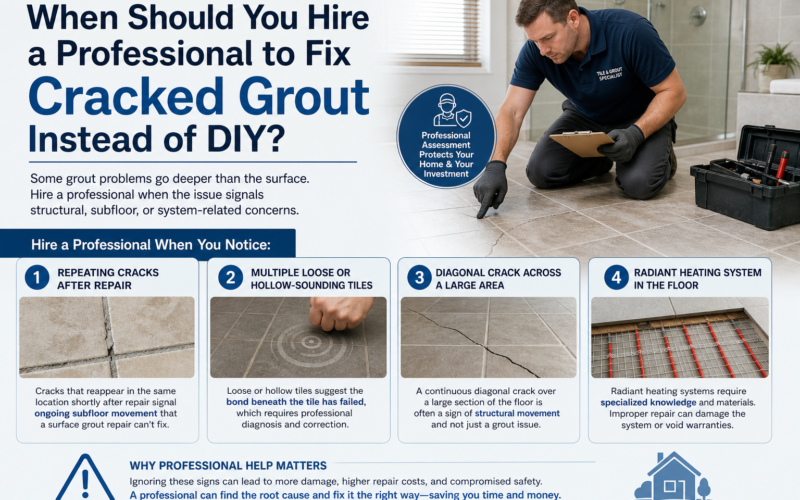
However, not every cracked tile is a candidate for repair without replacement. If the tile has completely detached from the subfloor, if pieces are missing, or if the crack was caused by ongoing subfloor movement that has not been corrected, a repair will fail prematurely and the crack will reappear. In those cases, addressing the root cause and replacing the tile is the more durable solution.
According to the Tile Council of North America, subfloor deflection exceeding L/360 (where L is the span length) is one of the most common underlying causes of recurring tile cracks, meaning any repair attempt without correcting floor flex will have limited longevity.
What Are the Types of Cracks in Floor Tiles That Can Be Fixed Without Replacement?
There are two main types of cracks in floor tiles that can be fixed without replacement: hairline fractures and full breaks, categorized by the depth of penetration and the degree of separation between tile sections. Recognizing which type you are dealing with directly determines which repair product and technique you should use, making this identification step critical before purchasing any materials.
To help you clearly identify your crack type, the following sections define each category in detail, describe the visual characteristics you can observe without any tools, and explain the risk level associated with each.
What Is a Hairline Fracture in a Floor Tile and How Serious Is It?
A hairline fracture is a very thin, shallow crack that runs across the surface of a floor tile without penetrating through its full thickness, typically measuring less than 0.5 mm in width and showing no separation between the two sides of the crack. When you run your fingernail across a hairline fracture, you feel only the slightest ridge or depression. No pieces have separated, and the tile still sits flat and fully bonded to the subfloor beneath it.
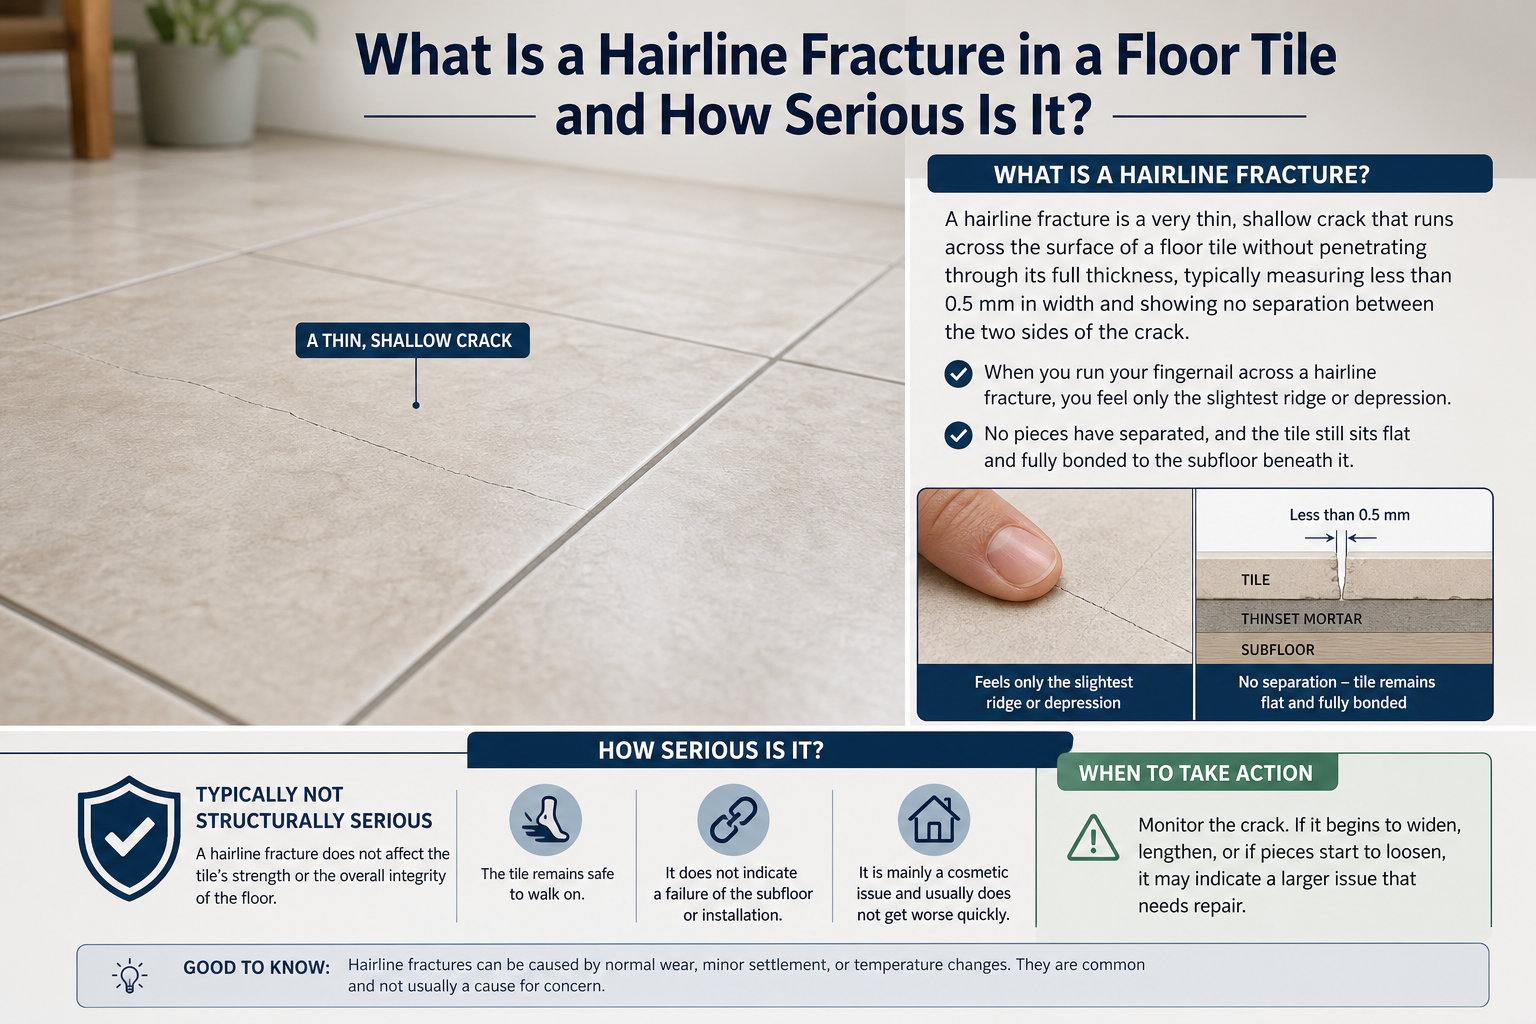
In terms of structural seriousness, a hairline fracture poses a low immediate risk to the integrity of the tile or the floor. However, it should not be left untreated, because even a narrow surface crack allows water to penetrate the tile body. Over time, moisture infiltration leads to staining, weakening of the tile from within, freeze-thaw expansion in cold climates, and gradual widening of the crack as foot traffic continues to stress the fracture point.
The most common causes of hairline fractures include:
- Point impact from a heavy dropped object
- Thermal expansion and contraction during seasonal temperature shifts
- Slight subfloor flex that transmits stress upward through the tile
- Manufacturing defects in the tile’s fired body
From a repair standpoint, hairline fractures are the easiest type of crack to address without replacement. A thin-viscosity tile crack filler or diluted epoxy can wick into the narrow gap by capillary action, fill the void completely, and cure to restore the tile’s surface integrity with minimal visible evidence of the repair.
What Is a Full Break in a Floor Tile and Can It Still Be Repaired Without Replacement?
A full break is a crack that penetrates completely through the entire thickness of a floor tile, dividing it into two or more distinct pieces that may show visible separation or edge displacement. Unlike a hairline fracture, a full break often produces sharp, fractured edges along the crack line, and you may notice one piece sitting slightly higher or lower than the other when you look across the tile surface at a low angle.
Yes, a fully broken tile can still be repaired without replacement, but only under specific conditions. The repair remains viable when all of the following are true:
- Every fragment of the broken tile is still present and accounted for
- The pieces have not shifted so far out of position that gaps remain after reassembly
- The adhesive bond between the tile and subfloor is intact beneath all pieces
- The subfloor itself shows no damage, moisture intrusion, or ongoing movement
When these conditions are met, a two-part structural epoxy applied to the broken edges can chemically bond the pieces back together with bonding strength that rivals the original tile integrity. The finished repair, when properly grouted and sealed, is durable enough to withstand normal residential foot traffic indefinitely. If any piece is missing or the subfloor is compromised, replacement becomes the more practical choice.
What Tools and Materials Do You Need to Repair a Cracked Floor Tile Without Replacing It?
Repairing a cracked floor tile without replacing it requires two distinct categories of supplies: repair materials including epoxy resin, tile crack filler, grout colorant, and surface sealant, and tools including a putty knife, fine-grit sandpaper, a syringe applicator, painter’s tape, a mixing palette, and clean cloths. Having everything assembled before you begin prevents the repair compound from curing in the container while you search for a missing item.
Below is a complete breakdown of each material and tool you will need, organized by category and annotated with the function each item serves in the repair process.
Repair Materials:
| Material | Function | Best Used For |
|---|---|---|
| Low-viscosity tile crack filler | Flows into narrow gaps by capillary action, seals the surface | Hairline fractures |
| Two-part structural epoxy | Bonds broken pieces with high shear strength | Full breaks |
| Grout colorant or pigment powder | Tints filler or epoxy to match existing tile and grout color | Both crack types |
| Tile and grout sealant | Protects cured repair from moisture and staining | Both crack types after finishing |
| Isopropyl alcohol (90% or higher) | Degreases and cleans crack interior for better adhesion | Both crack types during prep |
The table above summarizes the repair materials by primary function and the crack type each addresses, helping you purchase only what your specific repair requires.
Tools and Application Equipment:
| Tool | Function |
|---|---|
| Syringe applicator or squeeze bottle | Delivers filler or epoxy precisely into narrow crack openings |
| Flexible putty knife | Spreads and levels excess filler flush with the tile surface |
| Fine-grit sandpaper (400-grit or higher) | Smooths cured repair compound to match surrounding tile texture |
| Painter’s tape | Masks tile edges to protect adjacent grout lines during repair |
| Mixing palette or disposable surface | Mixes two-part epoxy components in correct ratio |
| Clean microfiber cloths | Wipes away excess filler before it cures on the tile surface |
| Small stiff-bristle brush or toothpick | Clears debris from inside the crack before filling |
The table above lists tools alongside their specific functions so you can confirm each is on hand before starting work.
Regarding product selection by crack type, choose a liquid or semi-liquid tile filler with a viscosity below 500 cP for hairline cracks, as thicker products will not penetrate the narrow gap effectively. For full breaks, select a two-part epoxy rated for stone or ceramic bonding with a compressive strength of at least 6,000 PSI to ensure the bonded joint withstands foot traffic stress over time.
How Do You Repair a Hairline Crack in a Floor Tile Without Replacing It?
Repairing a hairline crack in a floor tile without replacing it involves three sequential stages: thorough surface and crack preparation, precise filler application using a syringe or squeeze applicator, and finishing with light sanding followed by a protective sealant coat, producing a result that is structurally sound and visually inconspicuous. This method works because the narrow nature of the hairline fracture allows thin filler materials to penetrate deeply by capillary action, filling the void from the bottom up rather than just coating the surface.
To complete this repair successfully, follow the step-by-step process described in the sections below, working methodically through each phase before advancing to the next.
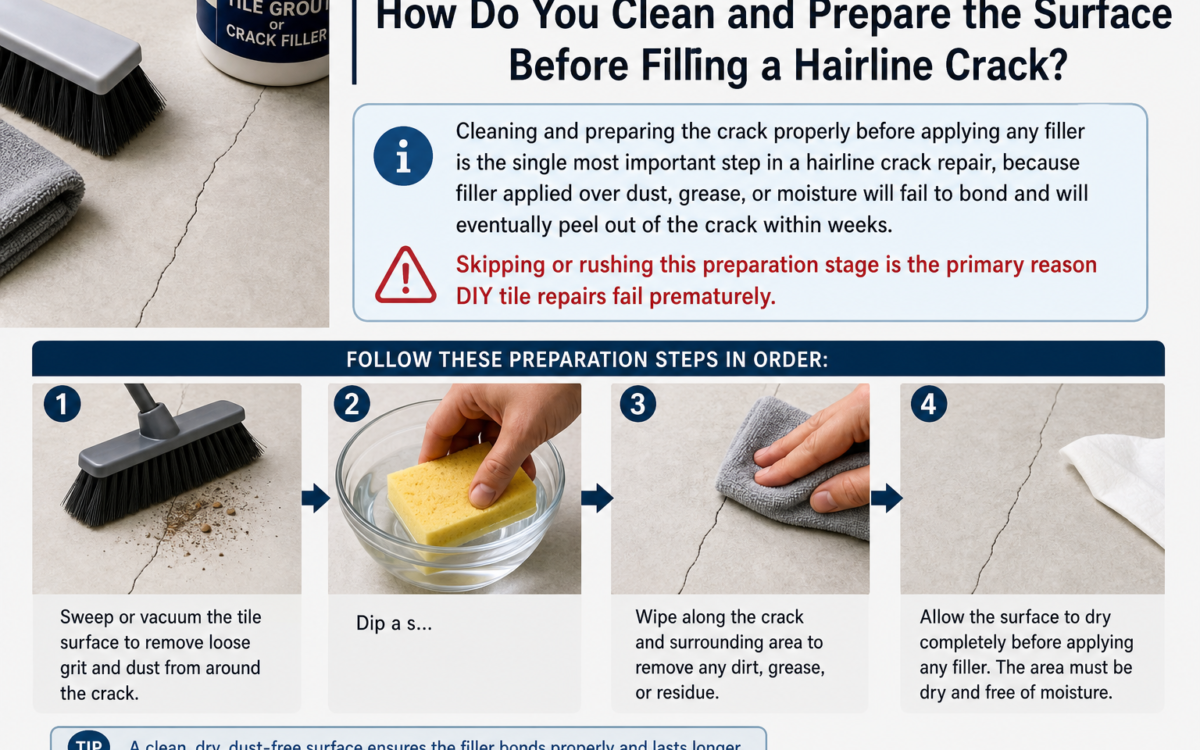
How Do You Clean and Prepare the Surface Before Filling a Hairline Crack?
Cleaning and preparing the crack properly before applying any filler is the single most important step in a hairline crack repair, because filler applied over dust, grease, or moisture will fail to bond and will eventually peel out of the crack within weeks. Skipping or rushing this preparation stage is the primary reason DIY tile repairs fail prematurely.
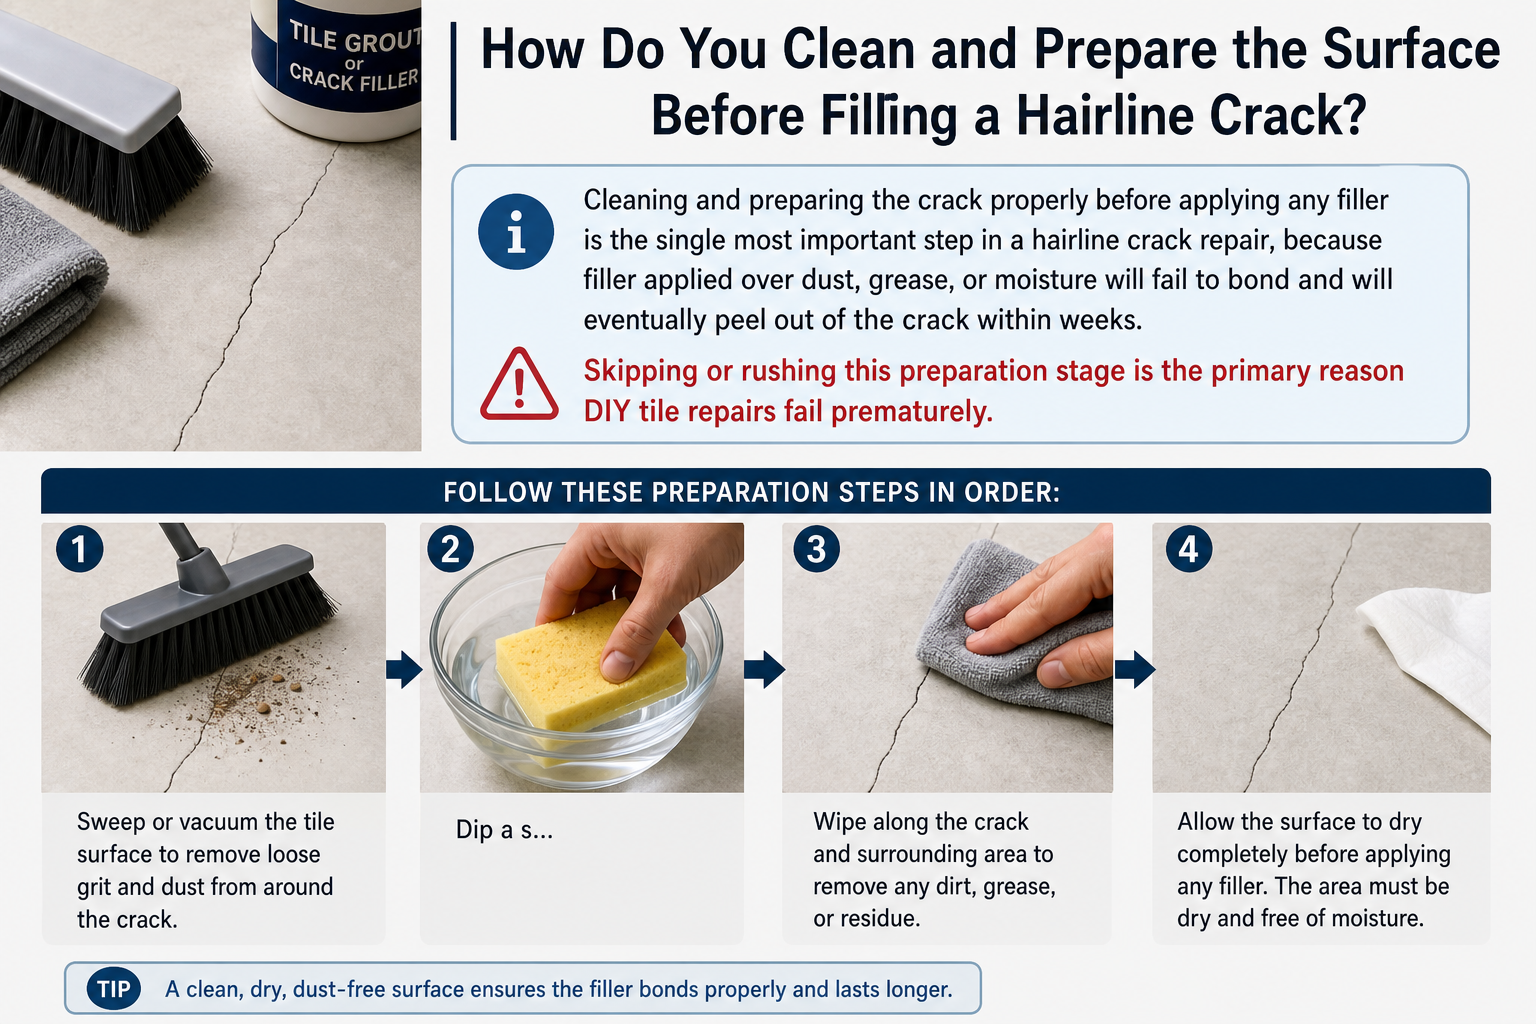
Follow these preparation steps in order:
- Sweep or vacuum the tile surface to remove loose grit and dust from around the crack
- Dip a small stiff-bristle brush, dental pick, or wooden toothpick into the crack and run it along the entire length to dislodge compacted debris from inside the gap
- Dampen a clean cloth with isopropyl alcohol at 90% concentration or higher and wipe firmly over the crack and the surrounding 5 cm of tile surface
- Use a fresh cloth moistened with alcohol to make a second pass specifically along the crack line, ensuring no oil residue, cleaning product film, or wax remains
- Allow the cleaned crack to air dry completely for a minimum of 30 minutes at room temperature before applying any filler
A critical detail at this stage is confirming that no moisture remains inside the crack before you proceed. If the tile is in a bathroom or kitchen where the floor may retain humidity, extend the drying time to 60 minutes or use a handheld hair dryer on a low heat setting directed at the crack for two to three minutes to accelerate evaporation. Applying filler over residual moisture traps water beneath the cured compound and creates a weak bond.
How Do You Apply Tile Filler or Epoxy to Fix a Hairline Fracture Step by Step?
Applying tile filler to a hairline fracture requires loading the material into a syringe applicator, injecting it slowly along the crack length to avoid air bubbles, leveling the surface immediately with a putty knife, and then allowing full cure time before sanding and sealing. Completing each step in the correct sequence and at the right pace prevents the two most common application failures: incomplete penetration of the crack and visible surface ridges after curing.
Proceed through the following steps carefully:
Step 1: Color matching. Squeeze a small amount of filler onto your mixing palette. Add grout colorant or pigment powder in small increments, mixing thoroughly after each addition, until the filler color matches your tile as closely as possible when viewed under the same lighting conditions as the floor. Test the mixed color on a scrap surface and allow it to dry before committing, because many fillers shift slightly darker or lighter as they cure.
Step 2: Load and apply the filler. Draw the tinted filler into a syringe applicator. Position the syringe tip directly at one end of the crack and inject the filler in a slow, steady motion while moving along the crack. Work at a pace slow enough to allow the material to settle into the gap under its own weight rather than sitting on top of it. Avoid pressing so hard that the filler pools on the surface before the crack interior is full.
Step 3: Level the surface. Within 60 to 90 seconds of application, hold a flexible putty knife at a 30-degree angle to the tile surface and draw it smoothly across the crack in a single clean stroke. This removes excess filler from the surface while leaving the interior of the crack fully packed. Immediately follow with a damp microfiber cloth to wipe away any remaining residue from the surrounding tile before it dries.
Step 4: Allow full cure. Consult the manufacturer’s cure time for your specific filler product. Most tile fillers reach handling strength within 2 to 4 hours but require a full 24 hours before sanding or sealing. Do not walk on the repaired area during this window.
Step 5: Sand and seal. Once fully cured, fold a piece of 400-grit or finer sandpaper and gently buff the repaired area using small circular motions until the cured filler is flush and smooth with the surrounding tile surface. Wipe away sanding dust with a clean damp cloth. Apply one coat of tile and grout sealant over the repaired crack using a small brush, allow it to dry according to the product instructions, and apply a second coat for maximum moisture protection.
How Do You Repair a Fully Broken Floor Tile Without Replacing It?
Repairing a fully broken floor tile without replacing it involves reassembling the fractured pieces using a two-part structural epoxy, clamping them in place while the epoxy cures, and then finishing the visible crack line with matched grout and a protective sealant, restoring both the structural integrity and the appearance of the tile in a single repair session. This method is effective when all tile pieces are present, undamaged at their edges, and the subfloor beneath remains flat and firmly bonded.
The repair process for a full break divides into two phases, covered in the sections below: bonding the pieces back together, and finishing the surface so the repair is as invisible as possible.
How Do You Rejoin and Bond Broken Tile Pieces Back Together Without Replacement?
Rejoining broken tile pieces without replacement requires cleaning the fractured edges, mixing a two-part structural epoxy to the manufacturer’s specified ratio, applying it evenly to all mating surfaces, pressing the pieces back into their original alignment, and holding them in position with painter’s tape for a minimum of 24 to 48 hours until the epoxy reaches full cure strength. The quality of this bonding step determines the long-term durability of the entire repair, so patience and precision here pay significant dividends.
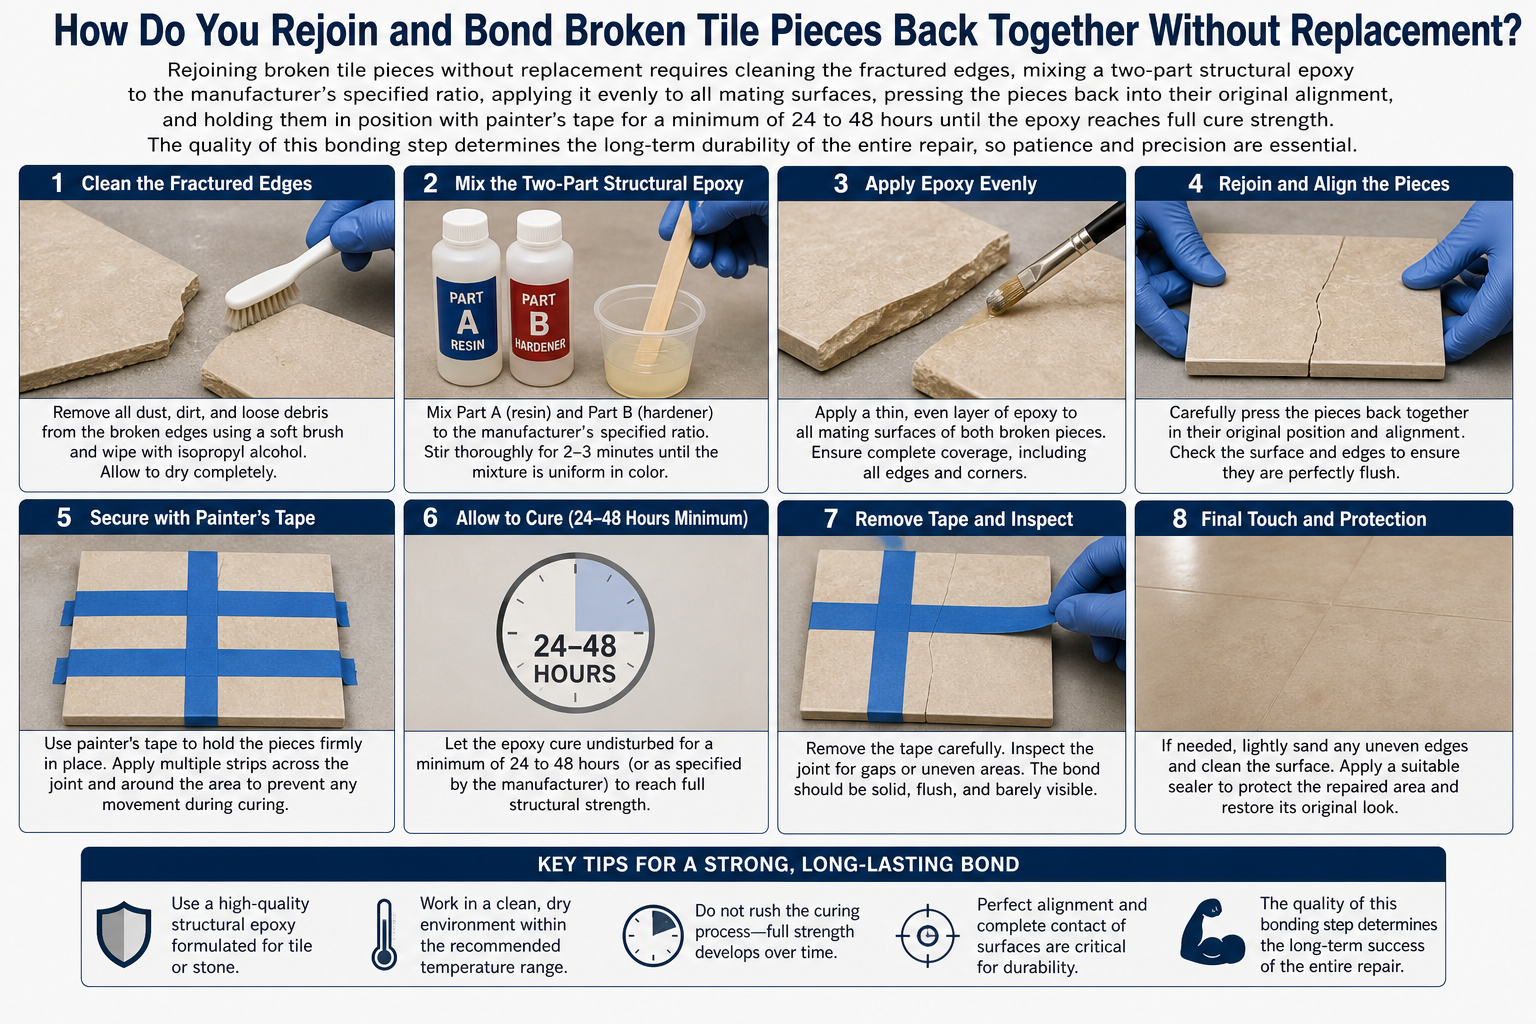
Follow these bonding steps in sequence:
Step 1: Clean the fractured edges. Hold each broken tile piece over a trash bin and use a dry, stiff-bristle brush to sweep all loose dust, grit, and fine particles from the fractured edges. Then wipe each edge thoroughly with a cloth dampened with isopropyl alcohol. Allow the edges to dry completely for 20 to 30 minutes.
Step 2: Test-fit before gluing. Before mixing any epoxy, do a dry fit by pressing all pieces together in their original positions on the floor. Confirm that the pieces align correctly, that the tile surface is level across all pieces, and that no gaps exist that are too large to be bridged by epoxy alone.
Step 3: Mix the epoxy. Squeeze equal amounts of both epoxy components onto your mixing palette according to the product ratio, typically 1:1 by volume. Mix vigorously with a mixing stick for the full time specified in the instructions, usually 60 to 90 seconds, until the mixture is a uniform color with no streaks.
Step 4: Apply and assemble. Using a small disposable brush or the mixing stick, apply a thin, even coat of mixed epoxy to one mating edge of each joint. Do not apply so much that it squeezes out excessively when the pieces are pressed together, as overflow that cures on the tile surface is difficult to remove without scratching. Press each piece firmly into place, ensuring the top surfaces align flush.
Step 5: Secure with painter’s tape. Run strips of painter’s tape across the repaired joints on the tile surface, pressing firmly to hold the pieces in tight contact while the epoxy cures. For a crack running across the tile, apply tape strips perpendicular to the crack line every 3 to 4 cm along its length. Leave the tape in place for the full 24 to 48 hour cure period specified by your epoxy product before applying any load to the tile.
According to the American Society for Testing and Materials (ASTM) standard C881, structural epoxy adhesives used for bonding ceramic and stone surfaces should achieve a minimum bond strength of 1,500 PSI in direct tension, which exceeds the forces typically exerted by residential foot traffic and makes a properly applied epoxy bond highly durable in normal use conditions.
How Do You Finish, Grout, and Seal a Repaired Full-Break Floor Tile?
After the epoxy has fully cured and the painter’s tape is removed, finishing a repaired full-break tile involves removing excess cured epoxy from the surface, filling any remaining visible gap with color-matched grout, polishing the surface lightly with fine sandpaper, and applying a sealer to protect the finished repair from moisture and staining. This finishing phase transforms a structurally sound but visually obvious repair into one that blends convincingly with the surrounding floor.
Complete the finishing process in the following order:
Step 1: Remove excess cured epoxy. Peel away all painter’s tape carefully. Examine the tile surface for any beads or ridges of cured epoxy that squeezed out during bonding. Use a sharp plastic scraper or the edge of a putty knife to chip away the excess carefully, working at a low angle to avoid scratching the tile glaze. Follow with a light pass of 400-grit sandpaper held flat against the tile to smooth the area, then wipe with a clean damp cloth.
Step 2: Fill remaining gap with grout. If a visible line remains along the crack after epoxy curing, dampen the crack line slightly and apply a thin layer of pre-mixed or powdered grout tinted to match your existing grout color. Press the grout firmly into the crack with a rubber grout float or your fingertip. Immediately wipe away all grout from the tile surface using a barely damp sponge, working diagonally across the crack to avoid pulling grout out of the joint. Allow the grout to cure for the time specified on the packaging.
Step 3: Polish the surface. Once the grout is fully cured, fold a piece of 600-grit sandpaper and buff the repaired area very lightly in circular motions to reduce any remaining surface irregularity. Wipe the area with a clean dry cloth to remove all dust.
Step 4: Apply sealant. Using a small brush, apply one even coat of tile and grout penetrating sealant over the entire repaired area, extending 2 to 3 cm beyond the crack line onto the intact tile surface. Allow the first coat to dry completely, then apply a second coat. The sealant fills any micro-porosity in the repair materials, prevents future moisture infiltration, and adds a subtle sheen that helps the repaired area match the surrounding tile finish.
Does the Type of Floor Tile Material Change How You Repair a Crack Without Replacing It?
Yes, the type of floor tile material significantly changes how you repair a crack without replacing it, because ceramic, porcelain, and natural stone tiles differ in density, porosity, surface texture, and chemical compatibility with repair products, meaning the epoxy or filler that works perfectly on one material may bond poorly or discolor another. Using the wrong product for your tile material is one of the most common reasons crack repairs fail or produce a visibly mismatched result.
The following sections examine the specific differences in repair approach between ceramic and porcelain tiles, and then address the unique considerations for natural stone floor tiles.
How Is Repairing a Cracked Ceramic Tile Different from Repairing a Cracked Porcelain Tile?
Porcelain tile requires a higher-bonding-strength epoxy and more thorough surface preparation than ceramic tile, because porcelain’s lower porosity means repair materials have less surface texture to grip during curing, while ceramic’s slightly rougher, more absorbent surface accepts standard tile fillers and epoxies more readily without additional surface treatment. This difference in surface density is the defining variable when selecting your repair product.
The key differences between repairing ceramic and porcelain tiles are:
- Porosity: Ceramic tiles typically absorb 3% or more water by weight, giving filler materials a porous surface to key into. Porcelain tiles absorb less than 0.5%, which means the filler relies almost entirely on adhesive bonding rather than mechanical grip.
- Surface preparation: For porcelain, lightly scuff the immediate area around the crack with 220-grit sandpaper before cleaning with alcohol. This creates microscopic surface roughness that dramatically improves epoxy adhesion without damaging the glaze visibly.
- Product selection: Use standard tile crack fillers for ceramic repairs. For porcelain, choose a two-part epoxy specifically labeled for low-porosity surfaces or rated for glass and vitreous tile, as these formulations contain adhesion promoters suited to dense, non-porous substrates.
- Color matching: Ceramic tiles typically have a matte or semi-matte glaze that accepts pigment blending well. Polished porcelain’s high-gloss surface makes color mismatches more visible. Test your tinted filler on the underside of a spare tile or in an inconspicuous corner before applying to the crack.
Can You Repair a Cracked Natural Stone Floor Tile Without Replacing It and What Makes It Different?
Yes, you can repair a cracked natural stone floor tile without replacing it, but the process differs significantly from ceramic or porcelain repair because natural stone such as marble, travertine, and slate contains natural pores, mineral veining, and in some cases, historic or irreplaceable surface character that requires stone-specific repair products and, where possible, reversible repair techniques that do not permanently alter the stone. Using standard tile filler on natural stone frequently results in discoloration, poor bonding, or staining of the surrounding material.
The key distinctions for natural stone crack repair include:
- Product compatibility: Use a stone-specific epoxy or polyester-based filler matched to your stone type. Many stone suppliers offer color-matched repair kits for marble and travertine. Never use grout-based fillers on natural stone, as the cement content can stain the stone permanently.
- Thermal expansion: Natural stone expands and contracts at different rates than ceramic adhesive layers, and cracks in stone floors near exterior walls or in sunlit rooms often result from thermal movement rather than impact. For these situations, fill with a slightly flexible stone filler rather than a rigid epoxy, allowing the repair to accommodate minor seasonal movement without re-cracking.
- Historic and vintage tile preservation: For irreplaceable antique stone tiles, consult a professional stone restorer before attempting any DIY repair. Where self-repair is appropriate, prioritize reversible methods: use a lime-based filler rather than epoxy so the repair can be cleaned out and redone if needed, preserving the tile’s historic integrity for future restoration work.