Fixing cracked grout in tile floors is a fully achievable DIY project that follows three core stages: removing the damaged grout, applying fresh grout, and sealing the surface for lasting protection. Most surface-level cracks do not require professional help, and with the right tools, a homeowner can complete the entire repair in a single weekend. The result is a floor that looks restored, resists moisture, and holds up against everyday wear for years to come.
Before starting the repair, knowing what tools and materials to gather makes the entire process significantly smoother. You will need a grout saw or oscillating multi-tool, a grout float, a sponge, clean buckets, painter’s tape, the correct type of grout for your joint width, and a quality grout sealant. Having everything ready before you begin prevents unnecessary delays mid-project and ensures you apply each material at the correct stage while conditions are still ideal.
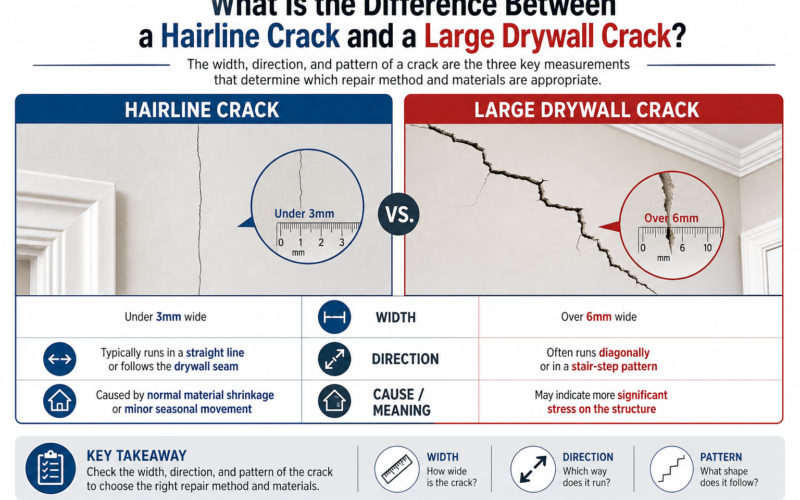
Understanding what caused the grout to crack in the first place is equally important, because sanding the surface and adding new grout without addressing the root cause means the problem will return within months. Cracked grout in tile floors is most commonly caused by natural shrinkage during drying, subfloor movement, heavy repeated loads, or improper installation such as missing expansion joints or an incorrect grout-to-water ratio. Identifying the correct type of crack, whether it is a hairline surface crack or a full-depth structural fracture, determines both the repair method and whether a DIY approach is appropriate.
How Do You Fix Cracked Grout in Tile Floors Step by Step?
Fixing cracked grout in tile floors follows a three-stage process: Stage 1 is removing the old or damaged grout, Stage 2 is applying new grout into the cleaned joints, and Stage 3 is sealing the fresh grout to protect it from moisture and future cracking. Each stage builds directly on the one before it, and skipping or rushing any step compromises the final result. The good news is that for the vast majority of surface-level cracks, this entire process is well within DIY reach and requires no specialized construction experience.
To complete this repair successfully, work through each stage in sequence without cutting corners on drying or curing times. The sections below break down each stage in precise detail so you know exactly what to do, what to avoid, and what results to expect at every point in the process.
How Do You Remove Cracked or Old Grout from Tile Floors?
Removing cracked grout from tile floors requires either a manual grout saw or an oscillating multi-tool fitted with a grout removal blade, with the goal of clearing out a minimum depth of 2 to 3 millimeters to give the new grout a solid surface to bond onto. This first stage is the most physically demanding part of the process, but doing it properly is what determines whether the repair holds long-term or fails within months.
Specifically, here is how to remove cracked grout safely and effectively:
- Score the joint with a grout saw or oscillating tool. Hold the blade flat against the joint and work in short, controlled strokes. Avoid pressing the blade diagonally into the tile edge, as this creates unwanted scratches on the glazed surface.
- Maintain a consistent removal depth of 2 to 3mm. You do not need to remove every trace of old grout, only enough to expose clean substrate so the new grout can grip properly.
- Protect adjacent tile surfaces. Apply painter’s tape along both sides of the joint before starting, particularly on polished or matte tiles that show scratch marks easily.
- Work in sections, not the entire floor at once. Completing one area before moving to the next gives you better control and keeps the workspace manageable.
- Vacuum and wipe the joints thoroughly. Use a vacuum to pull out loose grout dust, then wipe the joints with a slightly damp cloth. All dust and debris must be removed before applying new grout, because residue prevents proper adhesion.
According to guidance published by the Tile Council of North America (TCNA), grout joints must be cleaned to a minimum depth equal to the joint width, or at least 2mm, to ensure the replacement grout achieves full structural bonding.
How Do You Apply New Grout to Tile Floors After Removing the Old Grout?
Applying new grout to tile floors after removing the old material involves mixing the grout to a smooth, peanut-butter-like consistency, pressing it firmly into the cleaned joints using a grout float, and wiping off the surface excess before it dries. The quality of this stage depends equally on using the correct grout type for your joint size and on maintaining the right timing during application and cleanup.
Here is the step-by-step process for applying new grout correctly:
- Select the correct grout type. Use unsanded grout for joints narrower than 3mm and sanded grout for joints 3mm or wider. Sanded grout contains fine aggregate that prevents excessive shrinkage in wider joints.
- Mix the grout to the right consistency. If using powder grout, add water gradually and mix until the texture resembles smooth peanut butter. No lumps should remain. Pre-mixed grout in a tub skips this step but typically costs slightly more.
- Apply grout with a grout float at a 45-degree angle. Hold the float diagonally and sweep it across the joint in a diagonal motion, pressing firmly to pack the grout fully into the channel. Avoid using the float parallel to the joint, as this pulls material out rather than pushing it in.
- Work in small sections of approximately 0.5 to 1 square meter at a time. This prevents the grout from drying on the tile surface before you have a chance to clean it.
- Remove excess grout from the tile surface promptly. Using a damp sponge, wipe the tile surface in circular motions to remove the haze, then follow with diagonal strokes. Rinse the sponge frequently in clean water and wring it almost dry before each pass.
- Allow the grout to cure before sealing. Most cement-based grouts require a minimum of 24 to 72 hours of curing time before the sealant can be applied. Check the manufacturer’s datasheet for the exact recommended window.
How Do You Seal Grout on Tile Floors to Protect Against Future Cracking?
Sealing grout on tile floors after regrouting is essential because it creates a protective barrier that blocks moisture absorption, inhibits mold and mildew growth, and significantly extends the lifespan of the new grout by reducing the stress caused by repeated wet-dry cycles. Unsealed grout is porous by nature and begins absorbing water, cleaning chemicals, and staining agents from the very first use.
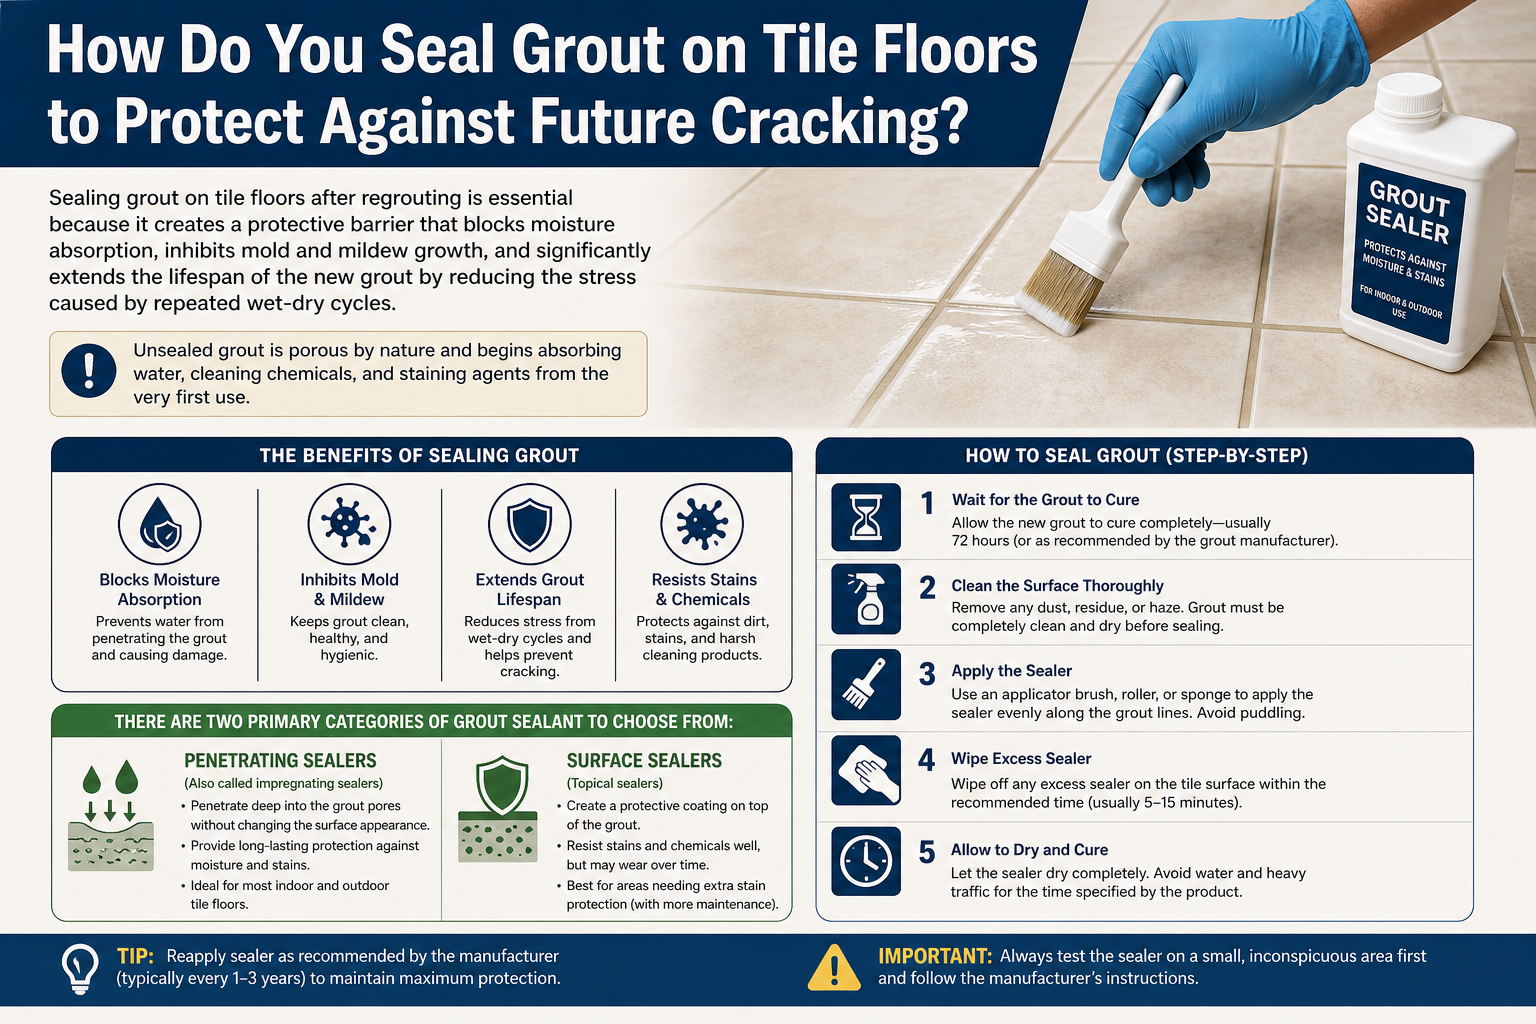
There are two primary categories of grout sealant to choose from:
- Penetrating sealers (also called impregnating sealers): These soak into the grout and chemically bond with the particles below the surface. They do not change the appearance of the grout and are the preferred choice for floors exposed to heavy traffic or regular wet mopping. Brands such as Aqua Mix Sealer’s Choice Gold and TileLab SurfaceGard are widely used.
- Membrane-forming sealers: These create a thin film on top of the grout surface. They offer a slight sheen but can peel or wear away faster in high-traffic areas, making them better suited for wall tile applications.
To apply sealant correctly, follow these steps:
- Confirm the grout is fully cured and completely dry. Even slight residual moisture will prevent the sealant from penetrating properly.
- Use a small foam applicator brush or an applicator bottle with a narrow tip to apply sealant directly onto the grout joint. Avoid flooding the tile surface.
- Allow the sealant to penetrate for the time specified on the product label, typically 5 to 15 minutes.
- Wipe off any excess sealant from the tile surface with a clean dry cloth before it dries into a hazy film.
- Apply a second coat if the grout absorbed the first coat rapidly, which indicates high porosity.
- Avoid washing the floor or exposing it to water for at least 24 hours after sealing.
Regarding resealing frequency, most penetrating sealers on floor grout require reapplication every 1 to 2 years depending on traffic levels and the specific product. A simple water-drop test tells you when it is time: drop a small amount of water onto the grout joint, and if it absorbs immediately instead of beading up, the sealant has worn down and reapplication is needed.
What Tools and Materials Do You Need to Repair Cracked Grout in Tile Floors?
There are two main categories of supplies needed to repair cracked grout in tile floors: tools for removing and applying grout, and materials that go directly into or onto the floor. Having the complete list ready before starting prevents mid-project trips to the hardware store and ensures you apply each product at the correct stage without unnecessary delays.
The table below outlines every tool and material required, organized by category, with notes on whether each item is essential or optional:
| Item | Category | Essential or Optional | Estimated Cost (USD) |
|---|---|---|---|
| Grout saw (manual) | Tool | Essential (budget option) | $8 to $15 |
| Oscillating multi-tool with grout blade | Tool | Essential (faster option) | $40 to $120 |
| Grout float (rubber-faced) | Tool | Essential | $8 to $20 |
| Bucket and clean water | Tool | Essential | Under $5 |
| Sponge (large, non-scratch) | Tool | Essential | $5 to $10 |
| Painter’s tape | Tool | Essential | $5 to $10 |
| Vacuum or shop vac | Tool | Essential | Varies |
| Rubber mallet | Tool | Optional (useful for tile tapping) | $10 to $20 |
| Tile spacers | Tool | Optional (if re-laying any tiles) | Under $5 |
| Sanded or unsanded grout | Material | Essential | $10 to $30 per bag |
| Grout sealant (penetrating type) | Material | Essential | $15 to $35 |
| Grout cleaner or mild acid wash | Material | Essential (for surface prep) | $10 to $20 |
| Pre-mixed grout (tub form) | Material | Optional (convenience alternative) | $15 to $40 |
Context for the table above: This table lists every supply used across all three stages of the repair process, the Remove, Regrout, and Seal stages. The “Essential” column helps budget-conscious DIYers identify where they can skip purchases. The oscillating multi-tool, for example, is not strictly required if you have patience with a manual grout saw, but it reduces physical effort by approximately 60 to 70 percent on larger floor areas.
Total estimated cost for a standard DIY grout repair project falls in the range of $50 to $120 USD, depending on whether you already own any of the tools listed. This compares favorably against the typical professional regrouting quote of $300 to $700 or more for a medium-sized bathroom or kitchen floor.
All supplies listed are available at major hardware retailers such as Home Depot, Lowe’s, and Ace Hardware, as well as through online marketplaces. When purchasing grout, bring a small sample of your existing grout or a photograph to the store so a staff member can help you match the color as closely as possible, particularly important if you are only patching sections rather than regrouting the entire floor.
What Causes Grout to Crack in Tile Floors?
Grout cracks in tile floors due to a combination of natural material properties, subfloor movement, and installation errors, with the most common causes being natural shrinkage during the curing process, subfloor flexion or settlement, heavy repeated loads, and temperature-related expansion and contraction. Understanding the cause behind your specific cracks is not an optional step: if you repair grout without fixing the underlying issue, the new grout will develop identical cracks within weeks or months.
Here is a detailed breakdown of the most common causes:
Natural shrinkage during curing:
Cement-based grout loses moisture as it hardens, which causes it to contract slightly. When this contraction is uneven, surface cracks called hairline cracks appear. This is especially common when grout is applied in very thin joints or when the grout mixture contains too much water.
Subfloor movement and settlement:
Wooden subfloors flex under load, particularly in older homes. Even small amounts of deflection between joists transmit stress upward through the tile adhesive and into the grout joint. Concrete subfloors can also develop micro-cracks over time as the slab settles or shifts seasonally.
Heavy repeated loads:
High-traffic areas such as hallways, kitchen floors near counters, and entryways experience concentrated pressure repeatedly in the same spots. Over time, this cyclical loading fatigues the grout matrix and produces cracking along the lines of maximum stress.
Temperature and humidity changes:
Outdoor areas, bathrooms, and kitchens are all subject to significant thermal cycling. As tiles expand in heat and contract in cold, the grout joint, which is less flexible than the tile itself, absorbs the differential movement and eventually fractures.
Installation errors:
Several mistakes during the original installation contribute heavily to premature grout cracking:
- Incorrect water-to-grout ratio during mixing (too much water weakens the final material)
- Applying grout before the tile adhesive has fully cured
- Missing or incorrectly placed expansion joints in large floor areas
- Laying tile on a subfloor that was not level or structurally sound at the time of installation
According to a technical bulletin published by the National Tile Contractors Association (NTCA), the absence of proper movement accommodation joints, commonly called expansion joints, is one of the top three causes of grout and tile failure in residential installations. These joints allow the floor assembly to expand and contract without transferring stress into the grout.
Understanding the specific cause of your cracking guides the repair approach. Hairline cracks from minor shrinkage require only a simple regrout. Cracks that re-appear repeatedly in the same location after repairs suggest subfloor movement and may require a structural assessment before any further regrouting is worthwhile.
What Are the Different Types of Cracked Grout in Tile Floors?
There are three main types of cracked grout in tile floors classified by severity: hairline surface cracks (minor), full-depth cracks through the entire grout joint (moderate), and complete grout loss where the material has crumbled or detached entirely (severe). Additionally, grout cracks can be classified by their location, which provides a separate set of diagnostic clues about the underlying cause.
Classification by severity:
- Hairline surface cracks: These are thin, shallow fractures that appear on the top layer of the grout without penetrating all the way through. They are cosmetic in nature and are the easiest to repair. A simple regrout or grout touch-up product resolves them without full removal.
- Full-depth cracks: These fractures run from the top surface of the grout all the way down to the substrate. They allow moisture to pass through the joint freely, which leads to adhesive degradation underneath the tile over time. Full removal of the damaged grout and full regrouting is necessary.
- Crumbled or missing grout: In this case, sections of grout have either fallen out, softened into powder, or separated from the tile edge. This level of damage is usually paired with visible gaps in the joint and often indicates prolonged moisture exposure or a severe underlying movement issue.
Classification by location:
- Center-of-joint cracks: Cracks that run along the middle of the grout line between tiles are typically caused by shrinkage or subfloor flexion. These are the most common type and are well-suited to DIY repair.
- Cracks at the tile-to-wall junction: Where the floor tile meets a vertical surface such as a wall or baseboard, a crack often forms because this joint must accommodate both horizontal and vertical movement. This type of joint should be filled with flexible caulk rather than rigid grout, and regrouting with standard grout here will fail again.
- Cracks at dissimilar material junctions: Where tile meets hardwood, carpet, or another flooring type, differential expansion rates cause ongoing stress. An expansion joint or flexible transition strip is the correct long-term solution here.
Determining whether a crack is DIY-safe or requires professional evaluation:
You can safely DIY a repair when:
- The grout cracks appear in isolated spots without a repeating pattern
- The tiles themselves are solid and do not move when pressed or tapped
- No adjacent tile produces a hollow sound when tapped with a rubber mallet (hollow sound indicates the tile has debonded from the substrate)
- The cracks are limited to the grout joint and do not extend across the tile face
You should seek a professional evaluation when:
- Multiple tiles feel loose, shift, or rock when you walk over them
- Cracks reappear in the same location shortly after repair
- A long continuous crack runs across the entire floor in a straight or diagonal line (this pattern often indicates a structural crack in the slab below)
- Water has visibly pooled beneath the tiles after a wet event
Can You Repair Cracked Grout in Tile Floors Without Removing the Tiles?
Yes, you can repair cracked grout in tile floors without removing the tiles in the vast majority of cases, provided the tiles themselves remain solidly bonded to the substrate. The grout removal and regrouting process targets only the material sitting in the joints between tiles, leaving the tiles entirely in place. Removing tiles is only necessary when the damage extends beneath the tile surface itself.
However, there are specific situations where tile removal becomes unavoidable. Understanding the distinction helps you avoid unnecessary demolition work on one hand, and avoid applying a surface fix to a structural problem on the other.
What Is the Difference Between Regrouting and Retiling a Tile Floor?
Regrouting involves replacing only the grout in the joints while the tiles remain fixed in place, whereas retiling means removing all existing tiles, scraping the substrate clean, and laying a completely new tile installation including new adhesive and grout. Regrouting wins on cost, speed, and disruption: it typically costs $50 to $120 as a DIY project versus $800 to $2,500 or more for professional retiling of a standard bathroom floor.
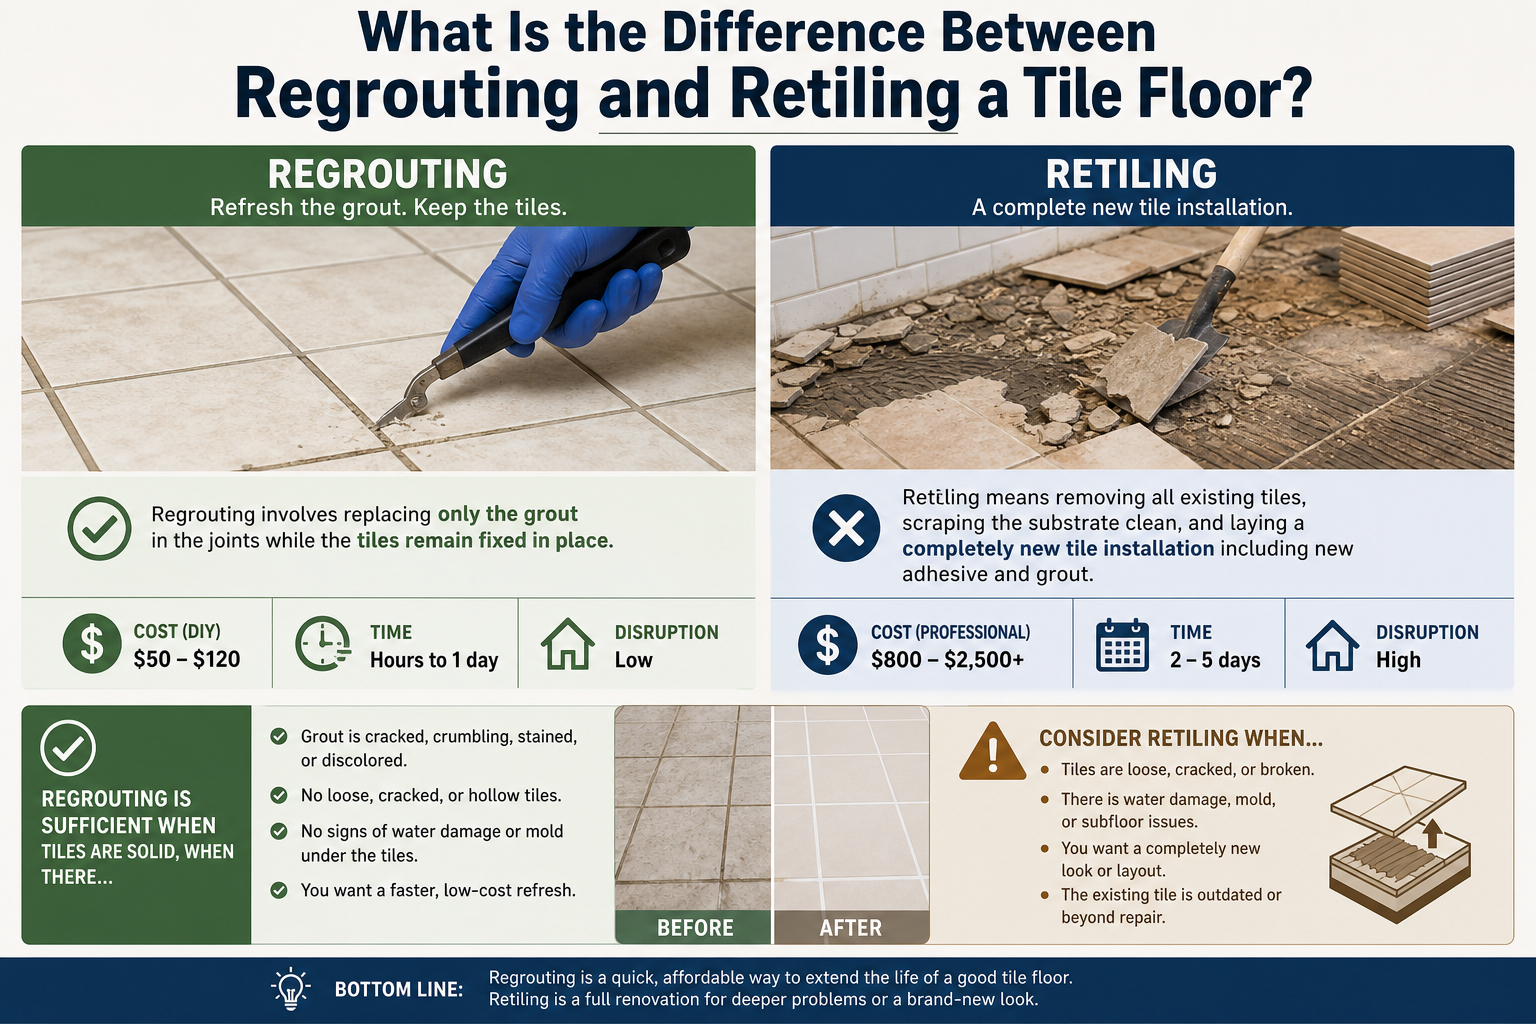
Regrouting is sufficient when tiles are solid, when there is no adhesive failure, and when the damage is limited to the grout joints. Retiling becomes necessary when tiles have cracked or chipped, when significant areas of tile have debonded from the substrate, when the subfloor itself needs repair or leveling, or when a homeowner wants to change the tile pattern or material entirely.
When Should You Hire a Professional to Fix Cracked Grout Instead of DIY?
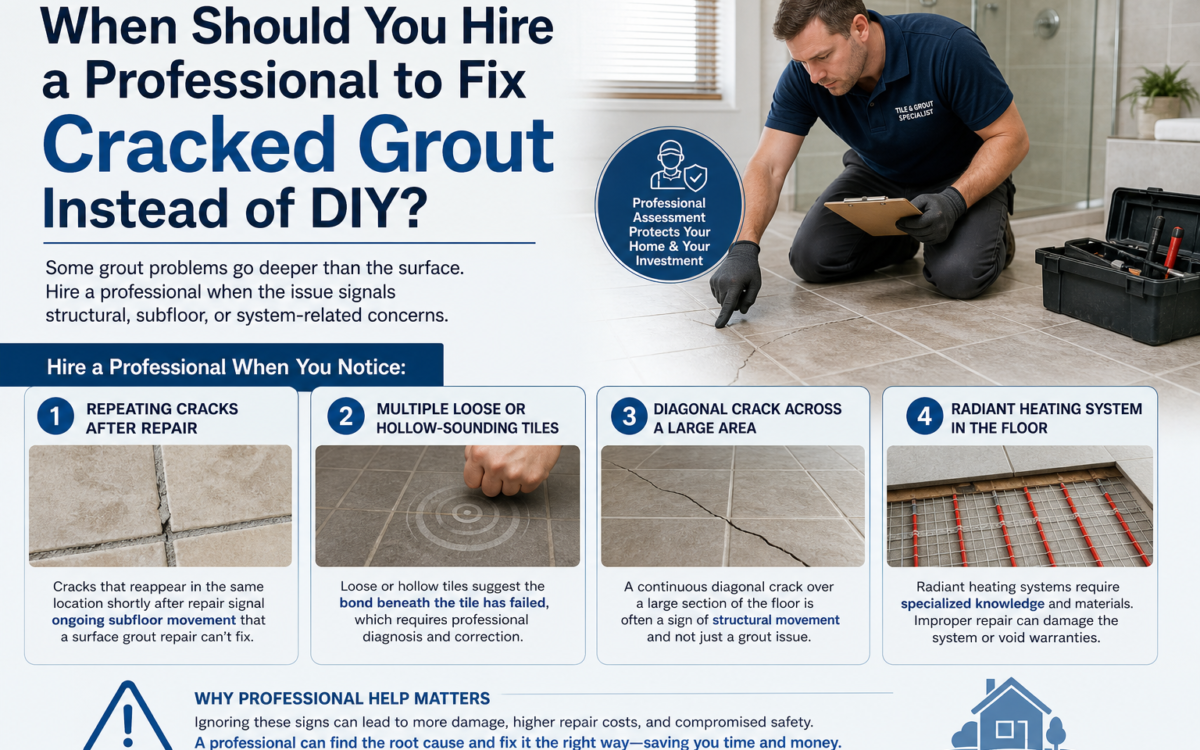
You should hire a professional to fix cracked grout when the cracks reappear in the same location shortly after repair, when multiple tiles are loose or hollow-sounding, when a continuous crack runs diagonally across a large section of the floor, or when the floor includes a radiant heating system embedded in the substrate.

Key warning signs that indicate a professional assessment is needed:
- Repeating cracks after repair: This pattern signals ongoing subfloor movement that a surface grout repair cannot resolve.
- Loose or rocking tiles: Tile debonding means the adhesive layer has failed, and regrouting without reseating the tiles will not restore structural integrity.
- Long diagonal or linear cracks across the floor: These often indicate a crack in the concrete slab itself, a condition requiring a structural contractor rather than a tile specialist.
- Radiant floor heating systems: Floors with in-slab heating require careful handling during grout removal to avoid cutting through heating cables or pipes. An oscillating tool in the wrong position can permanently damage the heating system, leading to repair costs far exceeding the original grout project.
Estimated professional regrouting costs range from $300 to $700 for a standard bathroom, while full tile and subfloor repair projects can reach $1,500 to $4,000 or more depending on the extent of damage. When seeking a tile contractor, ask specifically whether they have experience with your tile type (porcelain, natural stone, ceramic), request before-and-after photos from previous projects, and confirm whether their quote includes sealant application as a final step.