Stripping wallpaper the easy way follows a clear four-stage process: score the surface, apply a softening solution, peel the face layer, then remove the paper backing with a flat scraper. When you follow this sequence correctly, you lift both the decorative layer and the adhesive substrate without gouging the wall underneath. The key principle that makes every stage work is softening the adhesive before you apply any mechanical force, because dry glue bonds tightly to the wall surface and causes tearing when you try to pull against it.
Before picking up a single tool, you need the right supplies on hand, including a scoring tool, a putty knife or wide scraper, a wallpaper remover solution or a DIY alternative, a spray bottle or sponge, drop cloths, and painter’s tape. Having every item ready before you start means you can work section by section at a steady pace without letting the solution dry out between application and scraping.
After the paper comes off, the job is not finished. The wall surface almost always carries residual adhesive, minor gouges, and in the case of drywall, areas where the paper facing has torn away. Cleaning, patching, and priming that surface properly determines whether your new paint or fresh wallpaper will look smooth and last for years, making post-removal wall care just as important as the removal itself.
How Do You Strip Wallpaper Step by Step?
Stripping wallpaper step by step means moving through five ordered stages: prepare the room, score the paper surface, apply a softening solution, peel the face layer using a dry strip technique, and then remove the paper backing with a wet scraping technique. Each stage builds directly on the previous one, and skipping or rushing any single stage is the most common reason walls end up damaged. The overarching rule across all five stages is to let chemistry do the work before mechanics do the work.
Specifically, the sequence below explains what happens at each stage and why the order matters for protecting your wall.
How Do You Remove the Top Layer of Wallpaper?
You remove the top layer of wallpaper using the dry strip method: find a loose seam or corner, grasp the edge firmly, and pull the paper back slowly at a low angle between 15 and 30 degrees from the wall surface. This low pulling angle keeps tension distributed across a wide area rather than concentrated at one point, which reduces the chance of the paper tearing into small fragments that are difficult to grip.
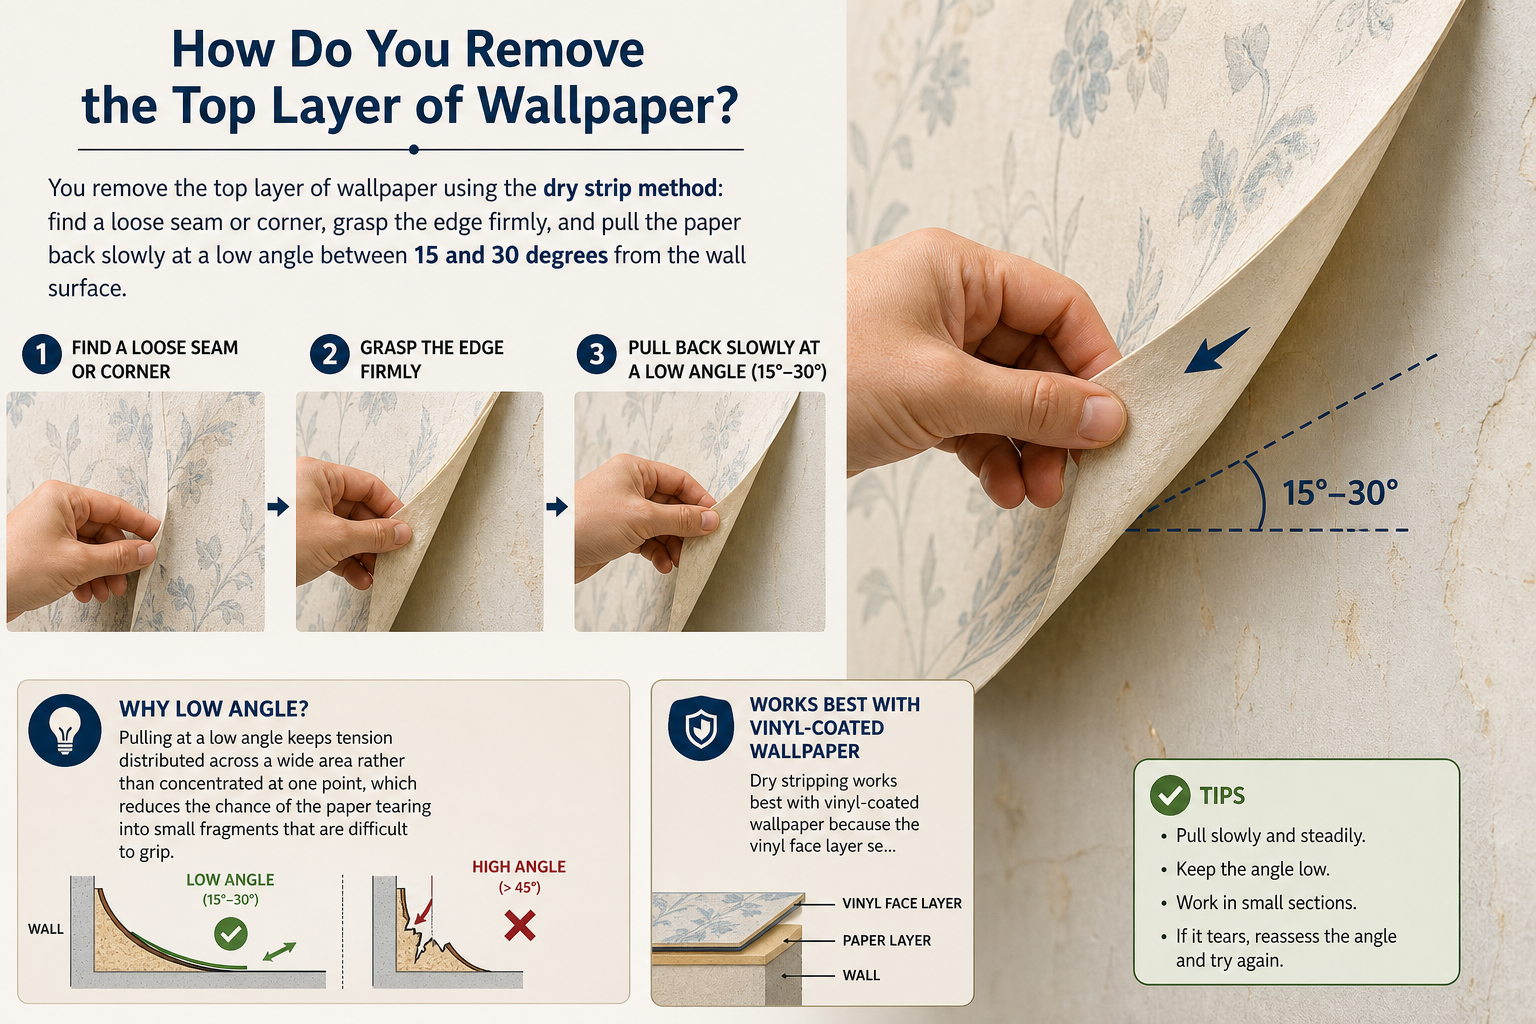
Dry stripping works best with vinyl-coated wallpaper because the vinyl face layer separates cleanly from the adhesive substrate underneath. To begin, run your fingernail or a putty knife under a seam at a corner or near a switch plate to create an initial tab of paper large enough to grip with two fingers. Once you have a grip, pull slowly and steadily. If the paper resists without tearing, stop and apply solution to that section before continuing. If the paper tears into small pieces, switch immediately to smaller sections of about 30 centimeters wide rather than attempting to pull across a large span.
Speed matters here. Pulling too fast creates a sharp, concentrated tear force that snaps the paper and leaves fragments bonded to the wall. A slow, even pull at a consistent 20-degree angle is always more effective than a fast yank, even when the paper feels like it wants to come off quickly.
How Do You Remove the Paper Backing Layer from the Wall?
After the face layer comes off, a thin paper backing layer almost always remains on the wall, bonded in place by dried adhesive. You remove this backing layer using the wet strip method: spray or sponge a wallpaper remover solution onto the backing, wait 5 to 10 minutes for the solution to penetrate and soften the adhesive, then use a putty knife held at a shallow angle to scrape the backing away from the wall surface.
The critical difference between removing the face layer and removing the backing is that the backing has no vinyl coating to protect it, which means it absorbs the softening solution quickly but also tears more easily if you rush. To manage this, work in small sections no larger than 30 by 30 centimeters. Apply solution to one section, move to an adjacent section and apply solution there, then return to the first section and begin scraping. This rotation keeps the solution active and prevents it from drying out before you reach each area.
Hold the putty knife as flat against the wall as possible, ideally at an angle of 10 to 15 degrees. A steeper angle digs the corner of the blade into the wall surface. Use short, overlapping strokes and re-wet any area that begins to feel sticky or resistant. When the adhesive is properly softened, the backing should lift away with light, consistent pressure rather than requiring hard force.
Is It Possible to Strip Wallpaper Without Damaging the Wall?
Yes, it is absolutely possible to strip wallpaper without damaging your wall, provided you control three key variables: the amount of moisture you introduce, the pressure you apply with the scraper, and the angle at which you hold the blade. Walls are damaged during wallpaper removal not because the process is inherently destructive, but because moisture is applied too heavily, scraping force is too strong, or the blade angle is too steep.
The most important factor determining how easily your walls survive removal is the type of wall you are working with. Drywall, which is also called plasterboard or gypsum board, has a paper facing that absorbs water rapidly and becomes soft and vulnerable to tearing within a few minutes of excessive wetting. Plaster walls, which are common in homes built before the 1950s, are far more tolerant of moisture and harder to damage mechanically because the surface is made of cured lime or gypsum compound that does not absorb water at the same rate.
For drywall specifically, the single most protective technique is to apply the softening solution in light, controlled amounts rather than saturating the wall surface. A spray bottle gives you better control than a large sponge for this reason. Apply just enough solution to darken the paper backing slightly, wait the recommended dwell time, and scrape immediately. Never allow the wall to remain wet for more than 10 to 15 minutes in any one area. If you can see the wall surface beginning to bubble or feel soft beneath the backing, stop adding solution and let the area dry slightly before continuing.
For the scraper, use the flattest angle you can manage and keep the blade moving. A stationary blade edge pressed into a soft drywall surface will carve a groove. A moving blade at a low angle distributes the contact force across the blade width and glides beneath the paper rather than cutting into the wall.
What Tools and Materials Do You Need to Strip Wallpaper?
Stripping wallpaper requires two categories of supplies: mechanical tools, including a scoring tool, a putty knife, a wide scraper, a sponge, a bucket, a spray bottle, and drop cloths; and chemical materials, including a wallpaper remover solution or a DIY softening mixture and warm water. You should have every item gathered and staged in the room before you start, because stopping mid-process to find a tool allows solution to dry on the wall and makes removal significantly harder.
The table below summarizes all recommended tools and materials, organized by category and purpose, to help you build a complete supply list before starting.
| Category | Item | Purpose |
|---|---|---|
| Mechanical tools | Scoring tool (perforator wheel) | Creates small perforations so solution penetrates the paper |
| Mechanical tools | Putty knife (4 to 6 inch) | Scrapes backing from tight corners and small areas |
| Mechanical tools | Wide scraper (10 to 12 inch) | Covers large flat wall sections efficiently |
| Mechanical tools | Plastic scraper | Safer alternative for drywall surfaces |
| Mechanical tools | Sponge and bucket | Applies solution evenly and rinses residue |
| Mechanical tools | Spray bottle | Controls solution application on drywall |
| Mechanical tools | Drop cloths | Protects flooring from wet paper and solution drips |
| Mechanical tools | Painter’s tape | Seals drop cloths to baseboards |
| Chemical materials | Commercial wallpaper remover | Enzyme-based solution that breaks down adhesive |
| Chemical materials | Warm water | Dilutes commercial solution or activates DIY mixtures |
| Optional tools | Wallpaper steamer | Accelerates softening for thick, multi-layer, or stubborn wallpaper |
What Types of Scrapers Work Best for Stripping Wallpaper?
The best scraper for stripping wallpaper depends on the wall type and the area size: a 4 to 6-inch flexible putty knife works best for corners, edges, and tight areas; a 10 to 12-inch wide rigid scraper covers open flat wall sections faster; and a plastic scraper is the safest mechanical choice for drywall because it cannot cut into the paper facing even under moderate pressure.
Specifically, the blade flexibility matters as much as the blade width. A flexible putty knife bends slightly under pressure, which helps it follow minor surface irregularities without digging in. A rigid wide scraper works best on flat plaster walls where consistent pressure across the full blade width removes large sections of backing in single strokes. For drywall, always default to a plastic scraper or a flexible metal scraper with rounded corners rather than a standard hardware-store putty knife with sharp square edges.
Regarding blade sharpness: the blade should be sharp enough to slide cleanly under the paper backing but not so sharp that the edge acts like a cutting tool against the wall. A blade that has been used for multiple projects and shows slight edge wear is often better for drywall removal than a brand-new blade fresh from the packaging. If you are using a new metal scraper on drywall, run the edge lightly across a concrete block two or three times to take off the sharpest edge before you begin.
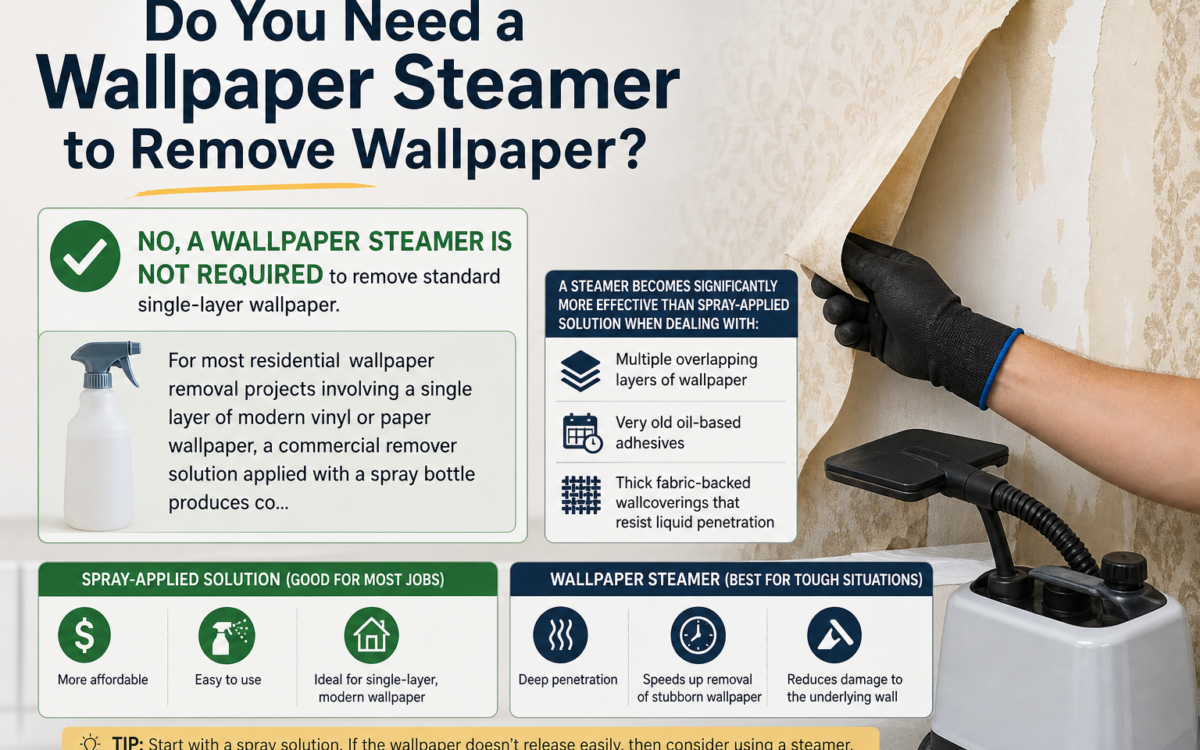
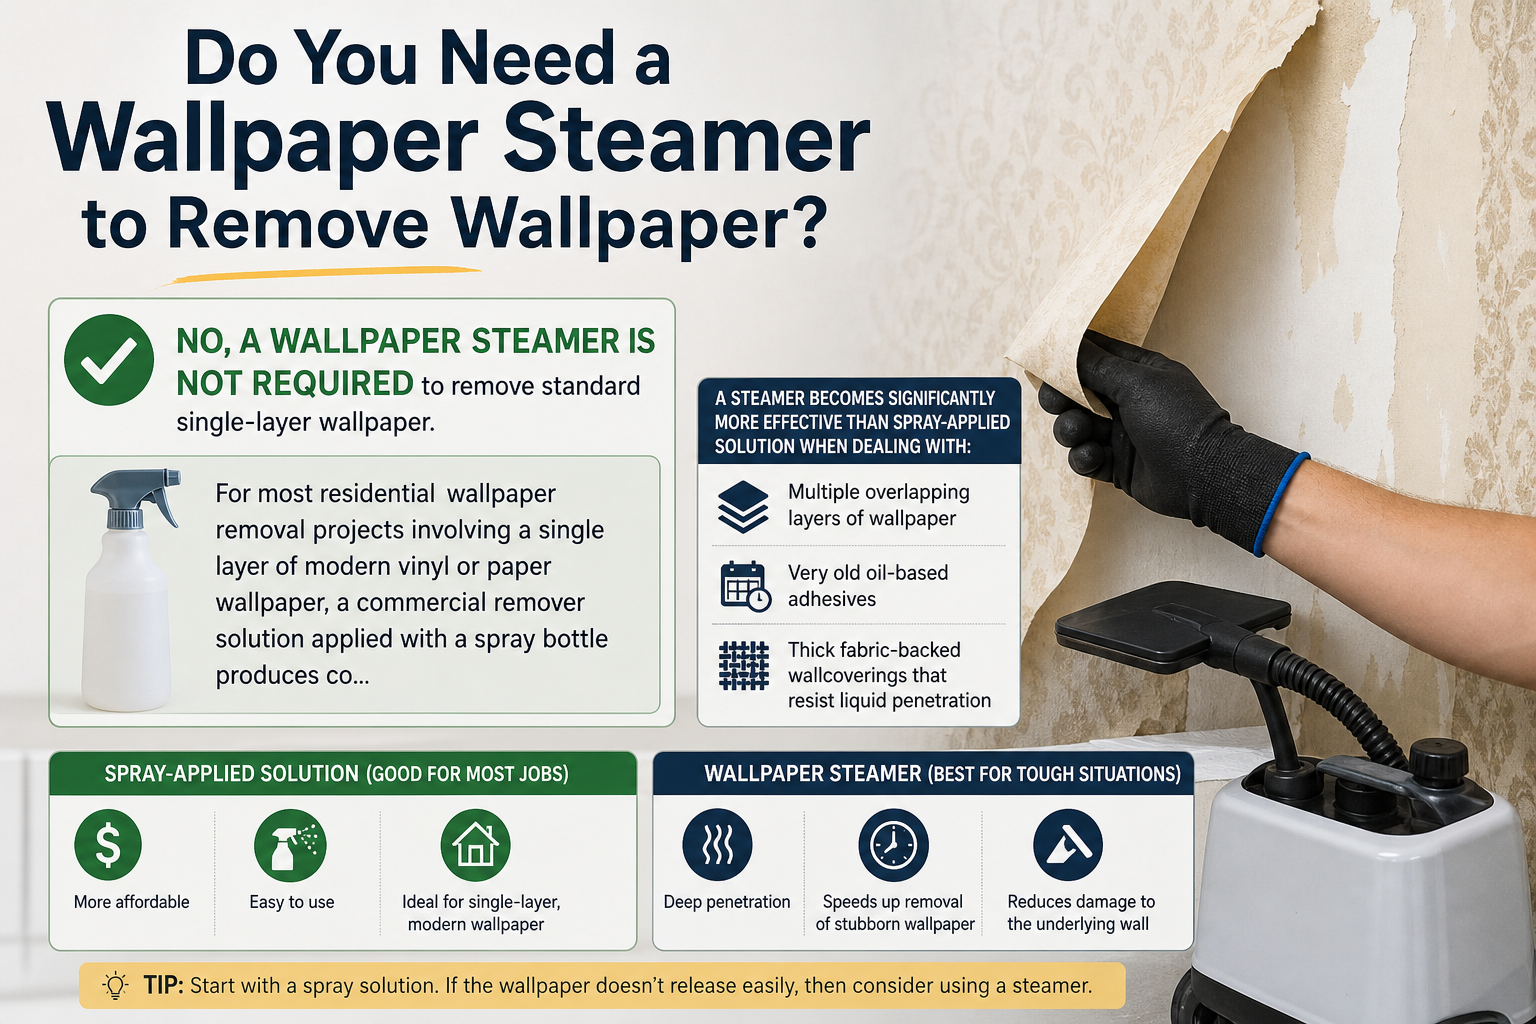
Do You Need a Wallpaper Steamer to Remove Wallpaper?
No, a wallpaper steamer is not required to remove standard single-layer wallpaper, but it becomes significantly more effective than spray-applied solution when you are dealing with multiple overlapping layers of wallpaper, very old oil-based adhesives, or thick fabric-backed wallcoverings that resist liquid penetration. For most residential wallpaper removal projects involving a single layer of modern vinyl or paper wallpaper, a commercial remover solution applied with a spray bottle produces comparable results at lower cost and without the learning curve of operating a steam machine.
The comparison between spray solution and steam comes down to penetration speed and heat. Steam penetrates the paper faster because heat opens the paper fibers, and the combination of moisture and heat breaks down adhesive more rapidly than room-temperature solution. However, steam also introduces more moisture into the wall over a shorter time, which increases the risk of over-saturating drywall. Spray solution allows slower, more controlled penetration, which is safer for drywall even if it requires slightly longer dwell times.
Renting a wallpaper steamer makes sense in three specific situations: the wallpaper has three or more layers from previous renovations, the adhesive has hardened over decades and resists standard chemical solutions, or the project covers an area larger than three or four rooms where the speed advantage of steam reduces total labor time meaningfully.
How Do You Prepare a Room Before Stripping Wallpaper?
Preparing a room before stripping wallpaper involves five steps: move or cover all furniture, protect the floor with drop cloths sealed at the baseboard, switch off electrical circuits serving the room, identify the wallpaper type and wall substrate, and open windows to maintain airflow throughout the process. Proper room preparation takes between 30 and 60 minutes but prevents costly accidents including water damage to flooring, electrical shorts from wet walls near outlets, and choosing the wrong removal technique for the wall type.
Floor protection is the first physical step. Wet wallpaper, water, and remover solution drip continuously during the removal process, and even a small amount of solution left on hardwood or laminate flooring can cause swelling or staining. Lay canvas drop cloths across the entire floor area and run a strip of painter’s tape along the edge where the drop cloth meets the baseboard to prevent liquid from wicking underneath.
Turning off the electrical circuit serving the room is not optional when working with water near walls. Spray solution and steam both introduce moisture that can travel along the wall surface to reach outlet boxes and switch plates. Turn the breaker off at the panel, and if you need working light in the room, use a battery-powered work light rather than plugging into a different circuit in the same room.
Before applying any solution, identify what type of wallpaper is on the wall and what type of wall is behind it. Scratch a small corner of the wallpaper with your fingernail. If the surface is hard and shiny, it is vinyl-coated. If it tears like paper, it is traditional paper wallpaper. For the wall type, knock on the surface. Plaster produces a dense, solid sound. Drywall produces a slightly hollow sound. This identification step determines how much moisture you can safely apply and which scraper material is appropriate.
Finally, open at least one window in the room and, if available, run a bathroom exhaust fan or a portable fan directed toward the window. Wallpaper removal generates significant humidity from solution application and paper wet with adhesive. Without ventilation, the room becomes damp, slowing drying time and making it harder to assess when each section is ready to scrape.
How Do You Clean and Repair Walls After Stripping Wallpaper?
Cleaning and repairing walls after stripping wallpaper requires three sequential stages: remove all residual adhesive from the wall surface using a TSP solution or a mild cleaning solution, allow the wall to dry completely for a minimum of 24 to 48 hours, then repair any surface damage with joint compound before priming. Skipping the cleaning stage or painting over a wall that still carries adhesive residue causes new paint to bubble, peel, or show a textured pattern through the finished coat.
The approach to cleaning and repair differs meaningfully between drywall and plaster. Drywall must be cleaned with a lightly dampened sponge using minimal solution because additional moisture can re-soften the paper face of the gypsum board and cause further damage. Plaster is more forgiving and can tolerate a more thorough wet wash with a TSP (trisodium phosphate) solution diluted in warm water. In both cases, wring the sponge nearly dry before touching the wall surface, and rinse the wall with clean water after the adhesive wash to remove any cleaning chemical residue.
The 24 to 48-hour drying period before priming or repairing is not negotiable. Moisture trapped inside the wall structure will cause joint compound to crack during drying, primer to peel, and paint to develop bubbles within weeks of application. Use a moisture meter if available to confirm the wall is fully dry before proceeding.
How Do You Fix Drywall Damage Caused by Wallpaper Removal?
You fix drywall damage caused by wallpaper removal using a skim coat of joint compound applied over the damaged area, followed by sanding, priming with a drywall primer sealer, and a second inspection before painting. The most common form of damage is the tearing away of the paper facing from the gypsum core, which leaves a rough, fuzzy surface that absorbs paint unevenly and shows texture through the finished coat.
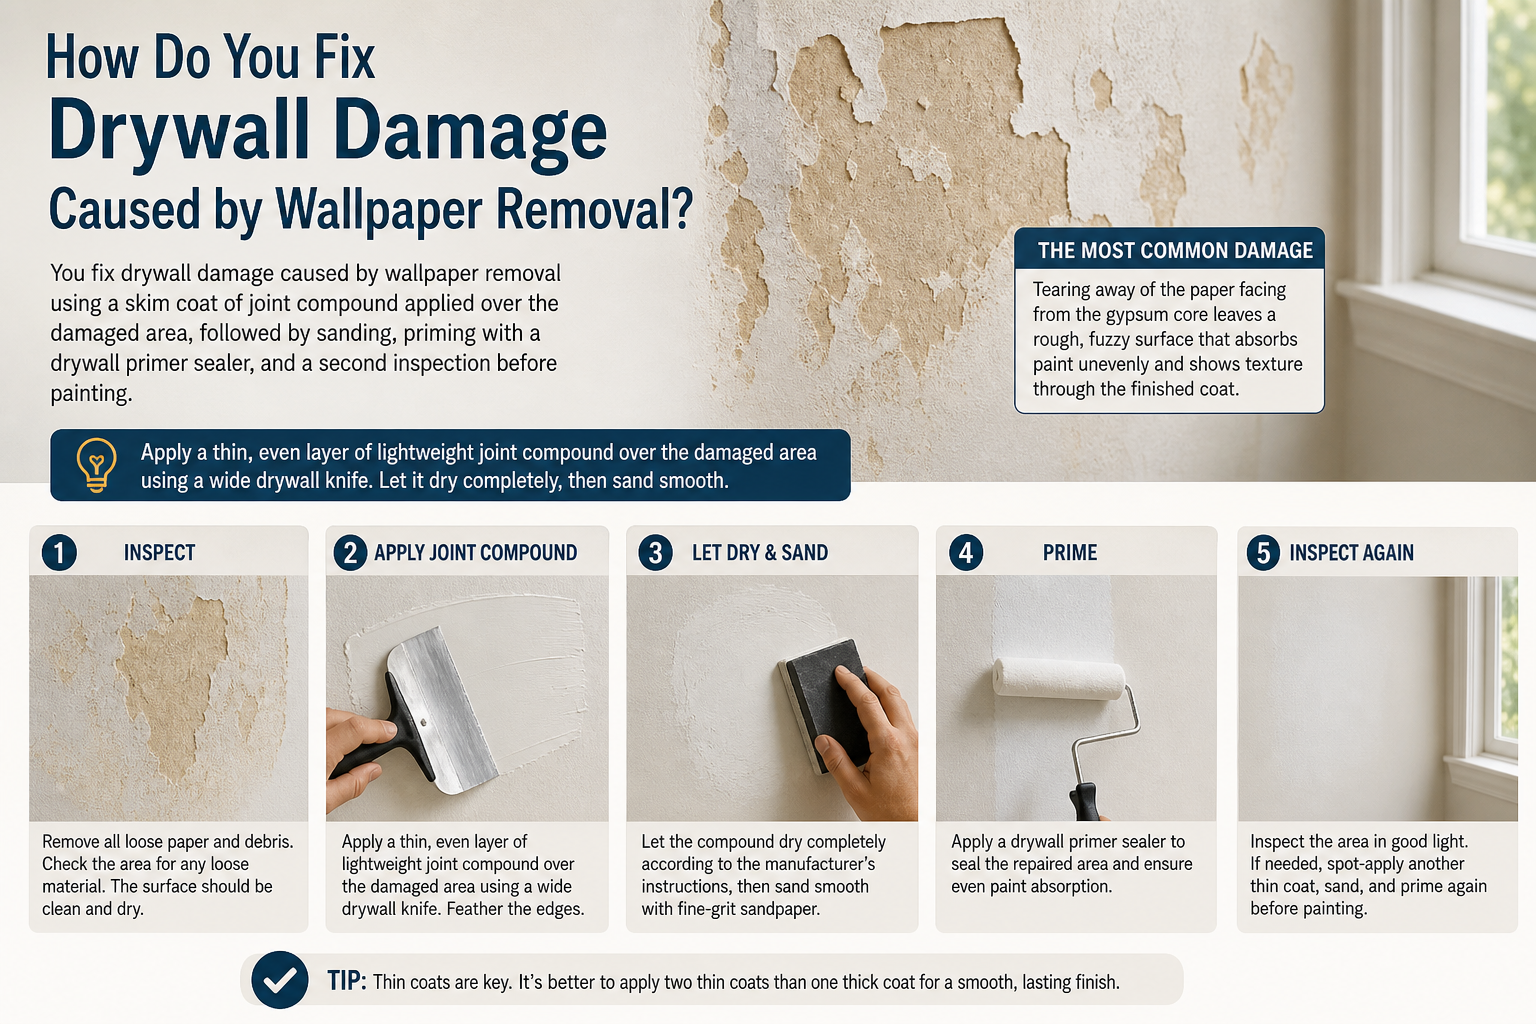
Apply a thin, even layer of lightweight joint compound over the damaged area using a 6 to 8-inch drywall knife. Feather the edges outward so the compound blends smoothly into the surrounding undamaged surface. Allow the compound to dry fully according to the manufacturer’s instructions, typically 24 hours in normal humidity conditions, then sand with 120-grit sandpaper until the surface is flat and smooth. Apply a drywall primer sealer specifically formulated for bare drywall before any finish paint or new wallpaper adhesive. Do not apply latex paint directly to unprimed bare gypsum or to a freshly skim-coated area without primer, as the paint will raise the paper fibers and create a rough, uneven texture that is visible through the finish coat.
Can You Use Fabric Softener or Vinegar to Strip Wallpaper?
Yes, both fabric softener and white vinegar work as DIY wallpaper removal solutions in many situations, though neither matches the performance of a commercial enzyme-based remover when dealing with thick vinyl wallpaper or multiple overlapping layers. The standard mixing ratio for each is one part fabric softener or white vinegar to one part warm water, applied with a spray bottle or sponge in the same manner as a commercial product.
Fabric softener works by conditioning the paper fibers, which allows water to penetrate more deeply and reach the adhesive layer faster than plain water alone. White vinegar works by using mild acidity to break down water-based adhesives. In practice, fabric softener tends to produce a slightly slicker surface that makes scraping easier, while vinegar is more effective against adhesives that have hardened over time.
Both DIY methods perform well on single-layer traditional paper wallpaper with standard water-based adhesive. Both lose effectiveness on thick vinyl-coated wallpaper, fabric-backed wallcoverings, or situations where multiple layers have been applied over decades, because the solution cannot penetrate deeply enough to reach the lower adhesive layers. For these more demanding applications, a commercial wallpaper remover or a steamer is the more reliable choice.