Prepping walls for painting means completing four essential stages in strict order: cleaning the surface, patching all holes and cracks, sanding patched areas smooth, and applying primer before any finish coat. Skipping even one of these stages causes paint to peel, blister, or show uneven color within months. Whether you are refreshing a single room or repainting an entire home, following the correct sequence from start to finish is the single most important factor in achieving a durable, professional-looking result.
To complete the full prep process, you need two categories of supplies: a cleaning kit (TSP or cleaner substitute, sponges, microfiber cloths, rubber gloves) and a patching and priming kit (spackling compound, joint compound, putty knives, sandpaper in 120-grit and 220-grit, and the right primer for your specific surface type). Having every tool ready before you begin prevents interruptions that can cause compound to dry unevenly or primer to be applied over dusty surfaces.
Beyond the standard four-step process, some walls present a unique challenge: wallpaper. If your walls are currently covered with wallpaper, you face an important decision before any cleaning or priming begins. In most cases, the wallpaper must come down first. Understanding why, and knowing the limited exceptions, will save you from a costly repaint failure. The sections below walk you through every stage in detail, starting with the full step-by-step process and the tools required, then addressing the wallpaper question specifically.
What Is Wall Preparation and Why Does It Matter Before Painting?
Wall preparation is the structured four-stage process of cleaning, patching, sanding, and priming a wall surface before applying any finish paint, and it matters because paint alone cannot hide or bond over a surface that is dirty, damaged, or porous. Skipping wall prep is the leading cause of premature paint failure in DIY projects and professional repaints alike.
To understand why prep matters so deeply, it helps to look at what paint is actually doing when it bonds to a wall.
Paint is a surface coating, not a filler or adhesive. It relies entirely on the quality of the surface beneath it to stay in place and look uniform. When that surface has grease, dust, or loose material on it, the paint bonds to those contaminants instead of the wall itself, and the bond fails within a short time. When the surface has unfilled holes or cracks, the paint stretches across the gaps and eventually cracks along the same lines. When a porous surface like new drywall absorbs moisture unevenly, paint dries at different rates across the wall and produces blotchy, inconsistent color.
The four stages of wall prep each solve one of these failure modes:
- Cleaning removes the contamination layer so paint bonds directly to the wall material.
- Patching fills structural gaps so the painted surface has a continuous, solid base.
- Sanding creates a uniform texture across both original wall and patched areas so the paint film sits flat.
- Priming seals the surface, equalizes porosity, and gives the finish coat a consistent base to adhere to.
According to the Paint Quality Institute, walls that are properly primed before painting show adhesion strength up to three times greater than walls painted directly without preparation, and finish coats on primed surfaces require fewer total coats to achieve full opacity.
Realistically, a thorough wall prep job on a standard bedroom takes between four and eight hours spread across two days, because joint compound and primer both require drying time before the next stage can begin. Rushing the drying stages is just as damaging as skipping a step entirely.
How Do You Prep Walls for Painting Step by Step?
Prepping walls for painting involves four steps completed in a fixed order: clean the surface first, patch all damage second, sand the patched areas third, and apply primer fourth. Each step depends directly on the quality of the previous step, and reversing or combining steps produces defects that become visible once finish paint is applied.
The following sections break down each of these four steps in detail, covering the correct materials, techniques, and timing required at every stage.
How Do You Clean Walls Before Painting?
Clean walls before painting by washing the entire surface with a TSP (trisodium phosphate) solution or a warm water and mild dish soap mixture, working from the top of the wall down to the baseboard, and allowing the surface to dry completely before touching any patching compound. Cleaning is non-negotiable because any grease, dust, or residue left on the surface will prevent both patching compound and primer from bonding correctly.
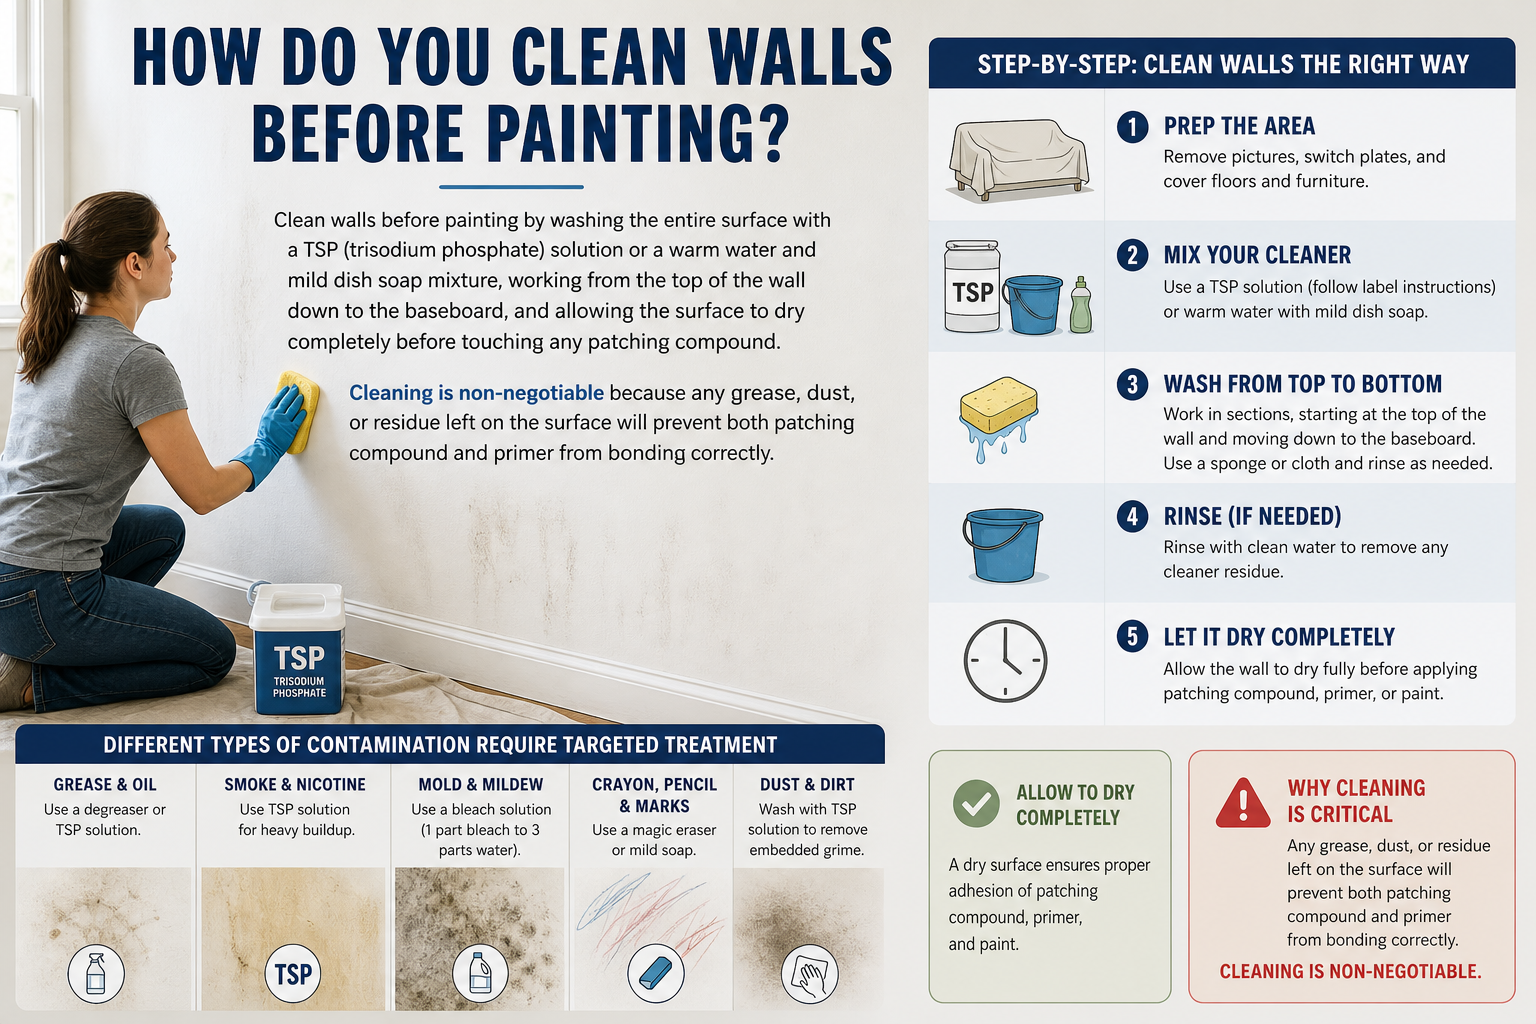
Different types of contamination require targeted treatment before the general wash.
Grease and cooking oil (common on kitchen walls) must be treated with a degreaser spray before the main wash. Apply the degreaser directly to the greasy area, let it sit for two to three minutes, then wipe off with a clean cloth. Do not skip this pre-treatment step, because a general TSP wash alone will not fully emulsify heavy grease deposits.
Water stains and smoke damage require a stain-blocking primer applied after cleaning, not during the cleaning stage. Cleaning removes the surface layer of the stain, but the underlying discoloration has already penetrated the wall material and will bleed through standard paint if not sealed with a shellac-based or oil-based stain-blocking primer later in the process.
Pencil marks, crayon, and pen ink can typically be removed with a damp melamine foam eraser (such as a Magic Eraser) before the main wash. Rubbing alcohol on a cloth is effective for ink specifically.
Nicotine and cigarette smoke residue requires a concentrated TSP wash, sometimes a second application, because nicotine is oily and acidic. Walls with heavy smoke exposure should be sealed with shellac-based primer regardless of how thoroughly they are cleaned.
The correct washing sequence is top to bottom, working in sections of approximately three feet wide. Use a large sponge dampened with solution, wring it out so it is not dripping, and wipe in overlapping horizontal strokes. Follow immediately with a clean sponge dampened in plain water to rinse the cleaned section.
Important: Do not use strong alkaline cleaners or excessive water on plaster or drywall surfaces. These wall materials are porous and will absorb moisture, which must evaporate completely before patching begins. Give the wall a minimum of 24 hours to dry in a well-ventilated room before moving to the patching stage.
How Do You Patch Holes and Cracks in Walls Before Painting?
Patch holes and cracks in walls by selecting the correct patching material based on the size of the damage: spackling compound for nail holes and small imperfections, joint compound with mesh tape for cracks and medium holes, and a drywall patch kit with backer board for holes larger than six inches. Using the wrong material for the size of damage is one of the most common mistakes in wall prep, and it leads to patches that crack or sink after the paint dries.
The size-to-material guide below provides the specific thresholds for each repair type.
Small holes (nail holes, screw holes, minor dings up to approximately half an inch): Use lightweight spackling compound applied with a 3-inch putty knife. Press the compound firmly into the hole, overfill very slightly, and draw the knife flat across the surface to remove the excess. Spackling compound for small repairs dries within 30 minutes to one hour in normal conditions. Once dry, it is ready to sand.
Medium cracks and holes (up to approximately three inches): Use setting-type or all-purpose joint compound with fiberglass mesh tape. Cut a piece of mesh tape slightly longer than the crack and press it flat over the damaged area. Apply joint compound over the tape using a 6-inch putty knife, spreading it in thin layers. Allow each layer to dry fully before applying the next. Most medium repairs require two to three coats to achieve a surface level with the surrounding wall.
Large holes (three inches to six inches): Use a self-adhering metal patch (California patch kit) as a backing, then apply joint compound over it in the same layered technique used for medium holes.
Holes larger than six inches: These require a proper drywall patch, which means cutting out a clean rectangular section around the damage, installing wooden backer boards inside the wall cavity, attaching a new drywall piece to the backers, taping all four seams with paper tape and joint compound, and feathering the compound out to blend with the existing wall.
The feathering technique is critical for all repairs larger than a nail hole. Feathering means spreading the joint compound outward from the patch in progressively thinner layers, extending the edges of the compound approximately two to three times the width of the damage itself. A 3-inch hole, for example, should have compound feathered out to a blended area of six to nine inches in diameter. This gradual thinning of the compound at the edges makes the transition between the patch and the surrounding wall invisible once sanded and painted.
Allow all patched areas to reach complete hardness, not just surface dryness, before sanding. Setting-type compounds reach full hardness based on their set time (20 minutes, 45 minutes, or 90 minutes depending on the product). All-purpose joint compound requires 24 hours per coat for full drying in normal room temperature and humidity.
How Do You Sand Walls After Patching?
Sand patched walls using 120-grit sandpaper for initial leveling of joint compound and 220-grit sandpaper for final smoothing, using small circular motions to avoid leaving directional scratches that become visible under paint. The goal of sanding is not to remove material aggressively but to bring the surface of each patch flush with the surrounding wall so that no raised edge or ridge remains.
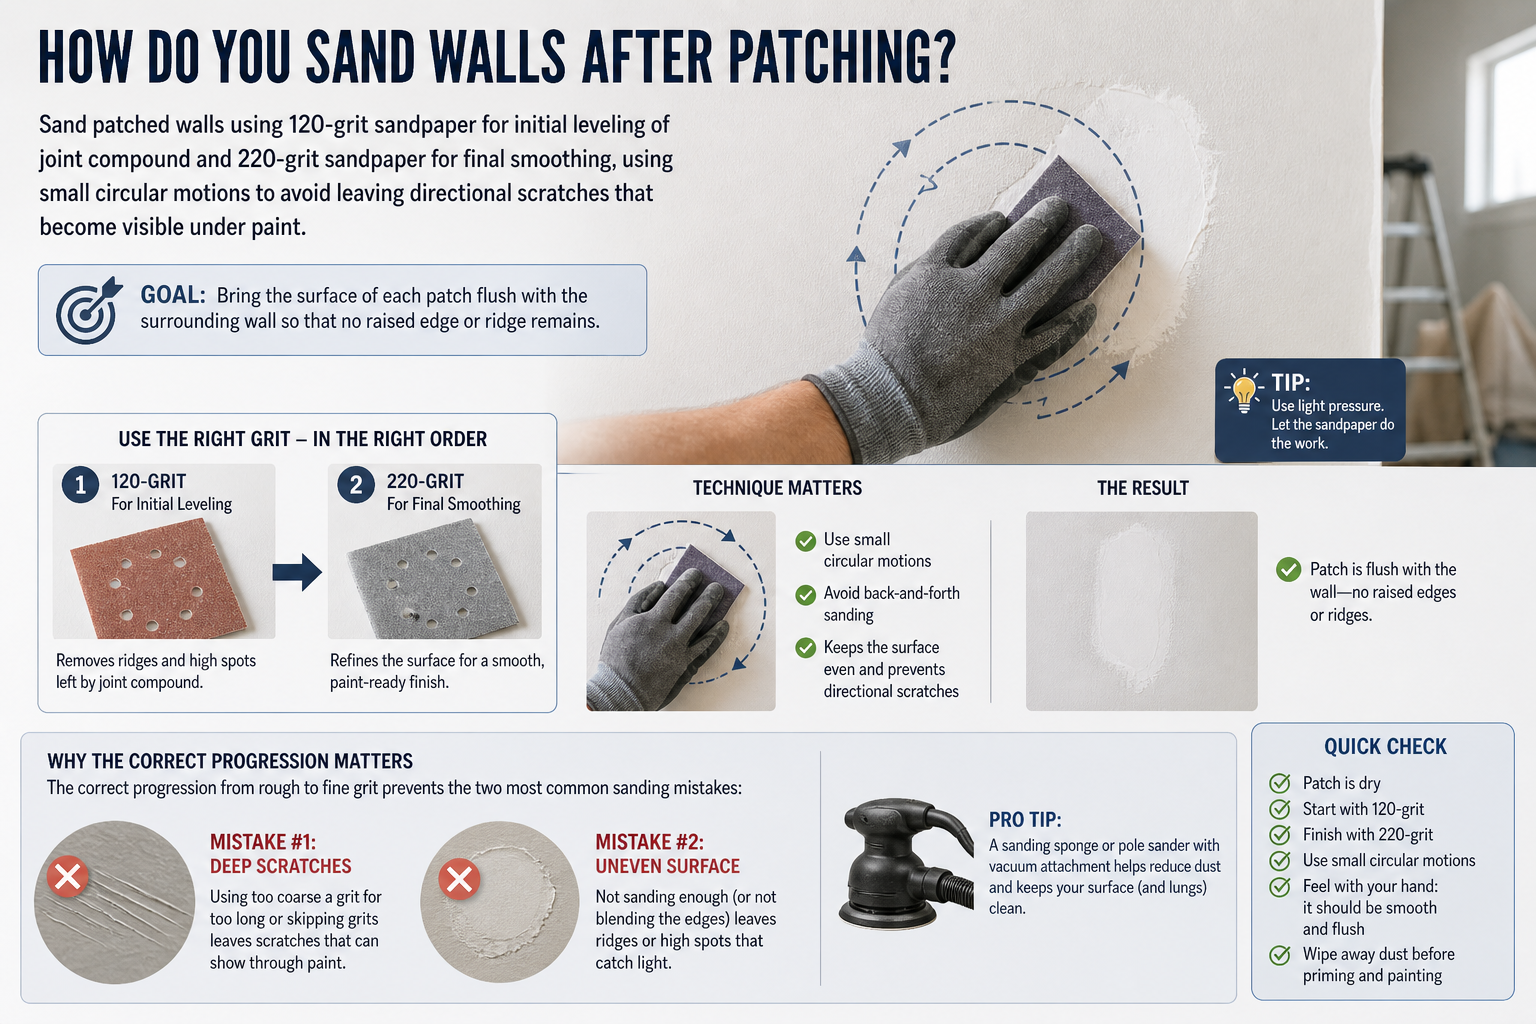
The correct progression from rough to fine grit prevents the two most common sanding mistakes: deep scratches from starting with too coarse a grit, and a surface that still shows ridges because you finished with too coarse a grit.
Step 1: Level with 120-grit. Wrap 120-grit sandpaper around a sanding block (a small rubber or foam block keeps the paper flat and distributes pressure evenly). Using circular motions, sand over each patched area until the joint compound surface feels level with the surrounding wall. Do not press hard. Let the abrasive do the work. Check your progress frequently by running your fingers across the transition between the patch edge and the original wall surface.
Step 2: Smooth with 220-grit. Switch to 220-grit to remove the fine scratches left by the 120-grit and bring the patched area to a smooth finish that matches the texture of the original wall. Use the same circular motion with light pressure.
Raking light test: The most reliable way to check whether a patched surface is truly flat is to hold a flashlight or work light at a low, oblique angle to the wall in a darkened room. This “raking light” reveals any ridges, depressions, or uneven texture that would not be visible under normal room lighting. If shadows appear around the edges of a patch, that area needs additional sanding or an additional thin coat of compound followed by re-sanding.
Dust removal before priming is mandatory. Sanding dust is extremely fine and settles back onto the wall surface as a loose, powdery layer. Apply primer over sanding dust and the primer bonds to the dust, not the wall, creating a weak film that will chip off later. Remove all dust by wiping the sanded areas with a tack cloth (a sticky cheesecloth designed to pick up fine particles) or a lightly dampened microfiber cloth. Allow any moisture from a damp cloth to evaporate completely before priming.
For large rooms or extensive patching work, a pole sander fitted with 120-grit mesh sanding screen speeds up the leveling stage significantly and reduces fatigue on overhead areas.
How Do You Prime Walls Before Painting?
Prime walls before painting by selecting the correct primer type for your surface condition, cutting in along edges and corners with an angled brush, and then rolling the remaining surface in a W-pattern to ensure even coverage without lap marks. Primer is not optional for new drywall, heavily patched surfaces, surfaces changing from a dark to a light color, or any wall with staining, and treating it as optional is the most expensive mistake in the entire painting process.
Understanding when each primer type is the correct choice prevents both over-engineering and under-engineering the primer selection.
Water-based (latex) primer is the standard choice for most interior walls in good condition, previously painted surfaces receiving a similar color, and drywall that has been lightly patched. It dries within one to two hours, cleans up with water, and has low VOC output. For new drywall specifically, use a drywall-specific latex primer (sometimes called a “high-build” or “PVA drywall primer”) which seals the paper face and fills fine texture variations before the finish coat.
Oil-based primer is required for walls with heavy staining (nicotine, water damage, bleeding tannins), walls being painted over existing glossy paint without sanding, and walls where maximum adhesion is needed on slick surfaces. Oil-based primer dries harder than latex and creates a better barrier against bleed-through stains. It requires mineral spirits for cleanup and has a longer dry time of six to eight hours.
Shellac-based primer (Zinsser BIN is the most widely used product) is the strongest stain blocker available and is required for severe smoke damage, water stains that have already bled through a previous coat of primer, and permanent marker or crayon stains that resist oil-based primer. It dries in 45 minutes and can be recoated quickly, but it requires denatured alcohol for cleanup and should only be used in well-ventilated spaces.
Application technique:
- Cut in around the ceiling line, baseboard, door frames, and window frames using a 2.5-inch angled (sash) brush. Complete all cutting-in for the entire room before rolling.
- Load a 3/8-inch nap roller cover with primer. Do not overload the roller. Roll the primer onto the wall in a W-pattern (paint a large letter “W” covering approximately a 3-foot by 3-foot section, then fill in the W without lifting the roller). This distributes the primer evenly and prevents thick ridges at the edges of each roller pass.
- Work from top to bottom in overlapping sections across the wall.
Dry time vs. recoat time: These are two different measurements. Primer may feel dry to the touch within one to two hours (dry time) but require four to eight hours before the finish coat can be applied without causing adhesion problems (recoat time). Always follow the recoat time listed on the primer container, not the dry time.
According to Sherwin-Williams technical specifications, applying finish paint before primer has reached its full recoat window reduces inter-coat adhesion by up to 40%, which directly shortens the lifespan of the finish coat.
What Tools and Materials Do You Need to Prep Walls for Painting?
There are two main groups of supplies needed to prep walls for painting: a cleaning group covering surface preparation tools and protective equipment, and a patching and priming group covering repair materials and application tools. Organizing supplies into these two groups before starting ensures you have everything on hand at each stage without interrupting the process mid-step.
The checklists below are organized by function so you can assemble each group independently and confirm readiness before beginning.
What Cleaning Supplies Do You Need for Wall Prep?
The cleaning supplies for wall prep fall into three sub-groups: the washing kit, the protective equipment kit, and a targeted degreaser for heavy grease buildup in kitchen areas. Having all three sub-groups assembled before you begin prevents stopping mid-clean to locate a missing item.
Washing kit:
| Item | Purpose |
|---|---|
| TSP (trisodium phosphate) or TSP substitute | Primary cleaning agent that cuts through grease, grime, and light nicotine residue |
| Two buckets | One for cleaning solution, one for rinse water |
| Large cellulose sponge | Applying the cleaning solution to the wall surface |
| Microfiber cloths | Final wipe-down and rinsing |
| Tack cloth | Removing sanding dust before priming |
The table above lists the washing kit items and their specific function at each stage of the cleaning process.
Protective equipment:
- Rubber gloves rated for chemical use (TSP is alkaline and irritates skin on prolonged contact)
- Safety glasses or goggles (overhead scrubbing can cause drips)
- Drop cloths for the floor (cleaning solution drips and splashes during washing)
- Painter’s tape to protect baseboards and switch plates during washing
Targeted degreaser for kitchen walls:
A dedicated kitchen degreaser spray (such as Krud Kutter or equivalent) is required when walls have heavy cooking grease deposits. A standard TSP solution will emulsify light grease but will not fully break down thick accumulated grease near stovetops and range hoods. Apply the degreaser to the greasy area before the main TSP wash for reliable results.
What Patching and Priming Supplies Do You Need?
The patching and priming supplies fall into three sub-groups: the patching kit with repair compounds and knives, the sanding kit, and the priming kit with brushes, rollers, and trays. Each sub-group should be staged in the room before starting the repair process so transitions between stages move without delay.
Patching kit:
| Item | Specification | Use Case |
|---|---|---|
| Lightweight spackling compound | Ready-mixed tub, small or medium size | Nail holes and minor dings up to half an inch |
| All-purpose joint compound | Pre-mixed or setting-type | Cracks, medium holes, skim coating |
| Fiberglass mesh tape | Self-adhesive, 2-inch width | Backing for crack repairs and medium hole patches |
| Putty knife, 3-inch | Flexible blade | Applying compound to small repairs |
| Putty knife, 6-inch | Flexible blade | Feathering compound over medium repairs |
| Sanding sponge (medium grit) | Combined sanding and smoothing | Curved corners and tight spaces |
The table above shows the patching kit items, their specifications, and the specific repair size each item addresses.
Sanding kit:
- 120-grit sandpaper sheets or sanding blocks for initial leveling
- 220-grit sandpaper sheets for final smoothing
- Sanding block (rubber or foam core) for flat surfaces
- Pole sander with 120-grit mesh screen for large areas and ceilings
- Tack cloth for dust removal after all sanding is complete
Priming kit:
- 2.5-inch angled (sash) brush for cutting in at edges and corners
- 9-inch roller frame with 3/8-inch nap roller cover for flat wall surfaces
- Paint tray with liner for loading the roller
- Stir stick for mixing primer before application
- Painter’s tape (1.5-inch or 2-inch) to protect ceiling lines, trim, and baseboards during priming
Advanced option for large projects: A pole sander is strongly recommended when patching covers more than 25% of a wall’s total area. Using a hand sanding block on large patched areas is significantly slower and results in less consistent flatness because it is difficult to maintain even pressure manually over wide areas.
Do You Need to Remove Wallpaper Before Painting Your Walls?
Yes, you should remove wallpaper before painting in almost every case, because wallpaper absorbs moisture from water-based paint, causing it to bubble, peel away from the wall, and create raised seams that are visible through the finish coat. The adhesive backing of wallpaper also reacts unpredictably with latex primer, and the paper itself can tear or shift as it absorbs the water content of the paint.
The exception to this rule is narrow, and the conditions for it are strict.
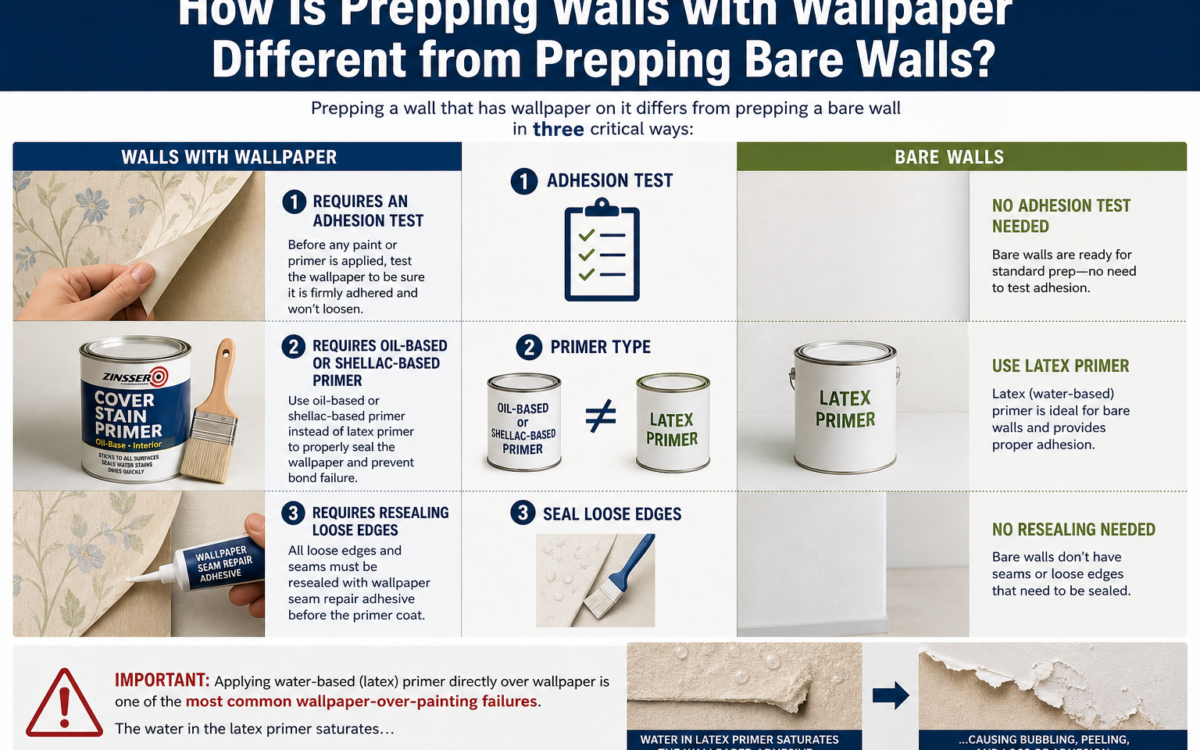
How Is Prepping Walls with Wallpaper Different from Prepping Bare Walls?
Prepping a wall that has wallpaper on it differs from prepping a bare wall in three critical ways: it requires an adhesion test before any paint or primer is applied, it requires oil-based or shellac-based primer instead of latex primer, and it requires resealing all loose edges with wallpaper seam repair adhesive before the primer coat.
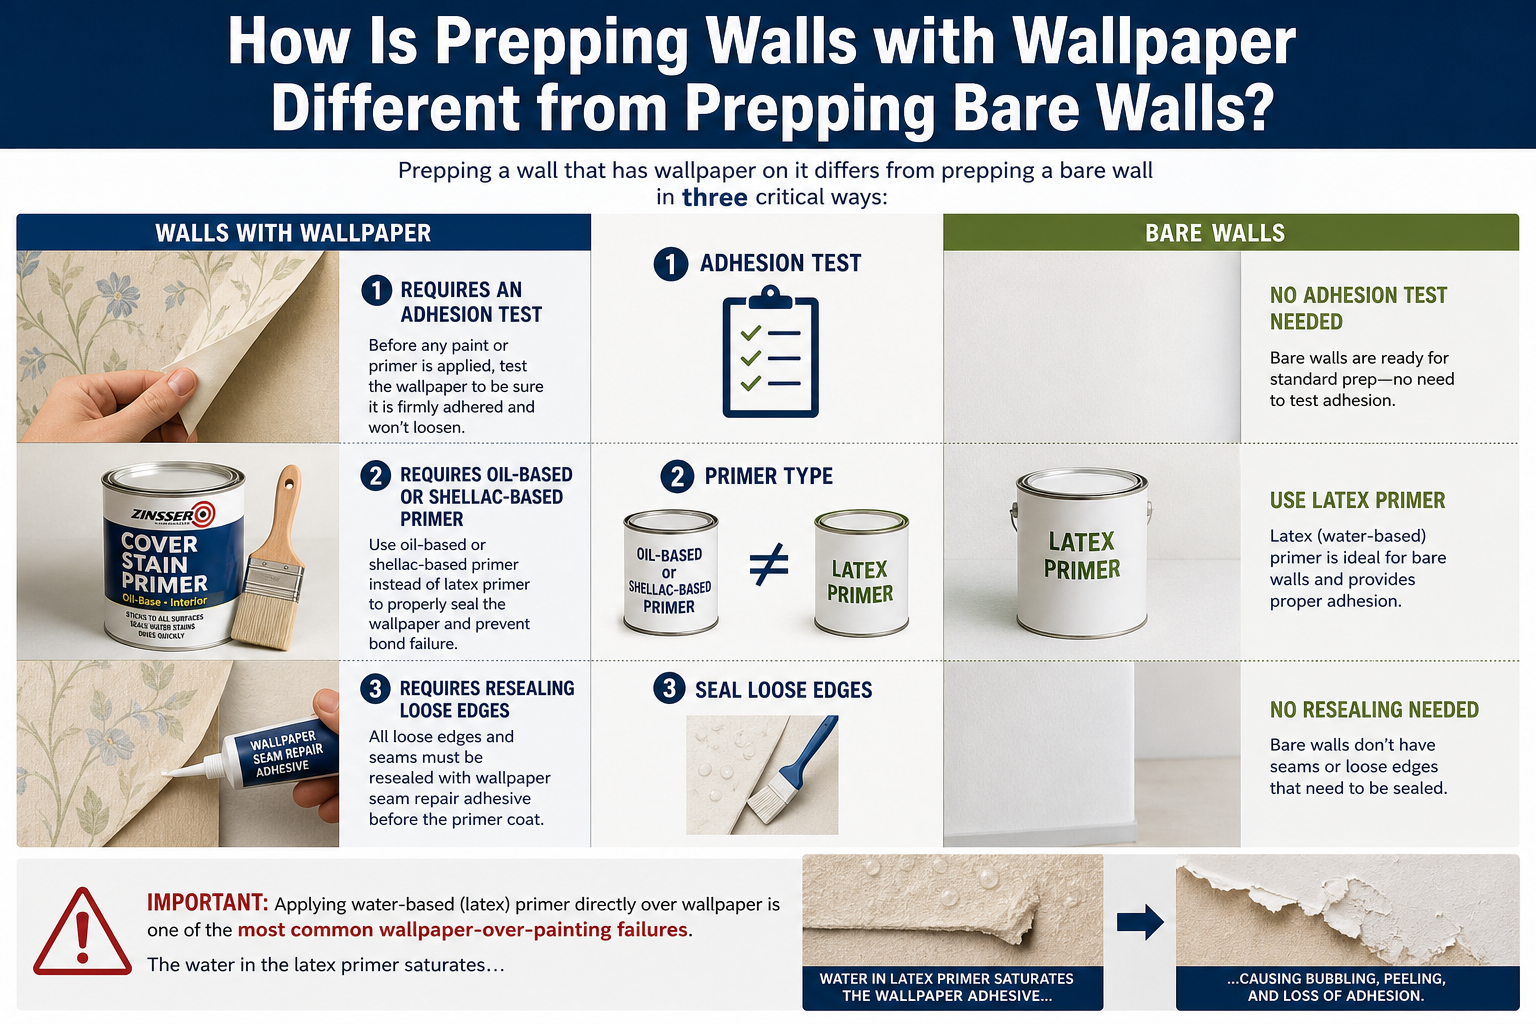
Applying water-based (latex) primer directly over wallpaper is one of the most common wallpaper-over-painting failures. The water in the latex primer saturates the paper facing of the wallpaper, causing it to detach from the wall and bubble outward. This bubbling is permanently locked in once the primer dries.
The correct primer for painting over wallpaper is an oil-based primer or a shellac-based primer. Both of these products have very low water content and will not activate the wallpaper adhesive or saturate the paper facing. They also block tannin staining from the wallpaper dye from bleeding through into the finish coat.
According to the Wallcovering Association’s installation and removal guidelines, over 70% of wallpaper-over-paint failures are caused by improper primer selection, specifically the use of water-based primer directly on paper-faced wallcovering.
Can You Paint Directly Over Wallpaper Without Any Prep?
No, you cannot paint directly over wallpaper without any preparation, because unprepared wallpaper produces visible seam lines through the paint, bubbling from moisture absorption, and an overall textured surface that no amount of finish coats will hide. Paint applied directly over unprepped wallpaper fails within one to three years in most interior conditions.
If complete wallpaper removal is not possible because the wallpaper is bonded so tightly that removal would destroy the drywall or plaster beneath it, the following minimum prep steps are required before any primer is applied:
- Test adhesion across the entire surface. Press firmly on multiple areas across the wall and listen for hollow sounds that indicate the paper is already separating from the wall. Areas that have separated must be re-adhered or removed before painting.
- Reglue all loose seams and edges. Use seam repair adhesive (available at any paint or wallcovering supply store) to press down every lifted edge. Allow the adhesive to cure for the full time specified on the product label before priming.
- Skim coat the entire surface with setting compound. Apply a thin skim coat of setting-type joint compound over the entire wallpapered surface to create a uniform, non-paper substrate for the primer to bond to. This is the closest you can get to a bare wall surface when removal is not an option.
- Apply oil-based or shellac-based primer over the skim coat. This is non-negotiable. Do not substitute water-based primer at any point in this process.
This approach creates a surface that performs closer to a bare wall, but it adds significant labor and material cost. In the majority of renovation situations, complete wallpaper removal followed by the standard clean, patch, sand, and prime process remains the faster and more reliable path to a durable paint job.